Ultra Chair Hydraulic Base Cylinder Test and Repair

| Hydraulic Base Cylinder - 1 | Hydraulic Base Cylinder - 2 |
1.Remove the seat and back Upholstery and rotate seat to one side.
Unplug chair power cord before removing covers or working on chair. Failure to comply could result in personal injury.
2.Unplug chair power cord.
3.Remove Covers.
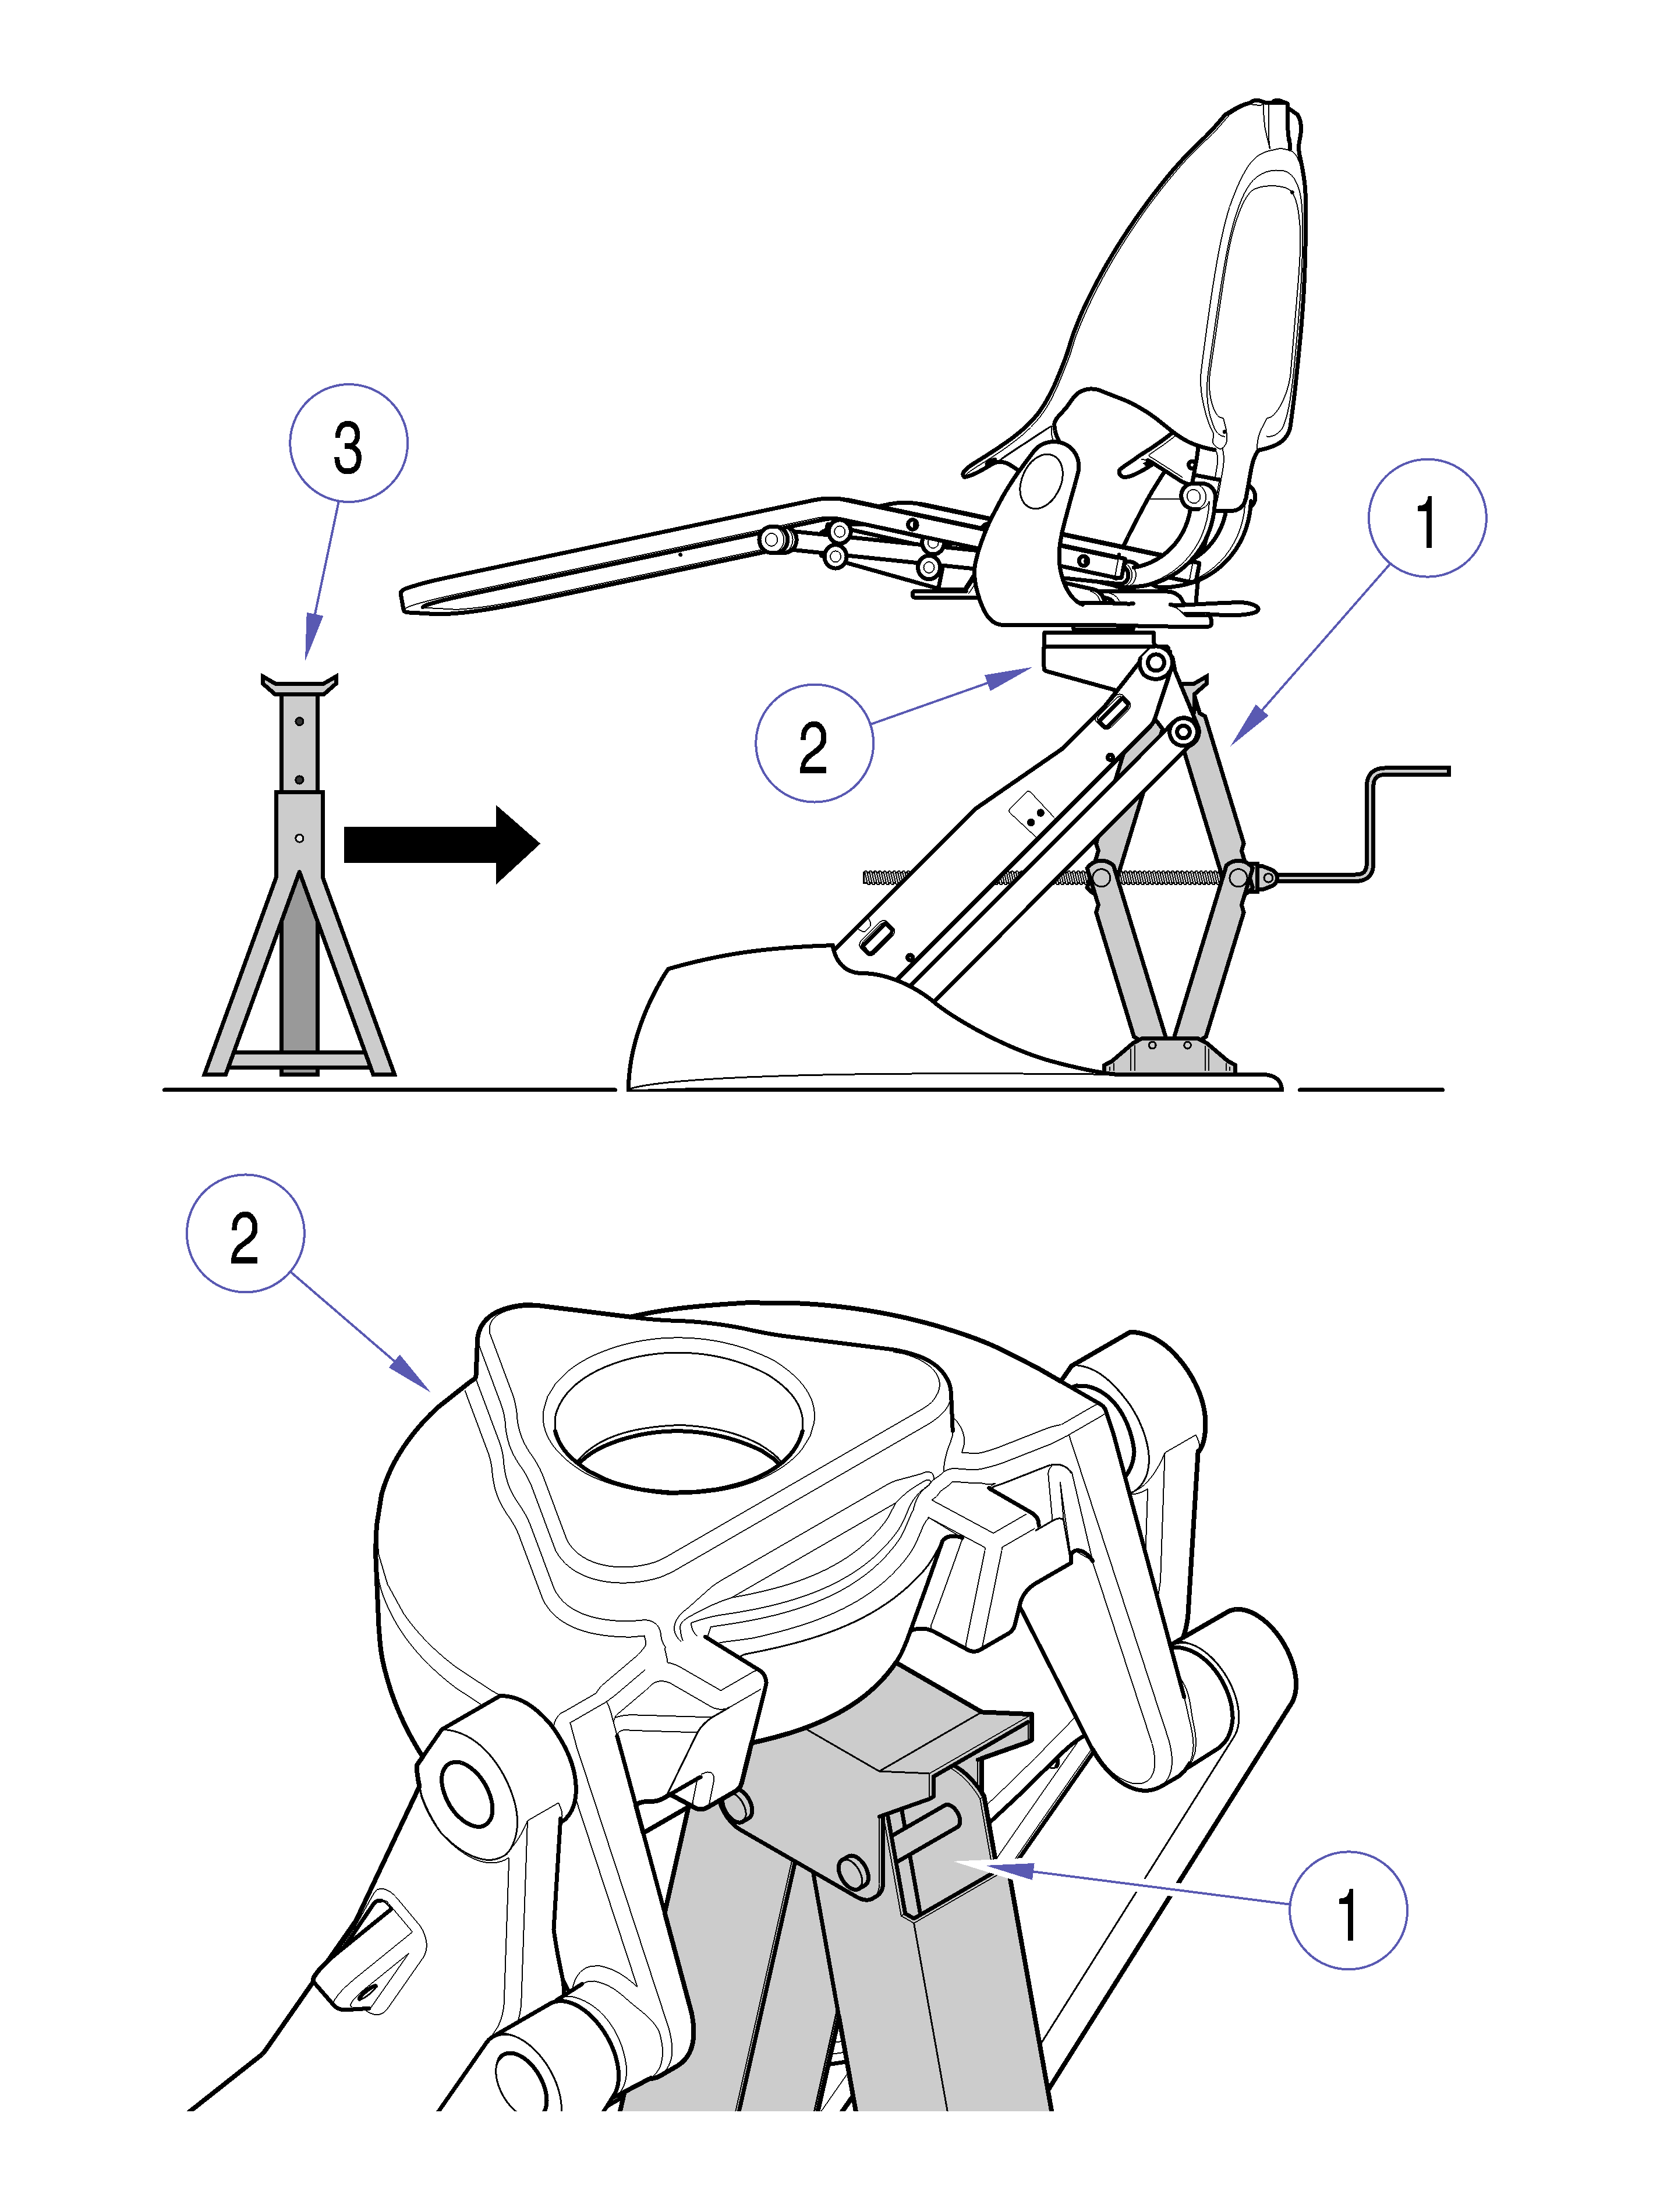
4.If base hydraulic cylinder is operable: See Hydraulic Base Cylinder - 1 illustration.
Use caution to prevent electrical shock with chair plugged into outlet. Electrical components and connections are exposed.
a.Plug chair power cord into outlet.
On chairs that contain delivery head assembly, cuspidor and/or assistant’s console it may be necessary to locate the jack stand(s) in some other location. Assure the stands are positioned to securely support the load without damage to the chair or accessories.
b.Raise Base Up function a minimum of 9" (23 cm) to get jack stand(s), Item 1, beneath upper lift casting, Item 2.
c.Lower Base Down function until chair rest securely on jack stand(s), Item 1.
Make sure chair top is securely supported before starting to remove base hydraulic cylinder. Failure to comply could result in chair top collapsing causing serious personal injury or death.
d.Unplug chair from outlet.
5.If base hydraulic cylinder is not operable: See Hydraulic Base Cylinder - 2 illustration.
a.Unplug chair power cord from outlet.
Use care to prevent damage to the electrical leads and hydraulic lines when locating the scissor jack.
b.Place a scissor jack, Item 1, or equivalent beneath upper lift casting, Item 2, and raise chair a minimum of 9" (23 cm).
On chairs that contain delivery head assembly, cuspidor and/or assistant’s console it may be necessary to locate the jack stand(s) in some other location. Assure the stands are positioned to securely support the load without damage to the chair or accessories.
c.Place jack stand(s), Item 3, beneath upper lift casting, Item 2, and lower chair until it rest securely on jack stand(s), Item 3.
Make sure chair top is securely supported before starting to remove base hydraulic cylinder. Failure to comply could result in chair top collapsing causing serious personal injury or death.
For personal safety, work on base hydraulic cylinder from front of chair. Do not place hands or arms beneath lift arm casting.
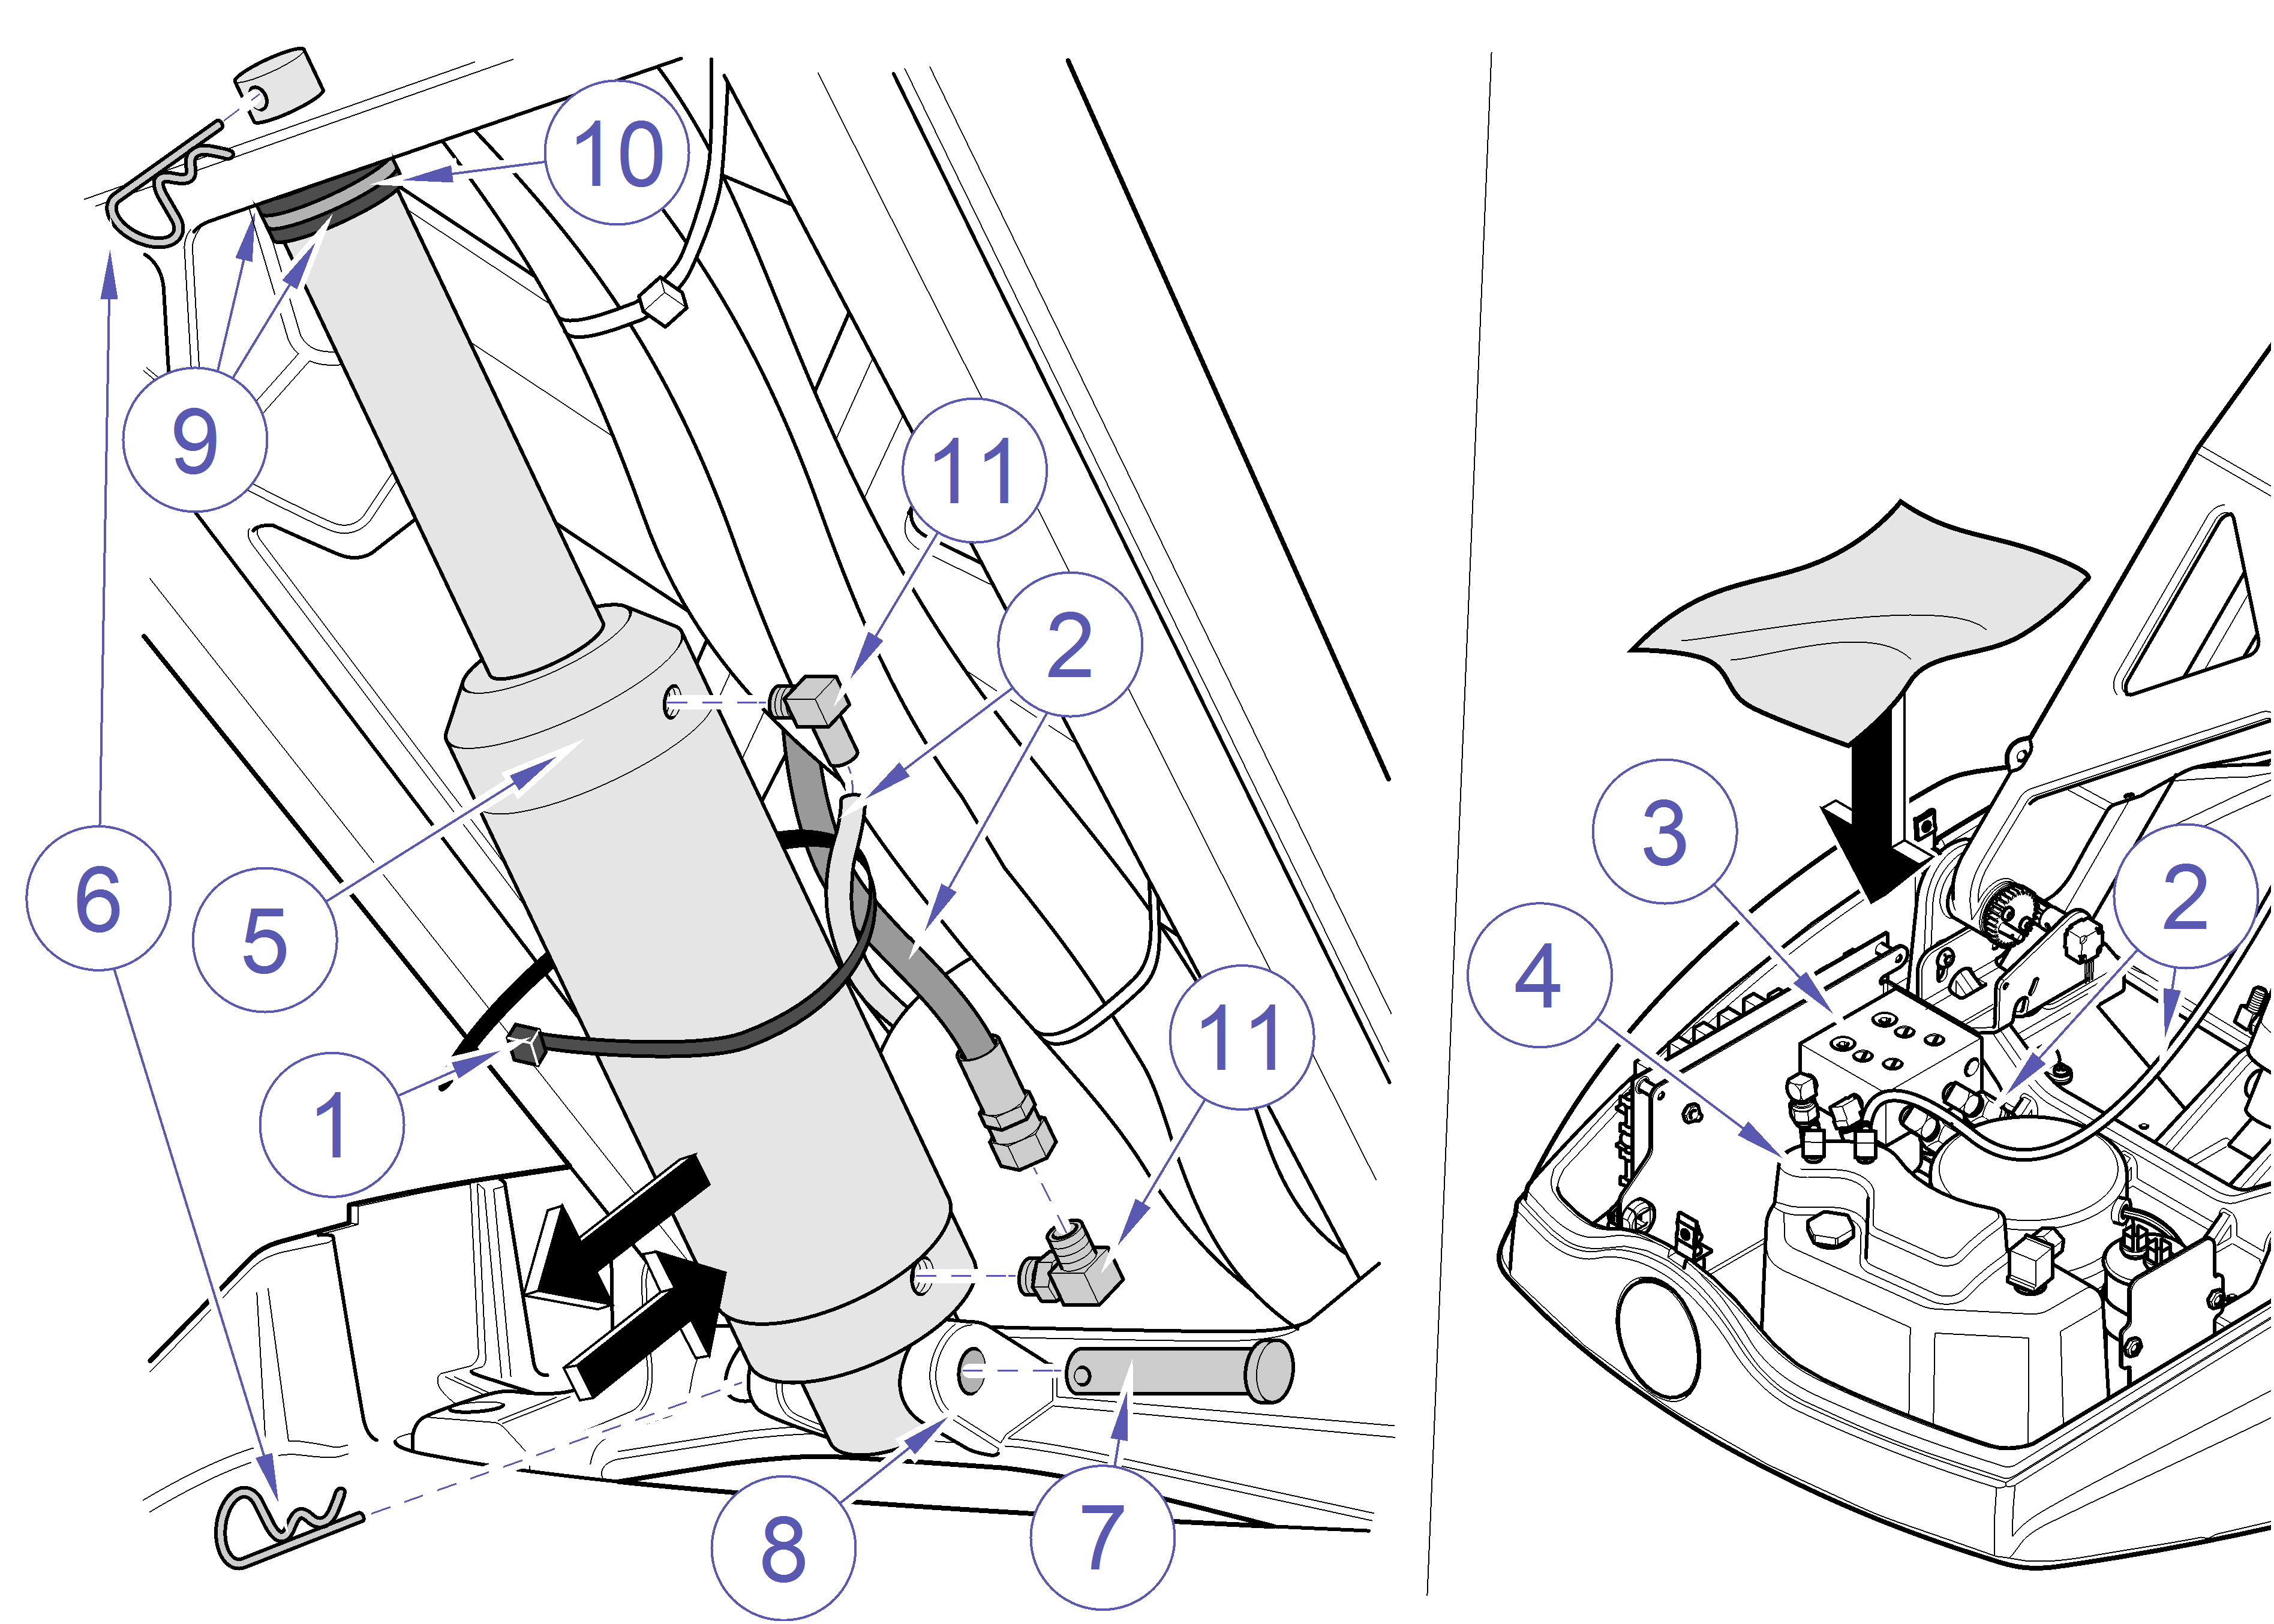
6.Mark location of cable tie that secure base cylinder leak line, Item 2, then remove tie (1). See Item 1 in Hydraulic Base Cylinder 3 illustration.
Hydraulic Base Cylinder - 3
7.Place towels beneath valve block assembly, Item 3, and reservoir, Item 4, then disconnect hydraulic lines , Item 2, from base cylinder, Item 5.
8.Remove hairpin cotter, Item 6, from rod-end of cylinder.
9.Remove hairpin cotter, Item 6, from clevis pin, Item 7, and extract clevis pin from lower lift casting, Item 8.
10.Remove hydraulic base cylinder, Item 5.
11.Remove two metal washers, Item 9, and plastic washer, Item 10, from rod-end of cylinder.
12.Remove hydraulic lines, Item 2, and fittings, Item 11, from base cylinder, Item 5.
For personal safety, work on base hydraulic cylinder from front of chair. Do not place hands or arms beneath lift arm casting.
Failure to use hydraulic sealant on fittings may result in leakage.
Hydraulic Base Cylinder - 3
1.After removing shipping plugs from base cylinder , install fittings, Item 11, and lines, Item 2. See Item 5 in Hydraulic Base Cylinder - 3
2.Install two metal washers, Item 9, and plastic washer, Item 10, on rod-end of cylinder, Item 5.
3.Place base cylinder, Item 5, in position, and install clevis pin, Item 7, and hairpin cotter, Item 6.
4.Connect hydraulic lines, Item 2, to valve block assembly, Item 3, and reservoir, Item 4.
Use caution to prevent electrical shock with chair plugged into outlet. Electrical components and connections are exposed.
5.Plug chair into electrical outlet.
6.Carefully jog Base Up until rod-end of base cylinder, Item 5, is located in hole of upper lift casting.
7.Install hairpin cotter, Item 6.
8.Install cable ties, Item 1, at previously marked locations.
9.Press Base Up to raise chair and remove jack stand(s). See Removal, Hydraulic Base Cylinder - 1 illustration
10.Check Hydraulic Fluid Level, then run chair through several functions and check for hydraulic leaks.
11.Unplug chair and install Covers and Upholstery.


