Biltmore/Knight Chairs Mounted Cuspidor Units Test and Repair
Cuspidor Units - Present Models
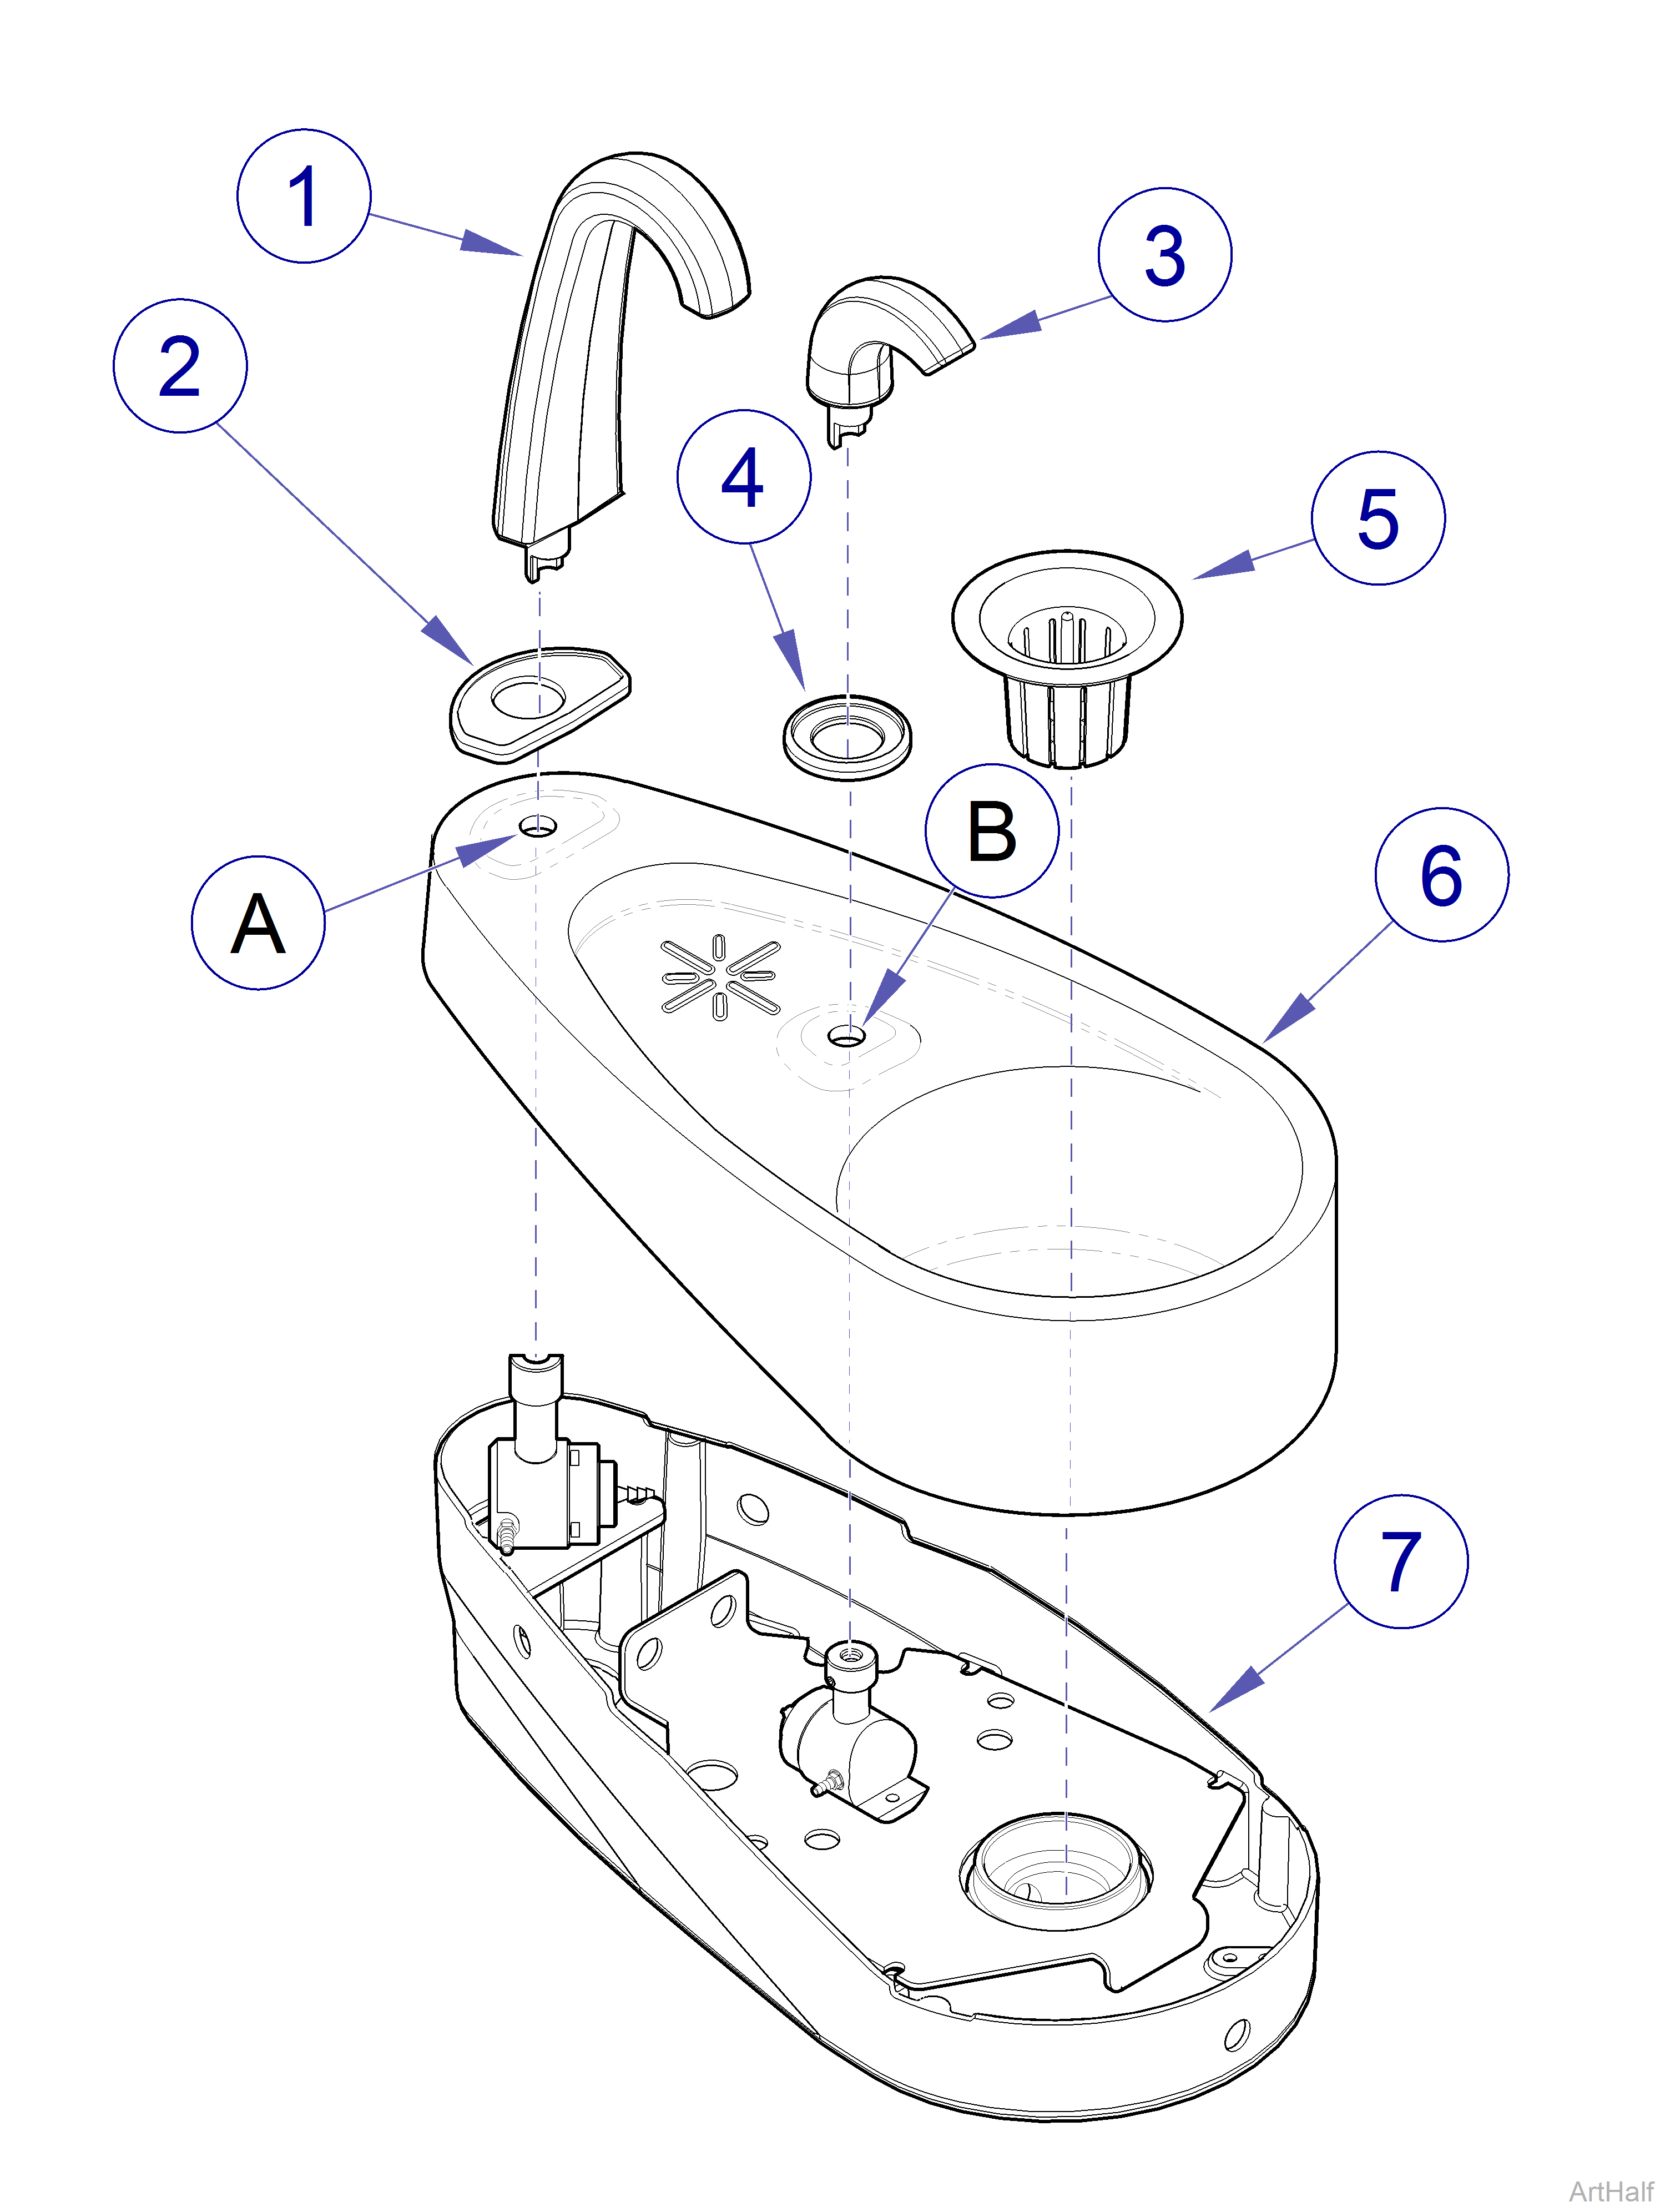
1.Turn master ON/OFF switch, on the delivery unit, to OFF position.
To prevent residual water spilling, place finger over end of spouts when removing.
2.Remove cup fill spout (1), cup fill gasket (2), bowl rinse spout (3), bowl rinse gasket (4), and gold trap (5).
Cuspidor bowl is pressure-fit. There is no hardware to remove.
3.Remove cuspidor bowl (6).
1.Position cuspidor bowl (6) over bottom housing (7) and gently press downward.
2.Install cup fill gasket (2) onto cup fill spout (1). Then, insert cup fill spout into hole (A).
3.Install bowl rinse gasket (4) onto bowl rinse spout (3). Then, insert bowl rinse spout into hole (B).
4.Install gold trap (5).
5.Turn master ON/OFF switch ON and check for proper operation.
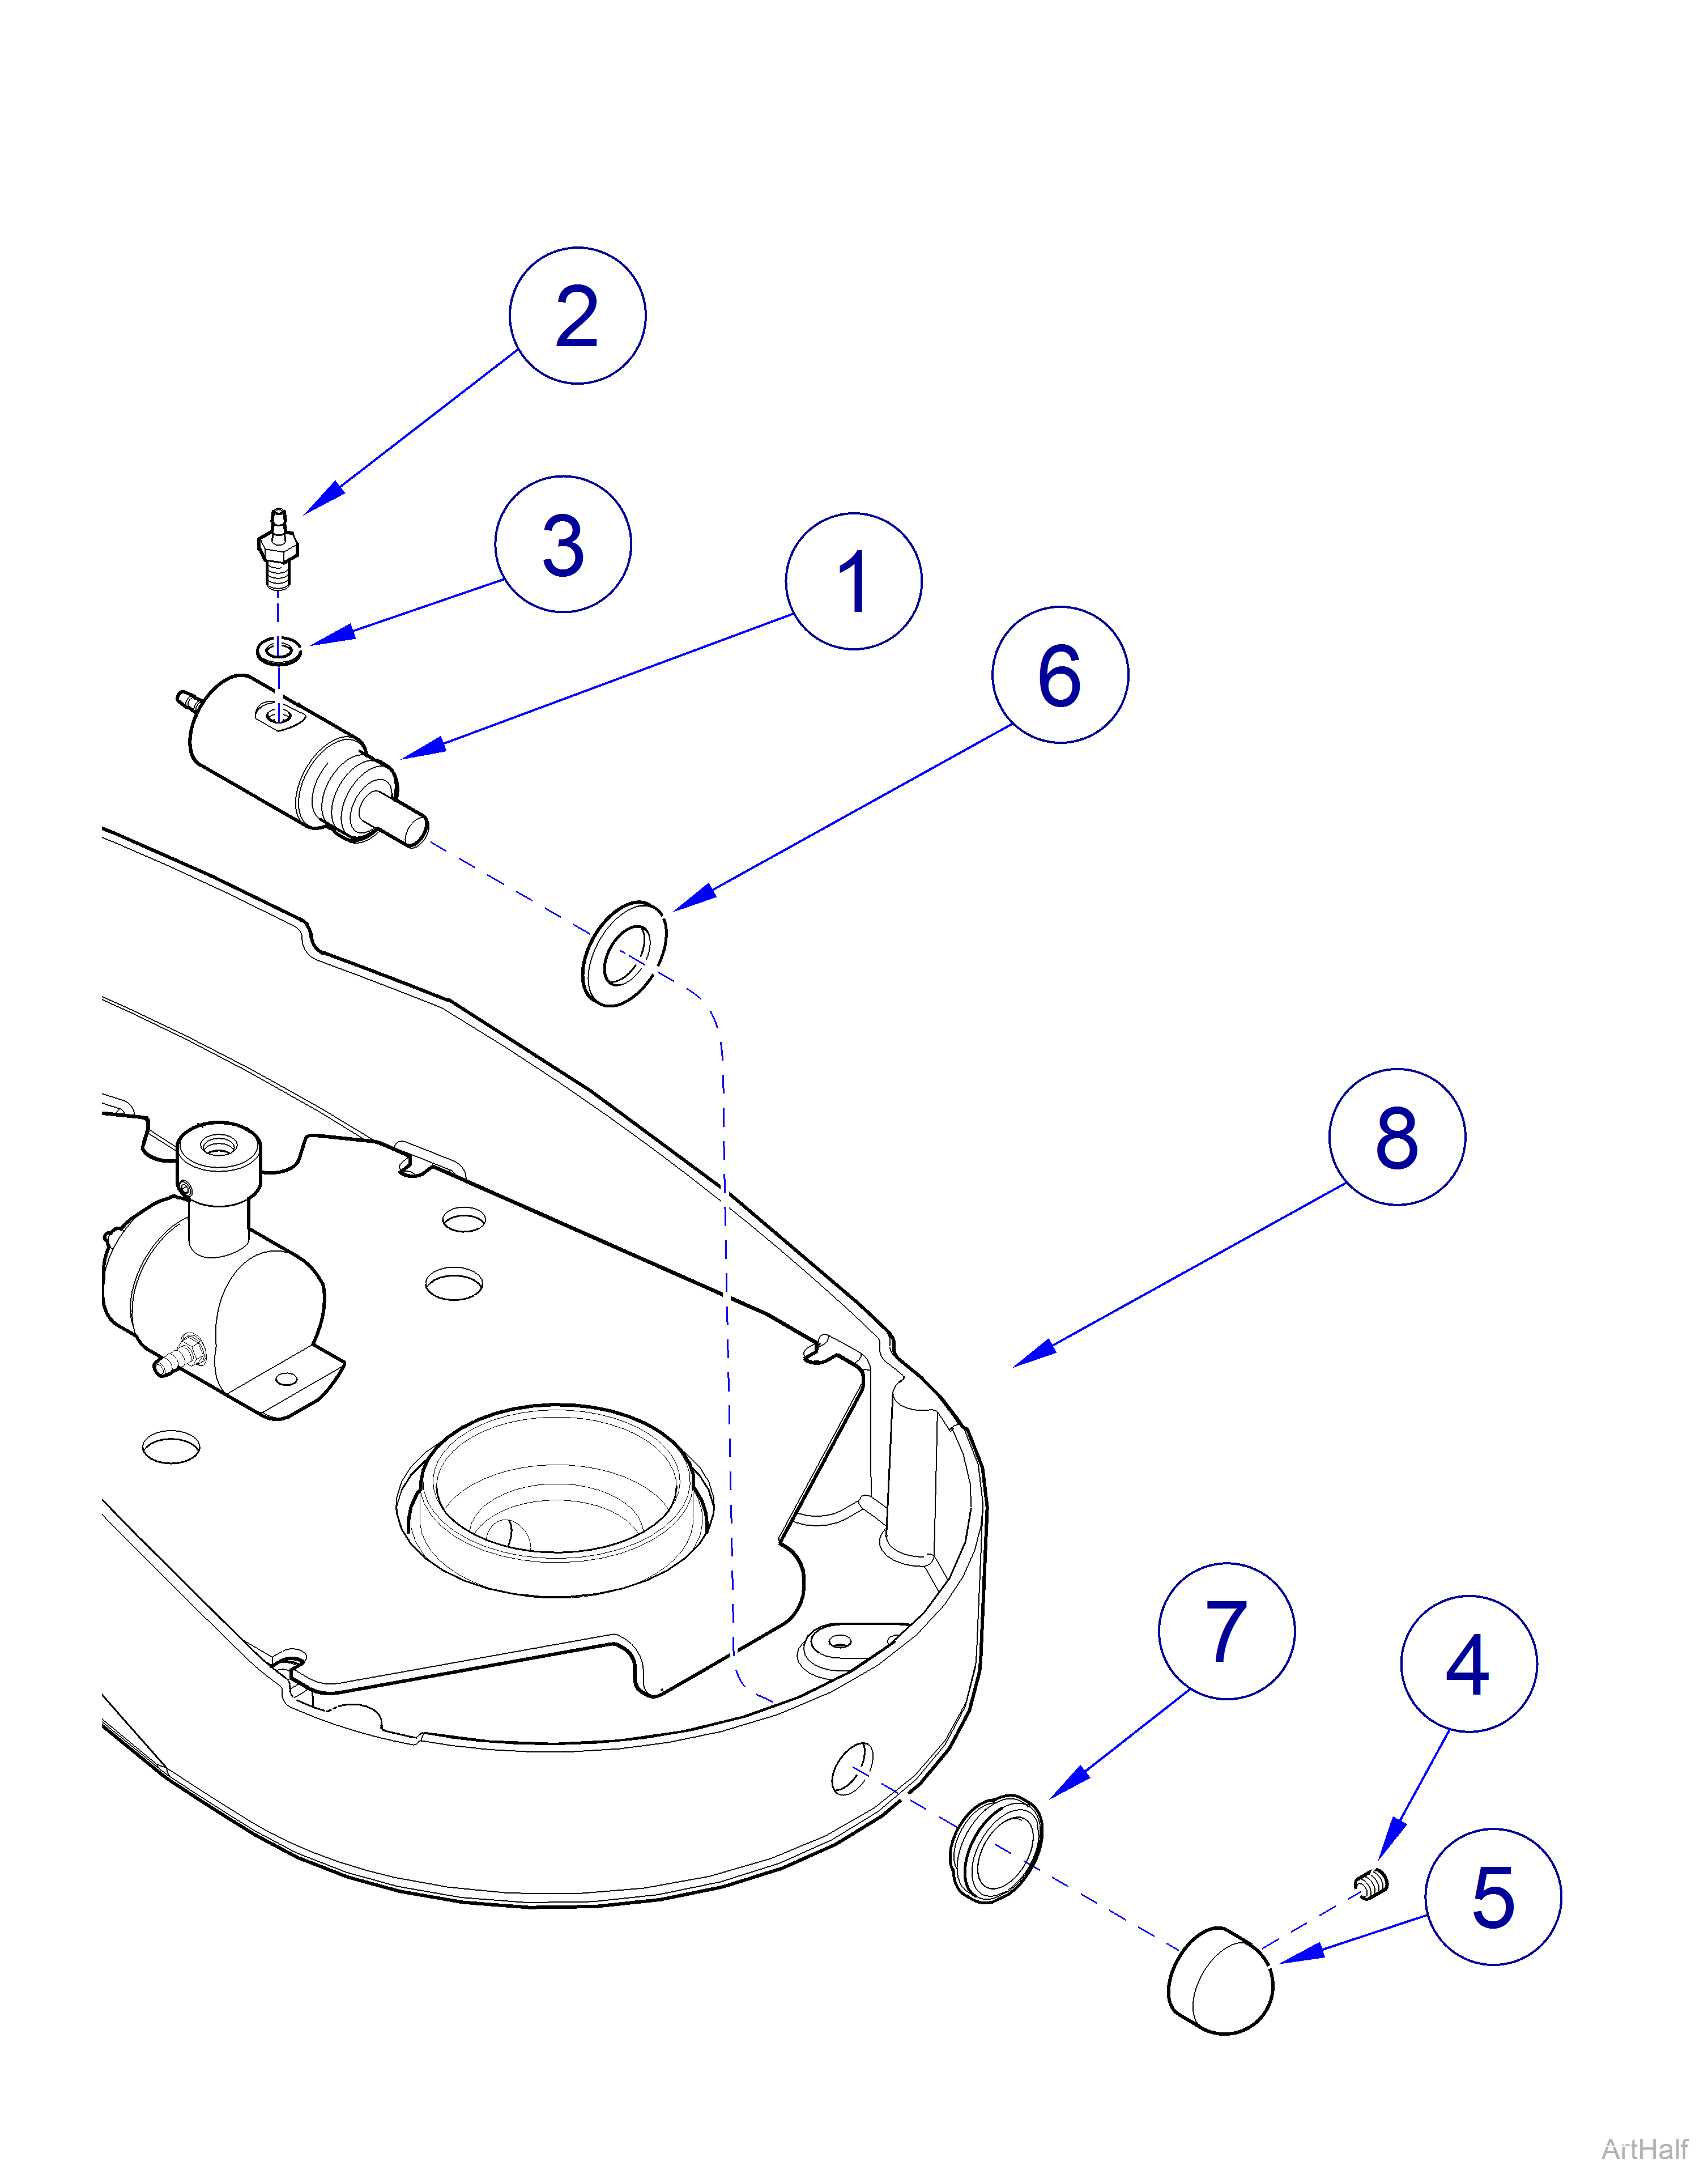
Typical Push Button Valve
The illustration shows the bowl rinse button valve. The procedure for the cup fill button valves is similar.
1.Remove cuspidor bowl.
2.Tag and disconnect all tubing connected to push button valve (1).
3.Remove barbed fitting (2) and gasket (3) from push button valve (1).
4.Loosen set screw (4) and remove knob (5).
5.Unscrew push button valve (1). Then, remove valve, washer (6), and trim ring (7) from bottom housing (8).
1.Insert push button valve (1) thru washer (6), and bottom housing (8).
2.Secure push button valve (1) with trim ring (7).
3.Install knob (5) and tighten set screw (4).
4.Install gasket (3) and barbed fitting (2) onto push button valve (1).
5.Connect all tubing to proper fittings of push button valve (1).
6.Install cuspidor bowl.
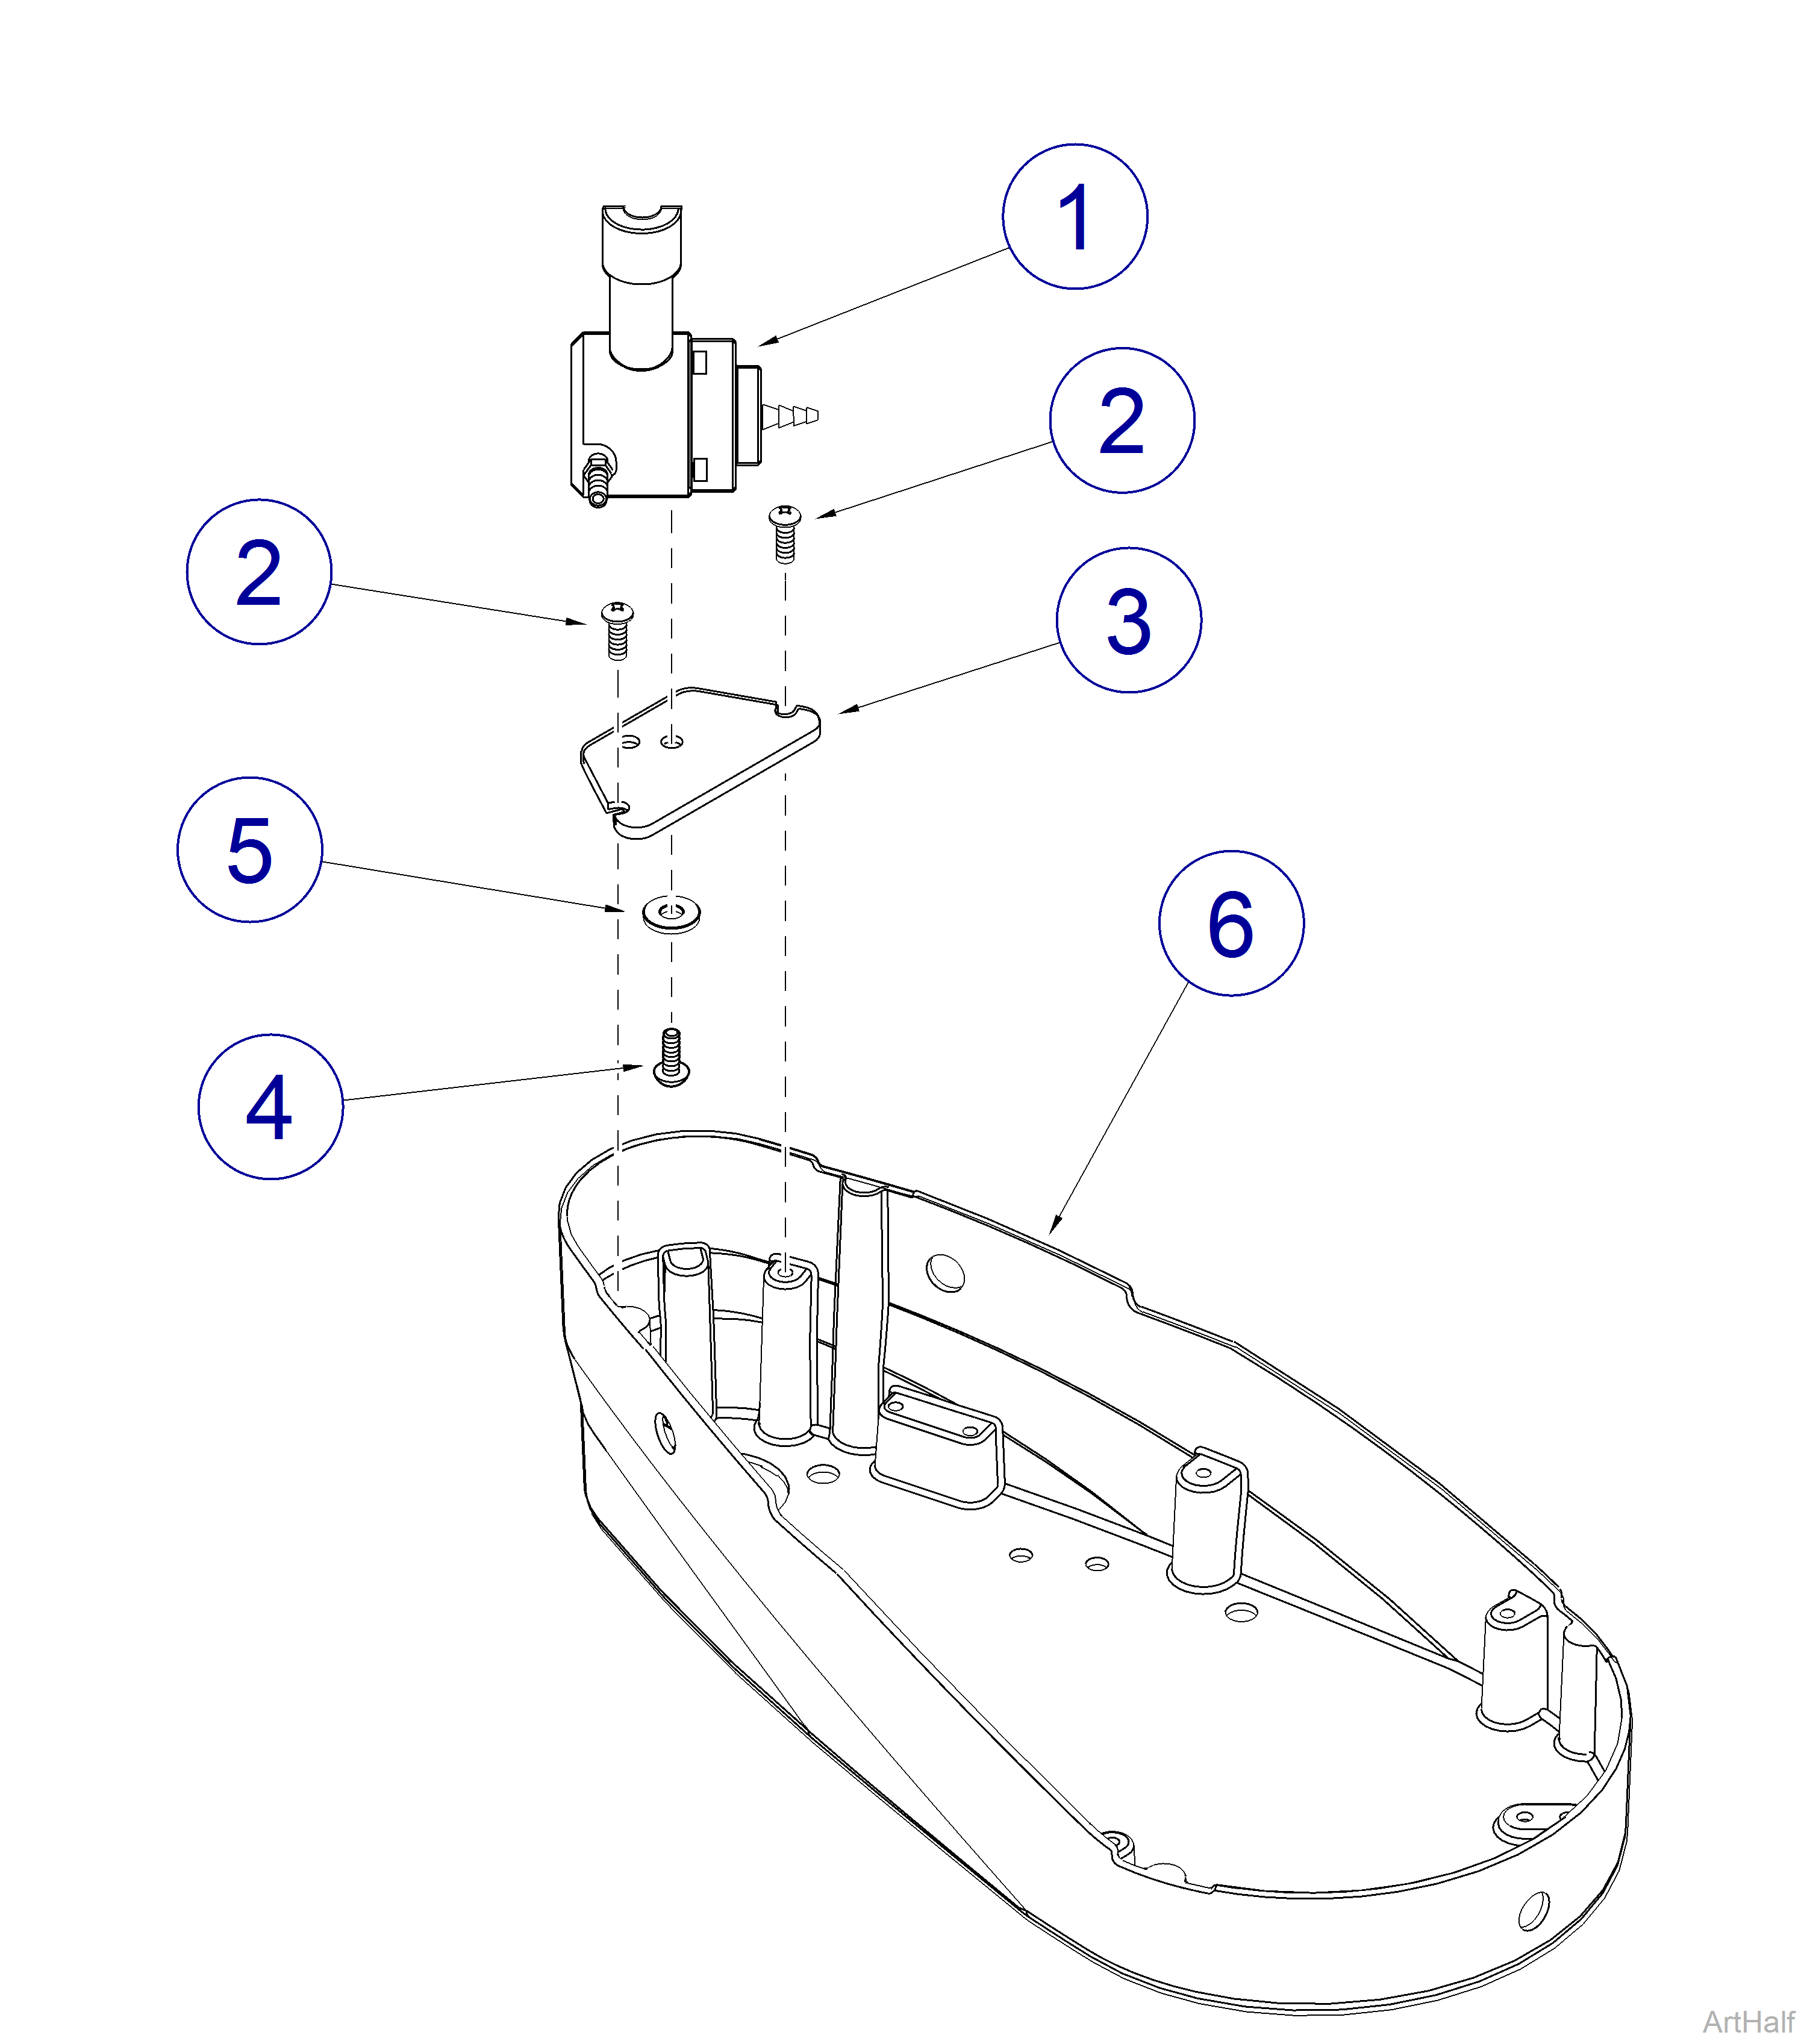
Cup Fill Water Valve
1.Remove cuspidor bowl.
2.Tag and disconnect 1/4 in. blue tubing and 1/8 in. red tubing from cup fill water valve (1).
3.Remove two screws (2) and valve bracket (3).
4.Remove screw (4), washer (5), and cup fill water valve (1) from valve bracket (3).
1.Secure cup fill water valve (1) to valve bracket (3) with screw (4) and washer (5).
2.Install valve bracket (3) into bottom housing (6) and secure with two screws (2).
3.Connect 1/4 in. blue tubing and 1/8 in. red tubing to proper fittings of cup fill water valve (1).
4.Install cuspidor bowl.
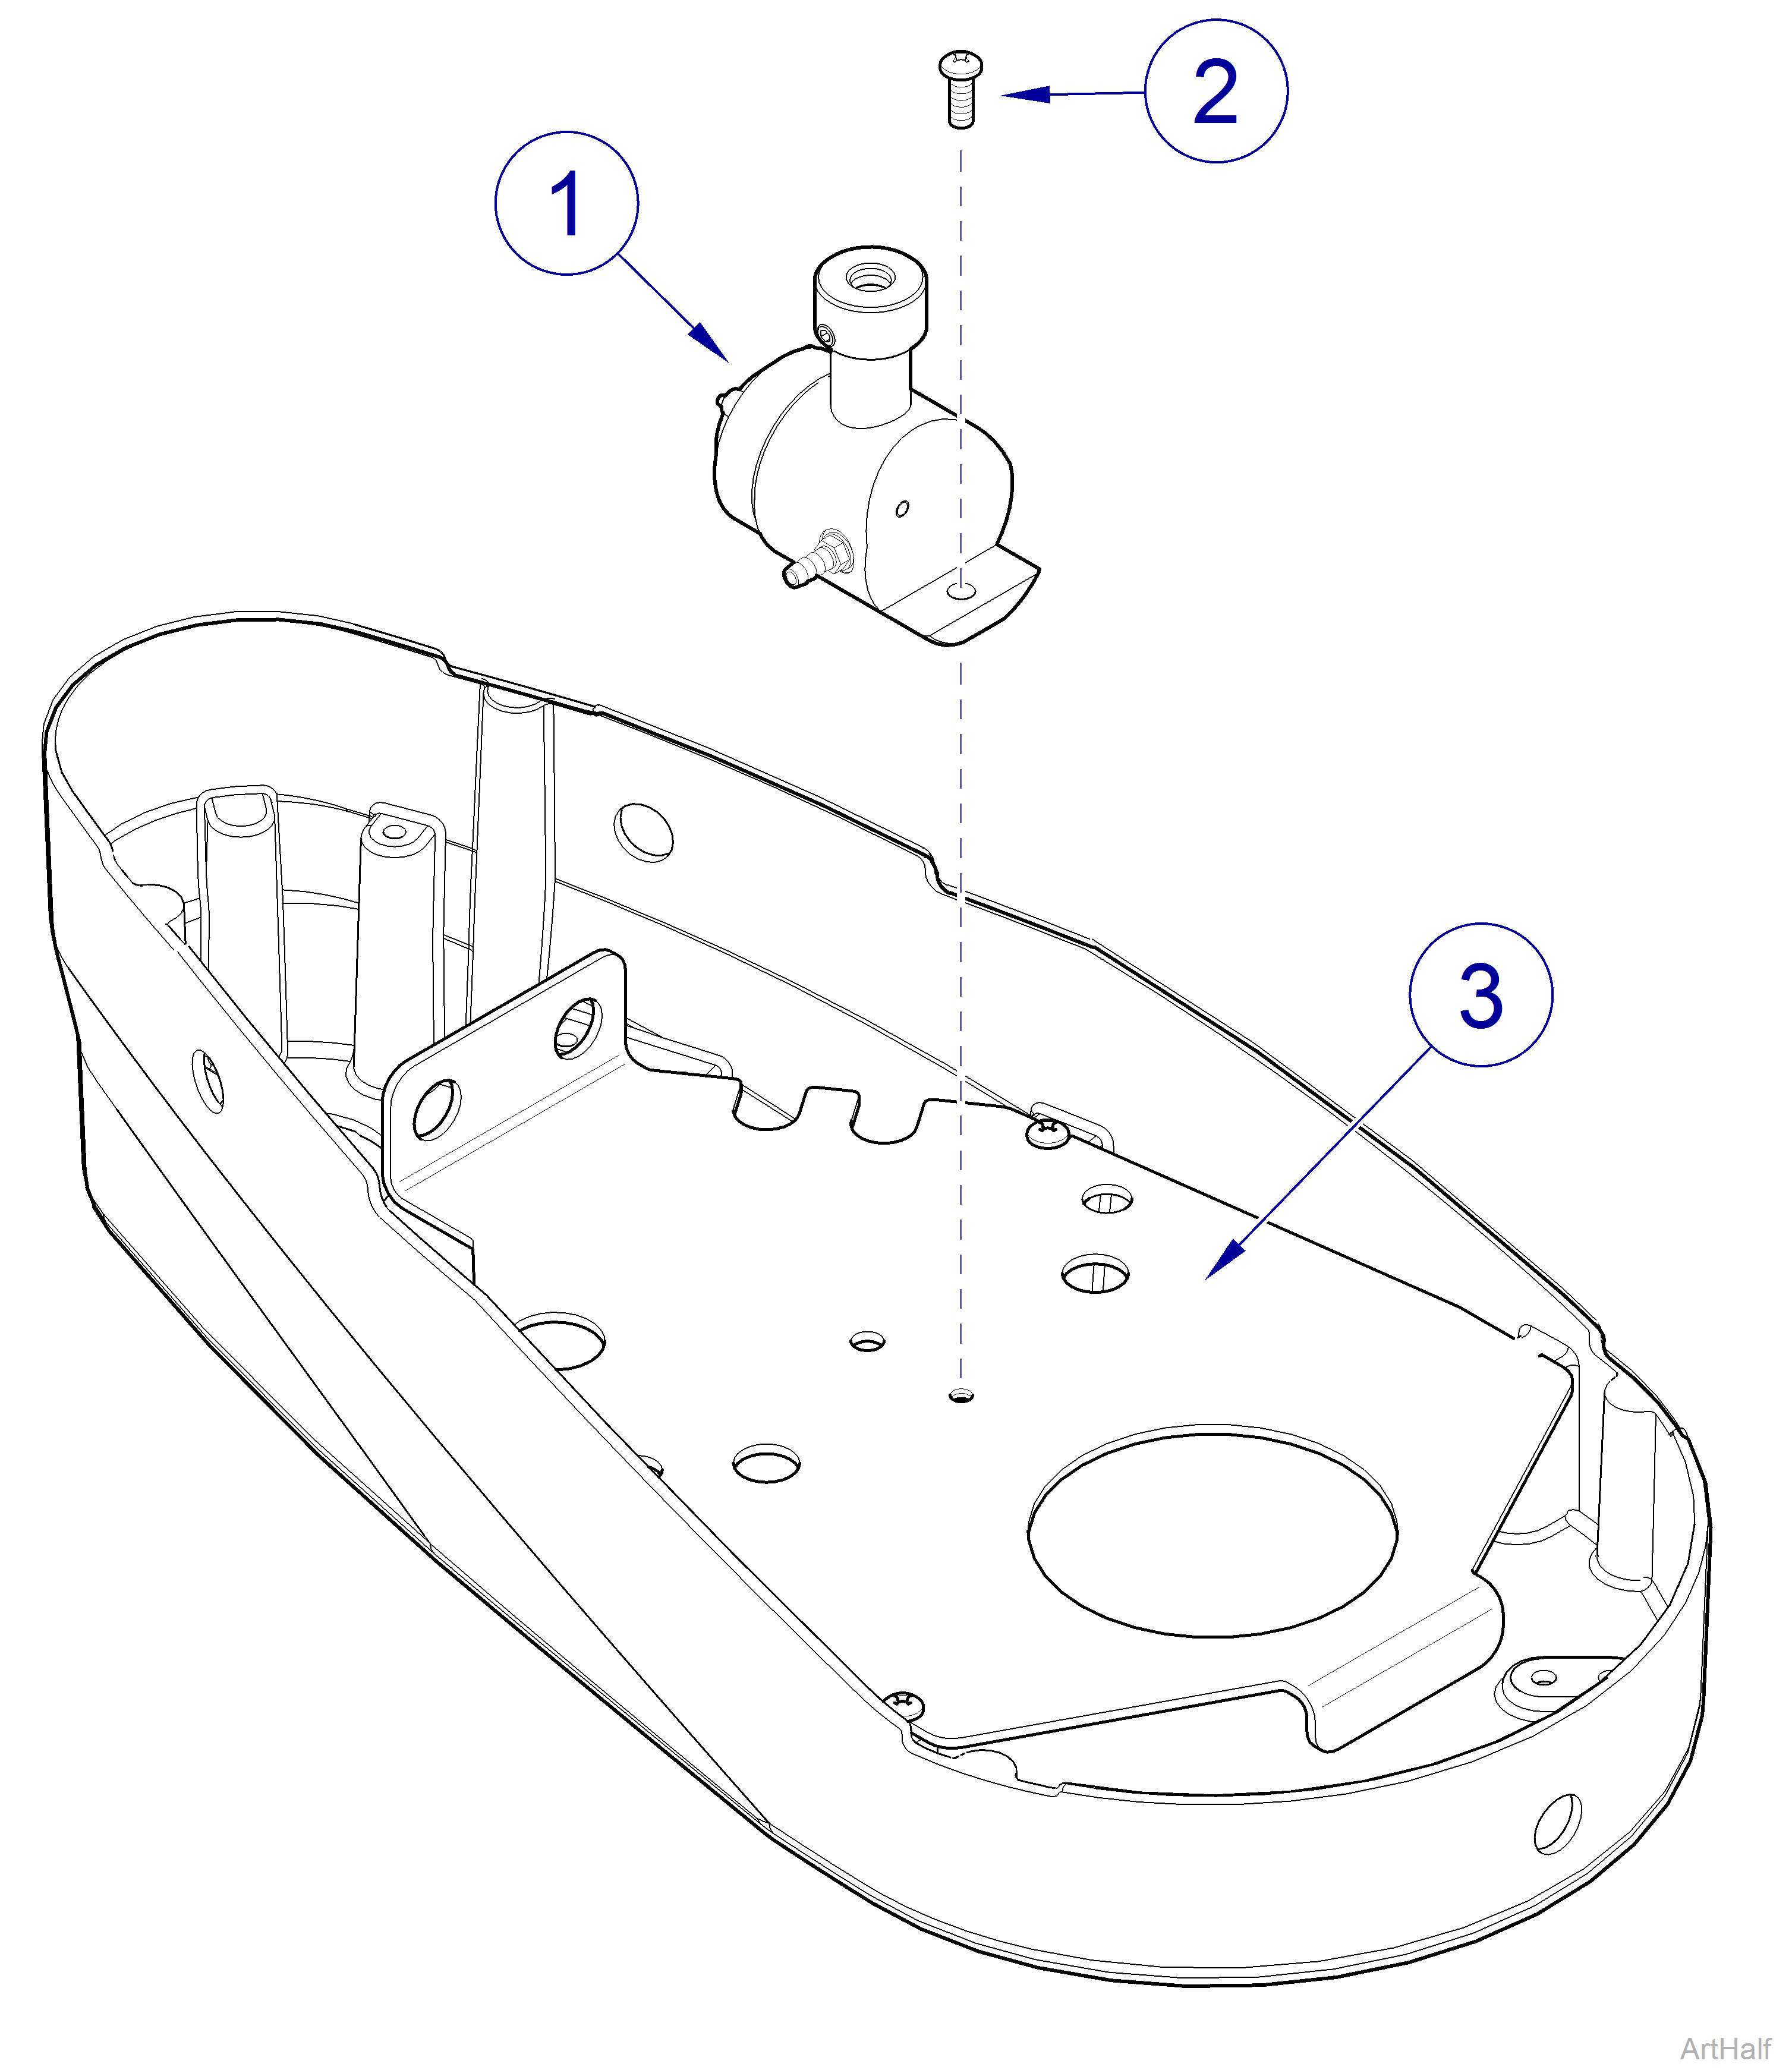
Bowl Rinse Water Valve
1.Remove cuspidor bowl.
2.Tag and disconnect 1/4 in. blue tubing and 1/8 in. red tubing from bowl rinse water valve (1).
3.Remove screw (2) and bowl rinse water valve (1).
1.Secure bowl rinse water valve (1) to bottom housing (3) with screw (2).
2.Connect 1/4 in. blue tubing and 1/8 in. red tubing to proper fittings of bowl rinse water valve (1).
3.Install cuspidor bowl.
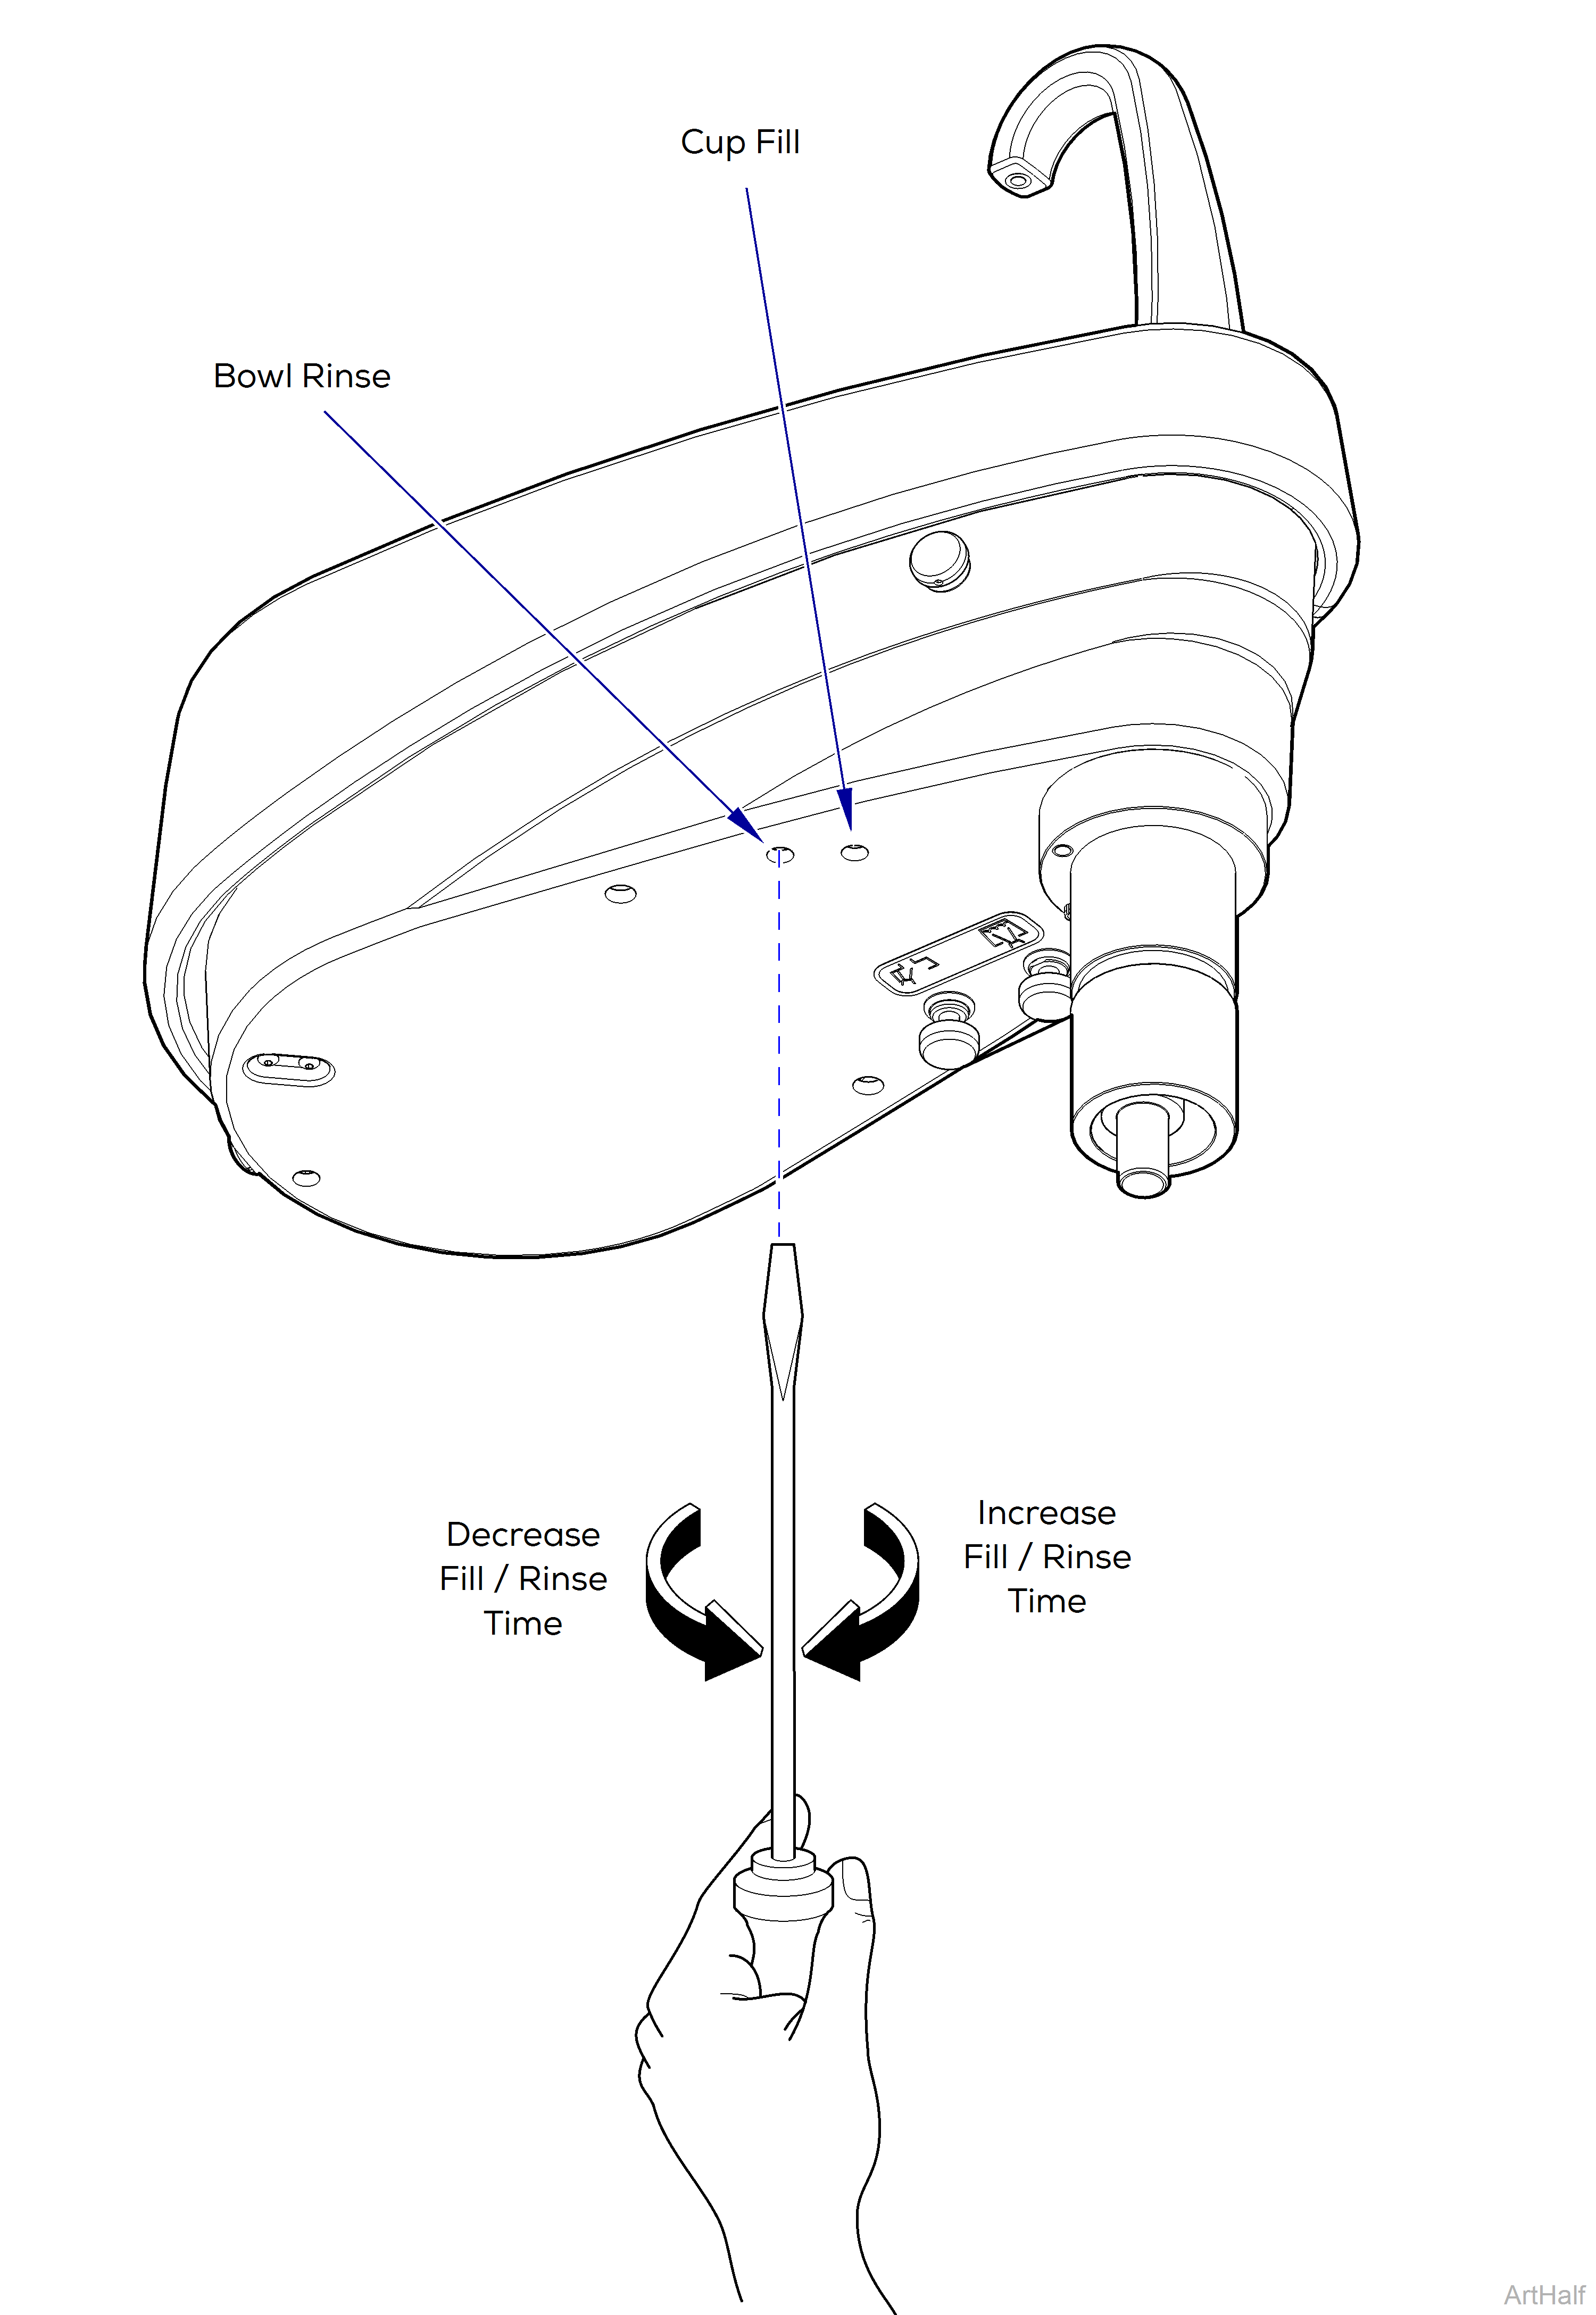
Cup Fill / Bowl Rinse Timing Valve Adjustment
1.To increase the length of time the bowl rinse / cup fill water runs, insert a screwdriver thru proper hole in bottom housing. Then turn valve adjuster counterclockwise.
2.To decrease the length of time the bowl rinse /cup fill water runs, insert a screwdriver thru proper hole in bottom housing. Then turn valve adjuster clockwise.
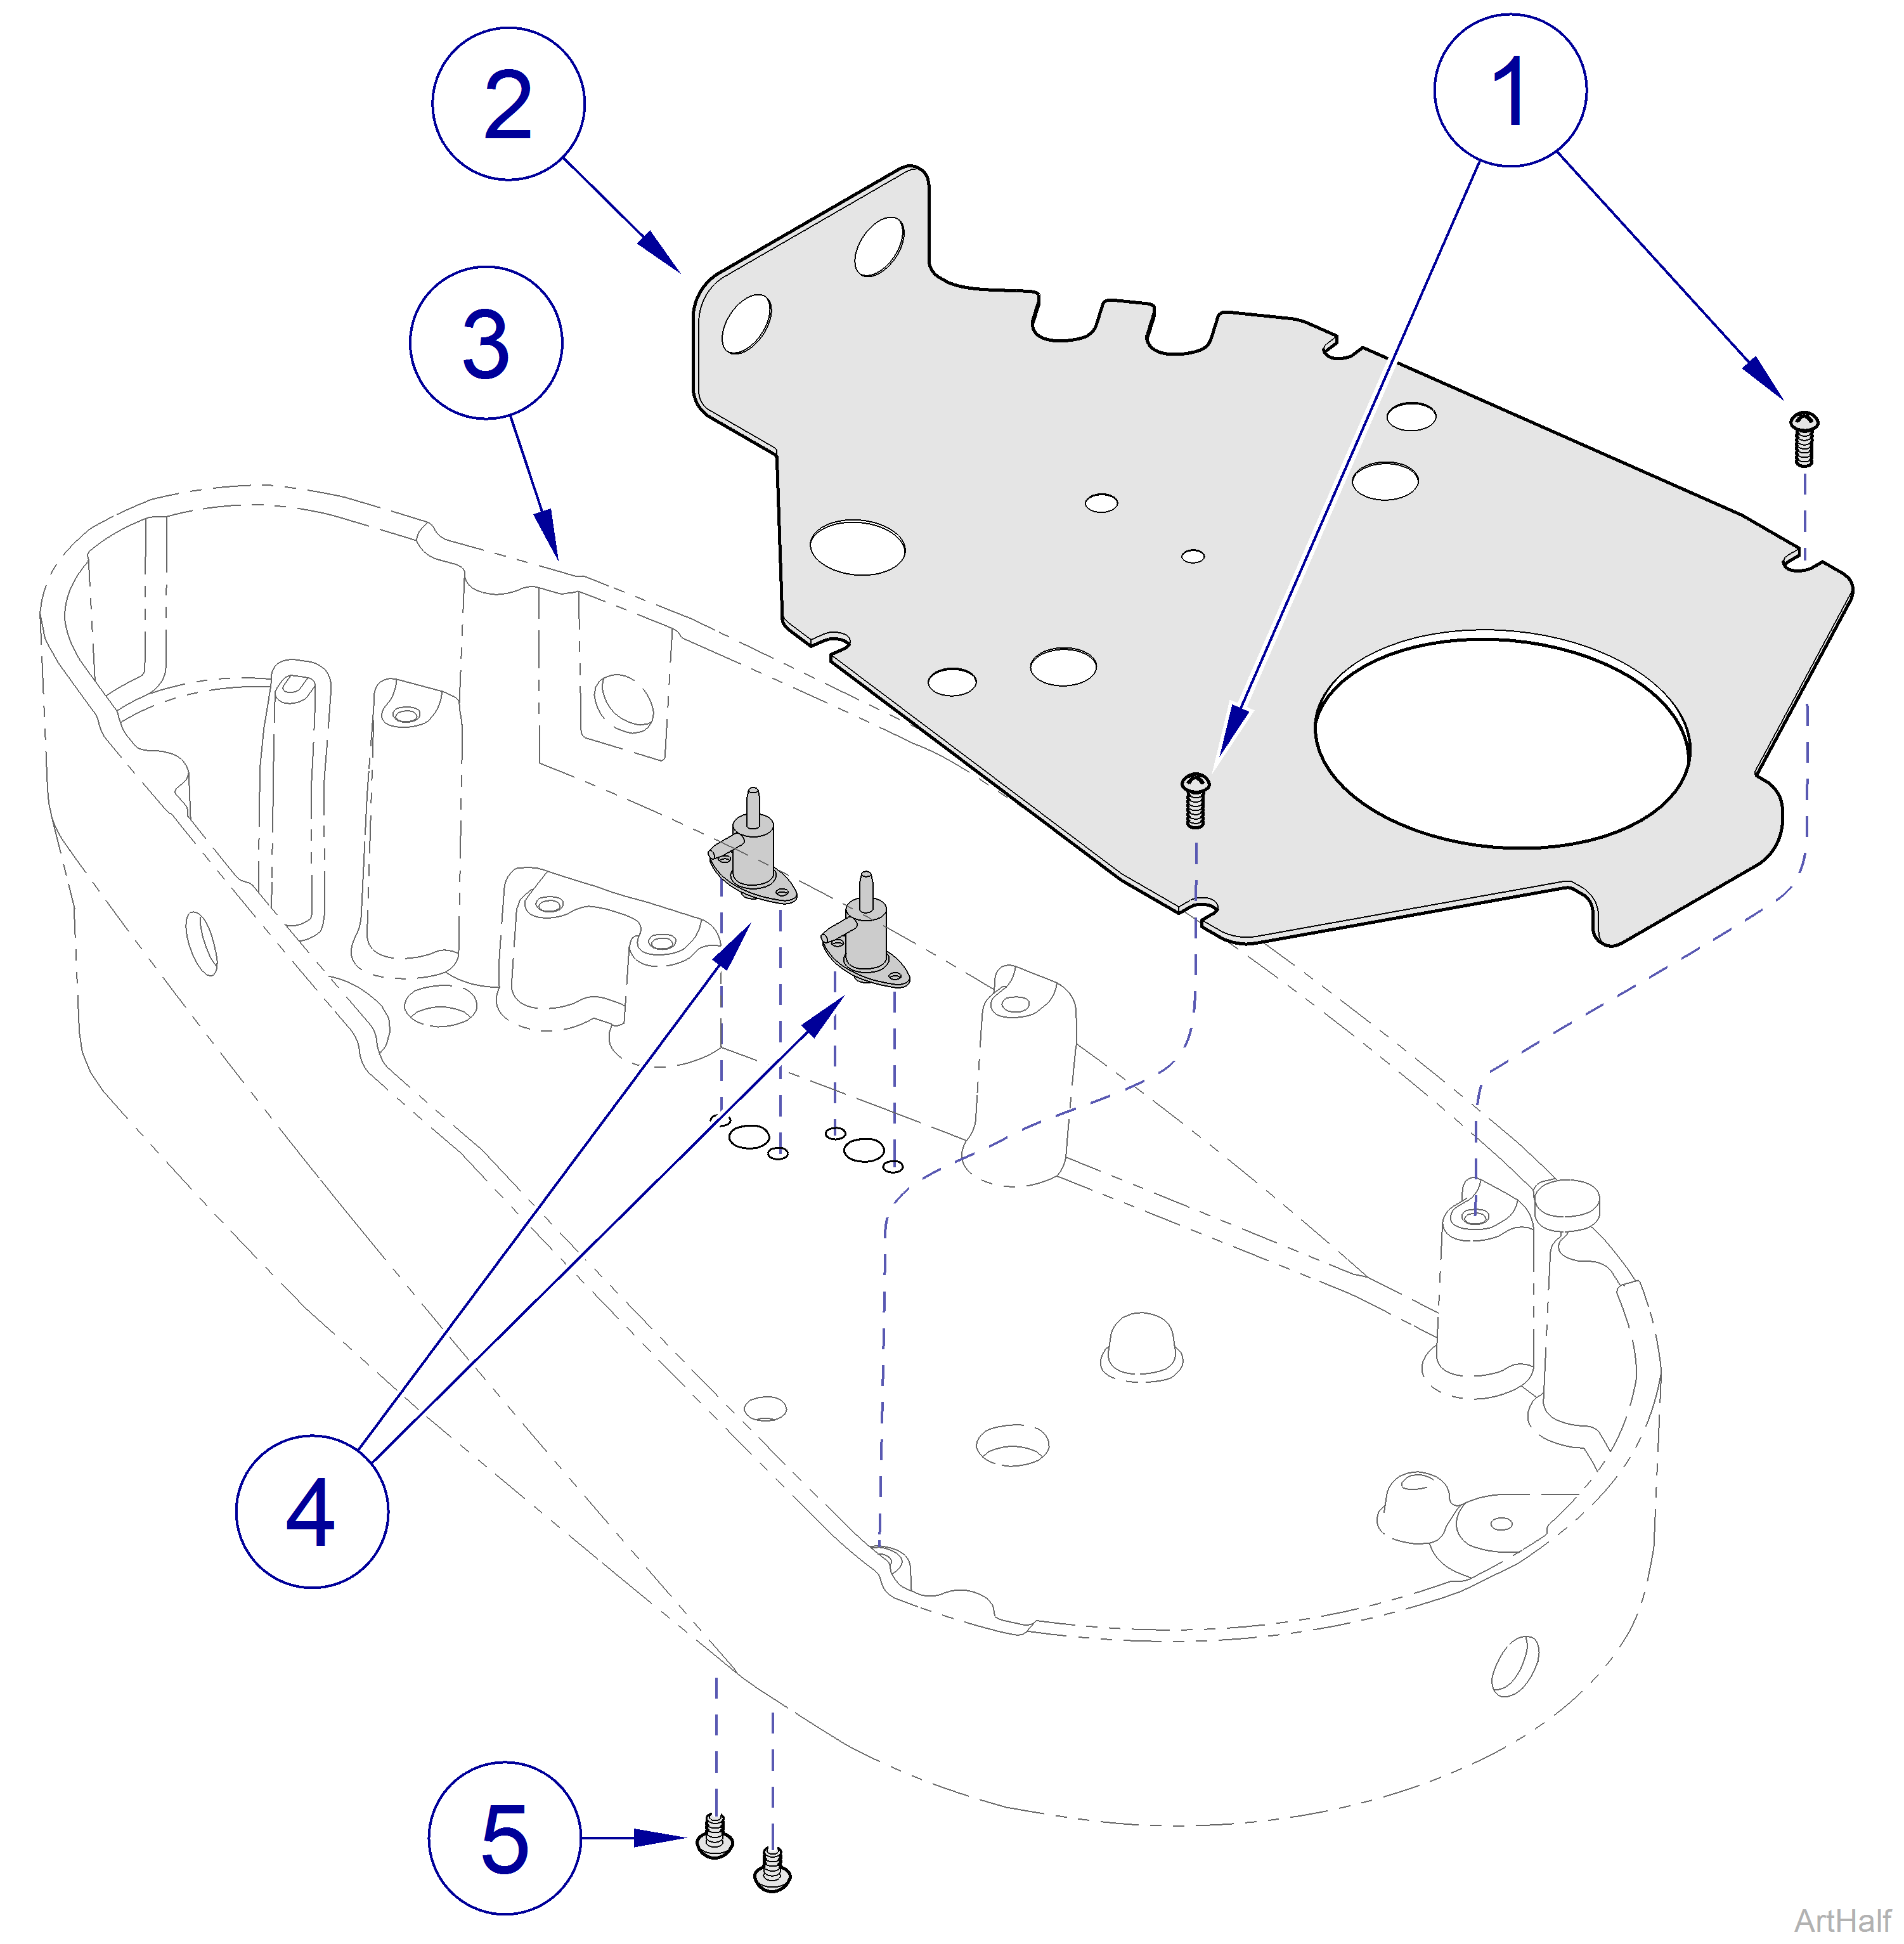
Cup Fill / Bowl Rinse Timing Valve Removal / Installation
1.Remove cuspidor bowl.
2.Remove four screws (1). Then, partially separate mounting plate (2) from bottom housing (3).
3.Tag and disconnect tubing connected to timing adjustment valve(s) (4).
4.Remove mounting screws (5) and timing adjusting valve(s) (4).
1.Place timing adjusting valve(s) (4) in position and secure with mounting screws (5).
2.Connect tubing to proper fitting(s) of timing adjustment valve (4).
3.Position mounting plate (2) and secure to bottom housing (3) with four screws (1).
4.Install cuspidor bowl.
Cuspidor Units - Earlier Models
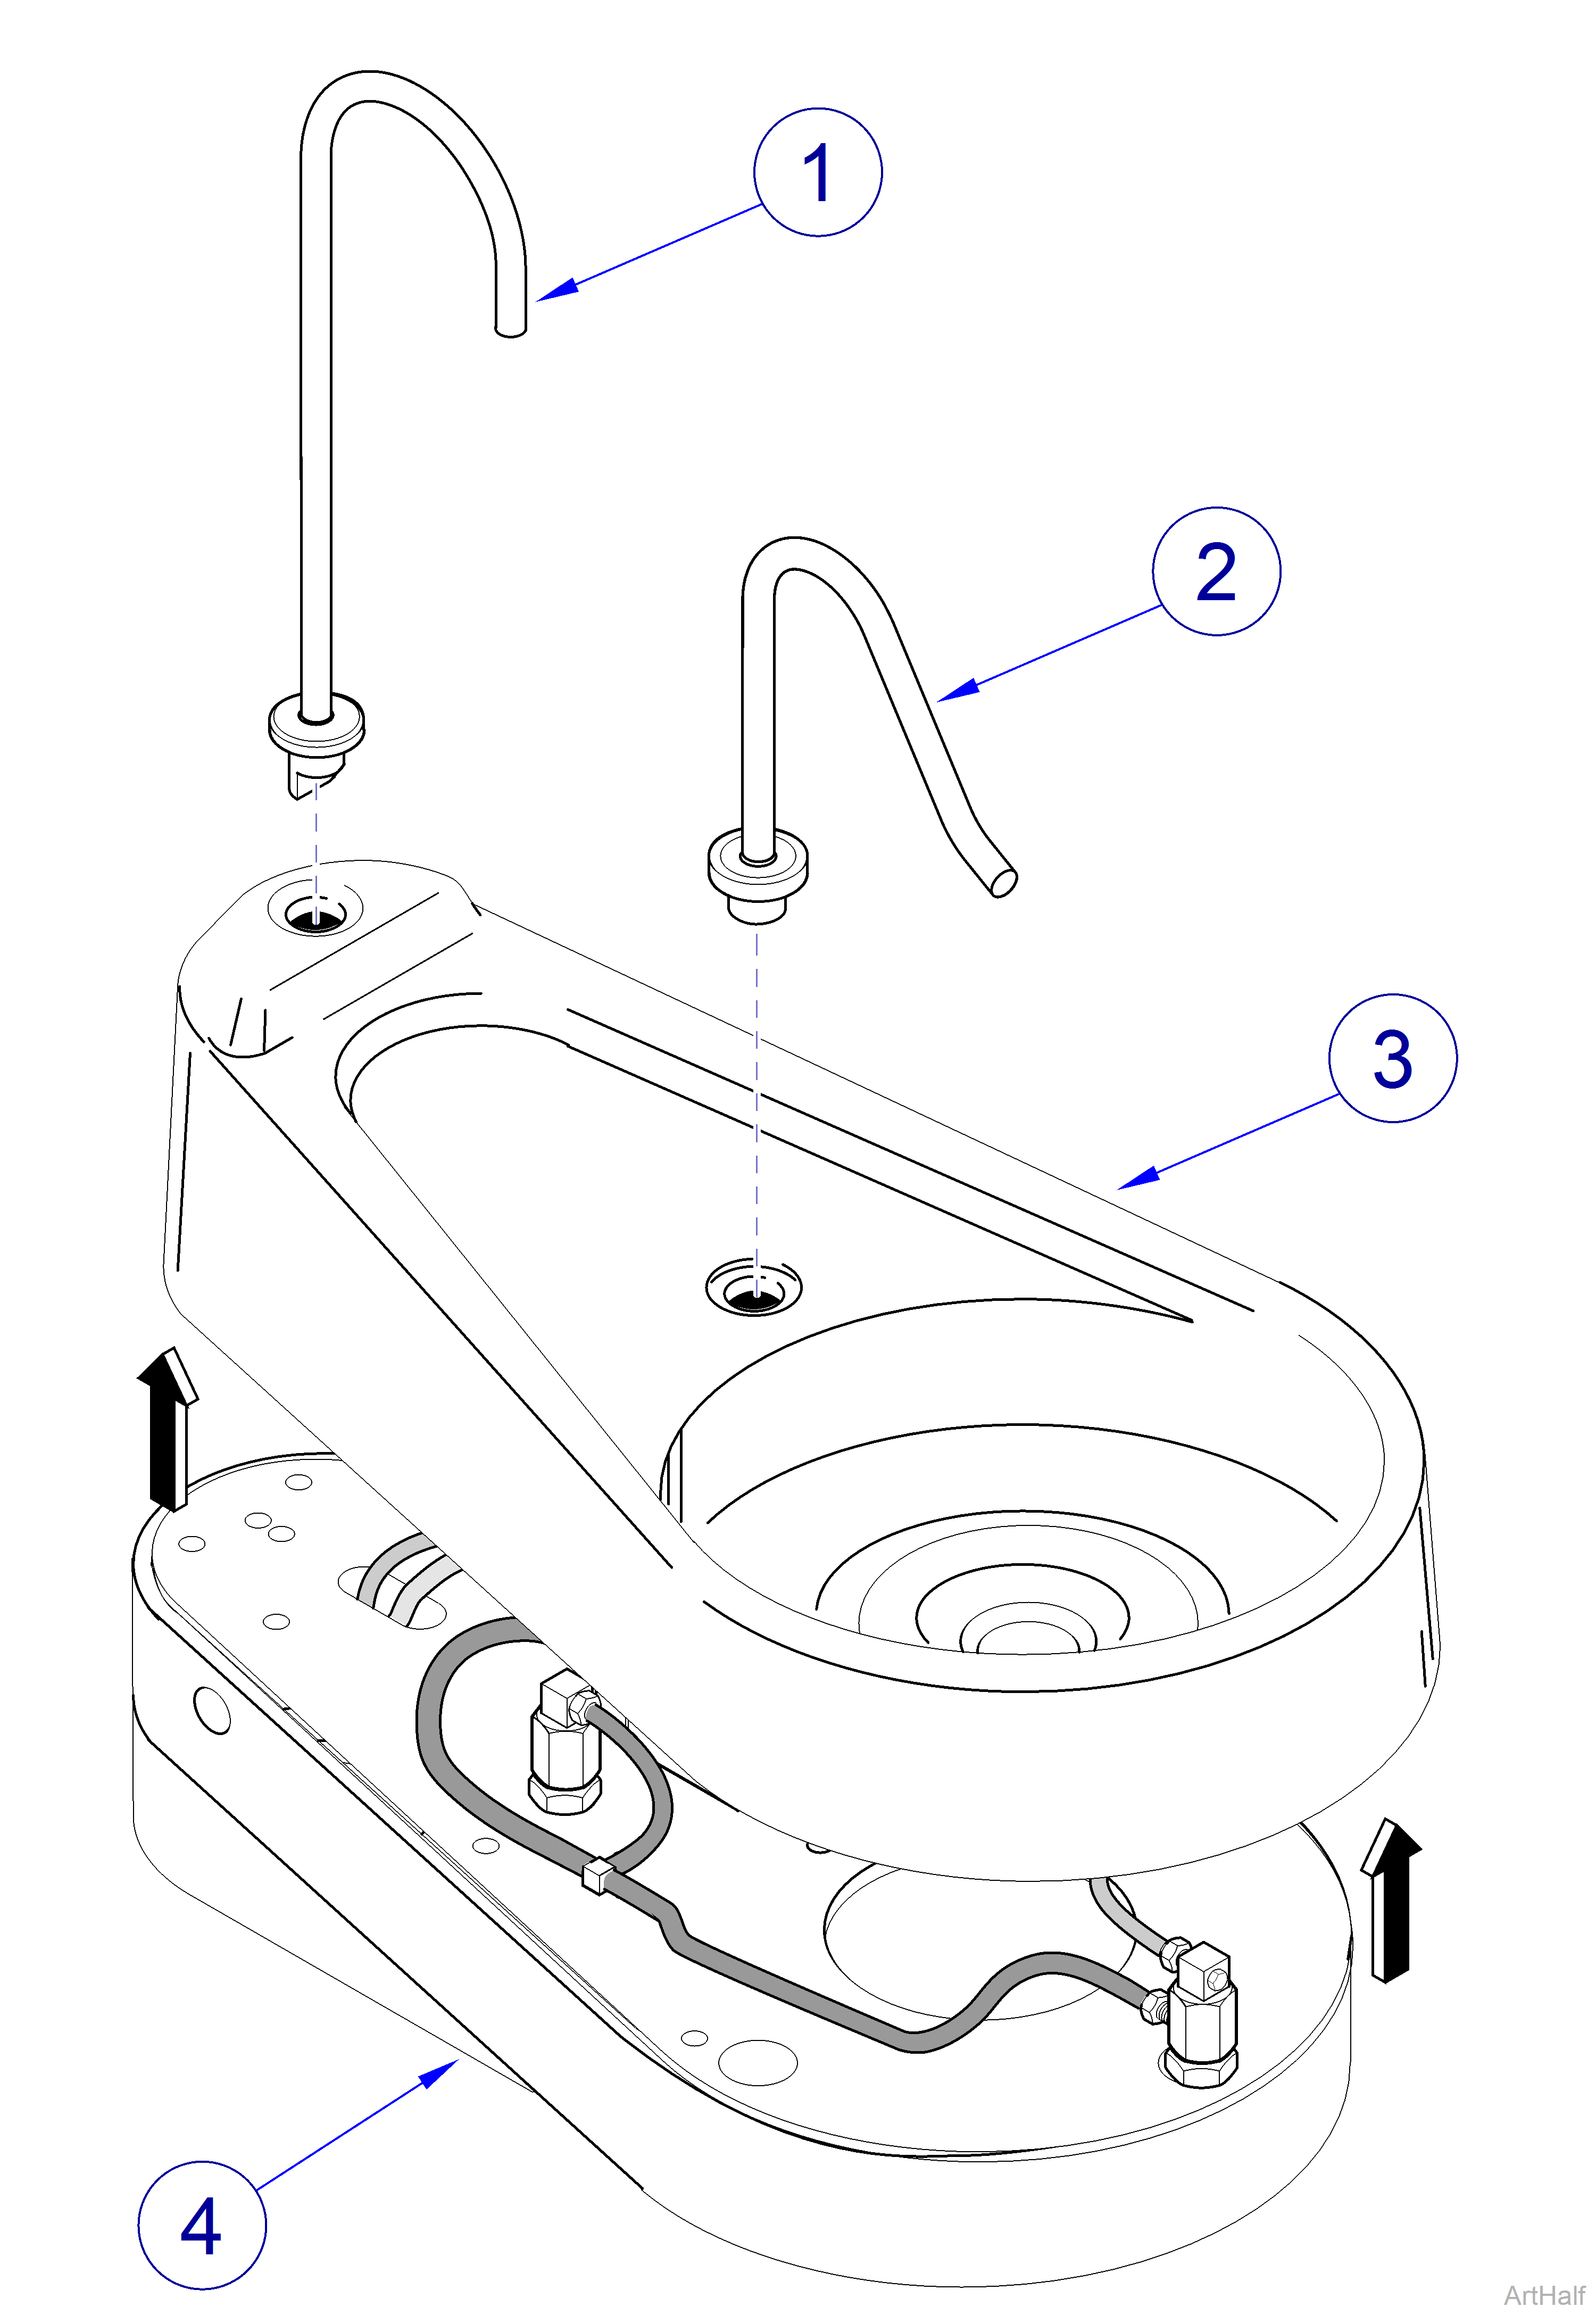
Cuspidor Bowl - Earlier Model
Removal
2.Remove cup filler tube (1) and bowl rinse tube (2) from cuspidor. The cup filler tube and bowl rinse tube are pressure fit. No tools are required.
The cuspidor bowl (3) is pressure fit to the lower housing (4) and may be very tight. Use caution when performing the following step to prevent damage to the cuspidor.
3.Remove cuspidor bowl (3) from lower housing (4) . The cuspidor bowl is pressure fit to the lower housing. No tools are required.
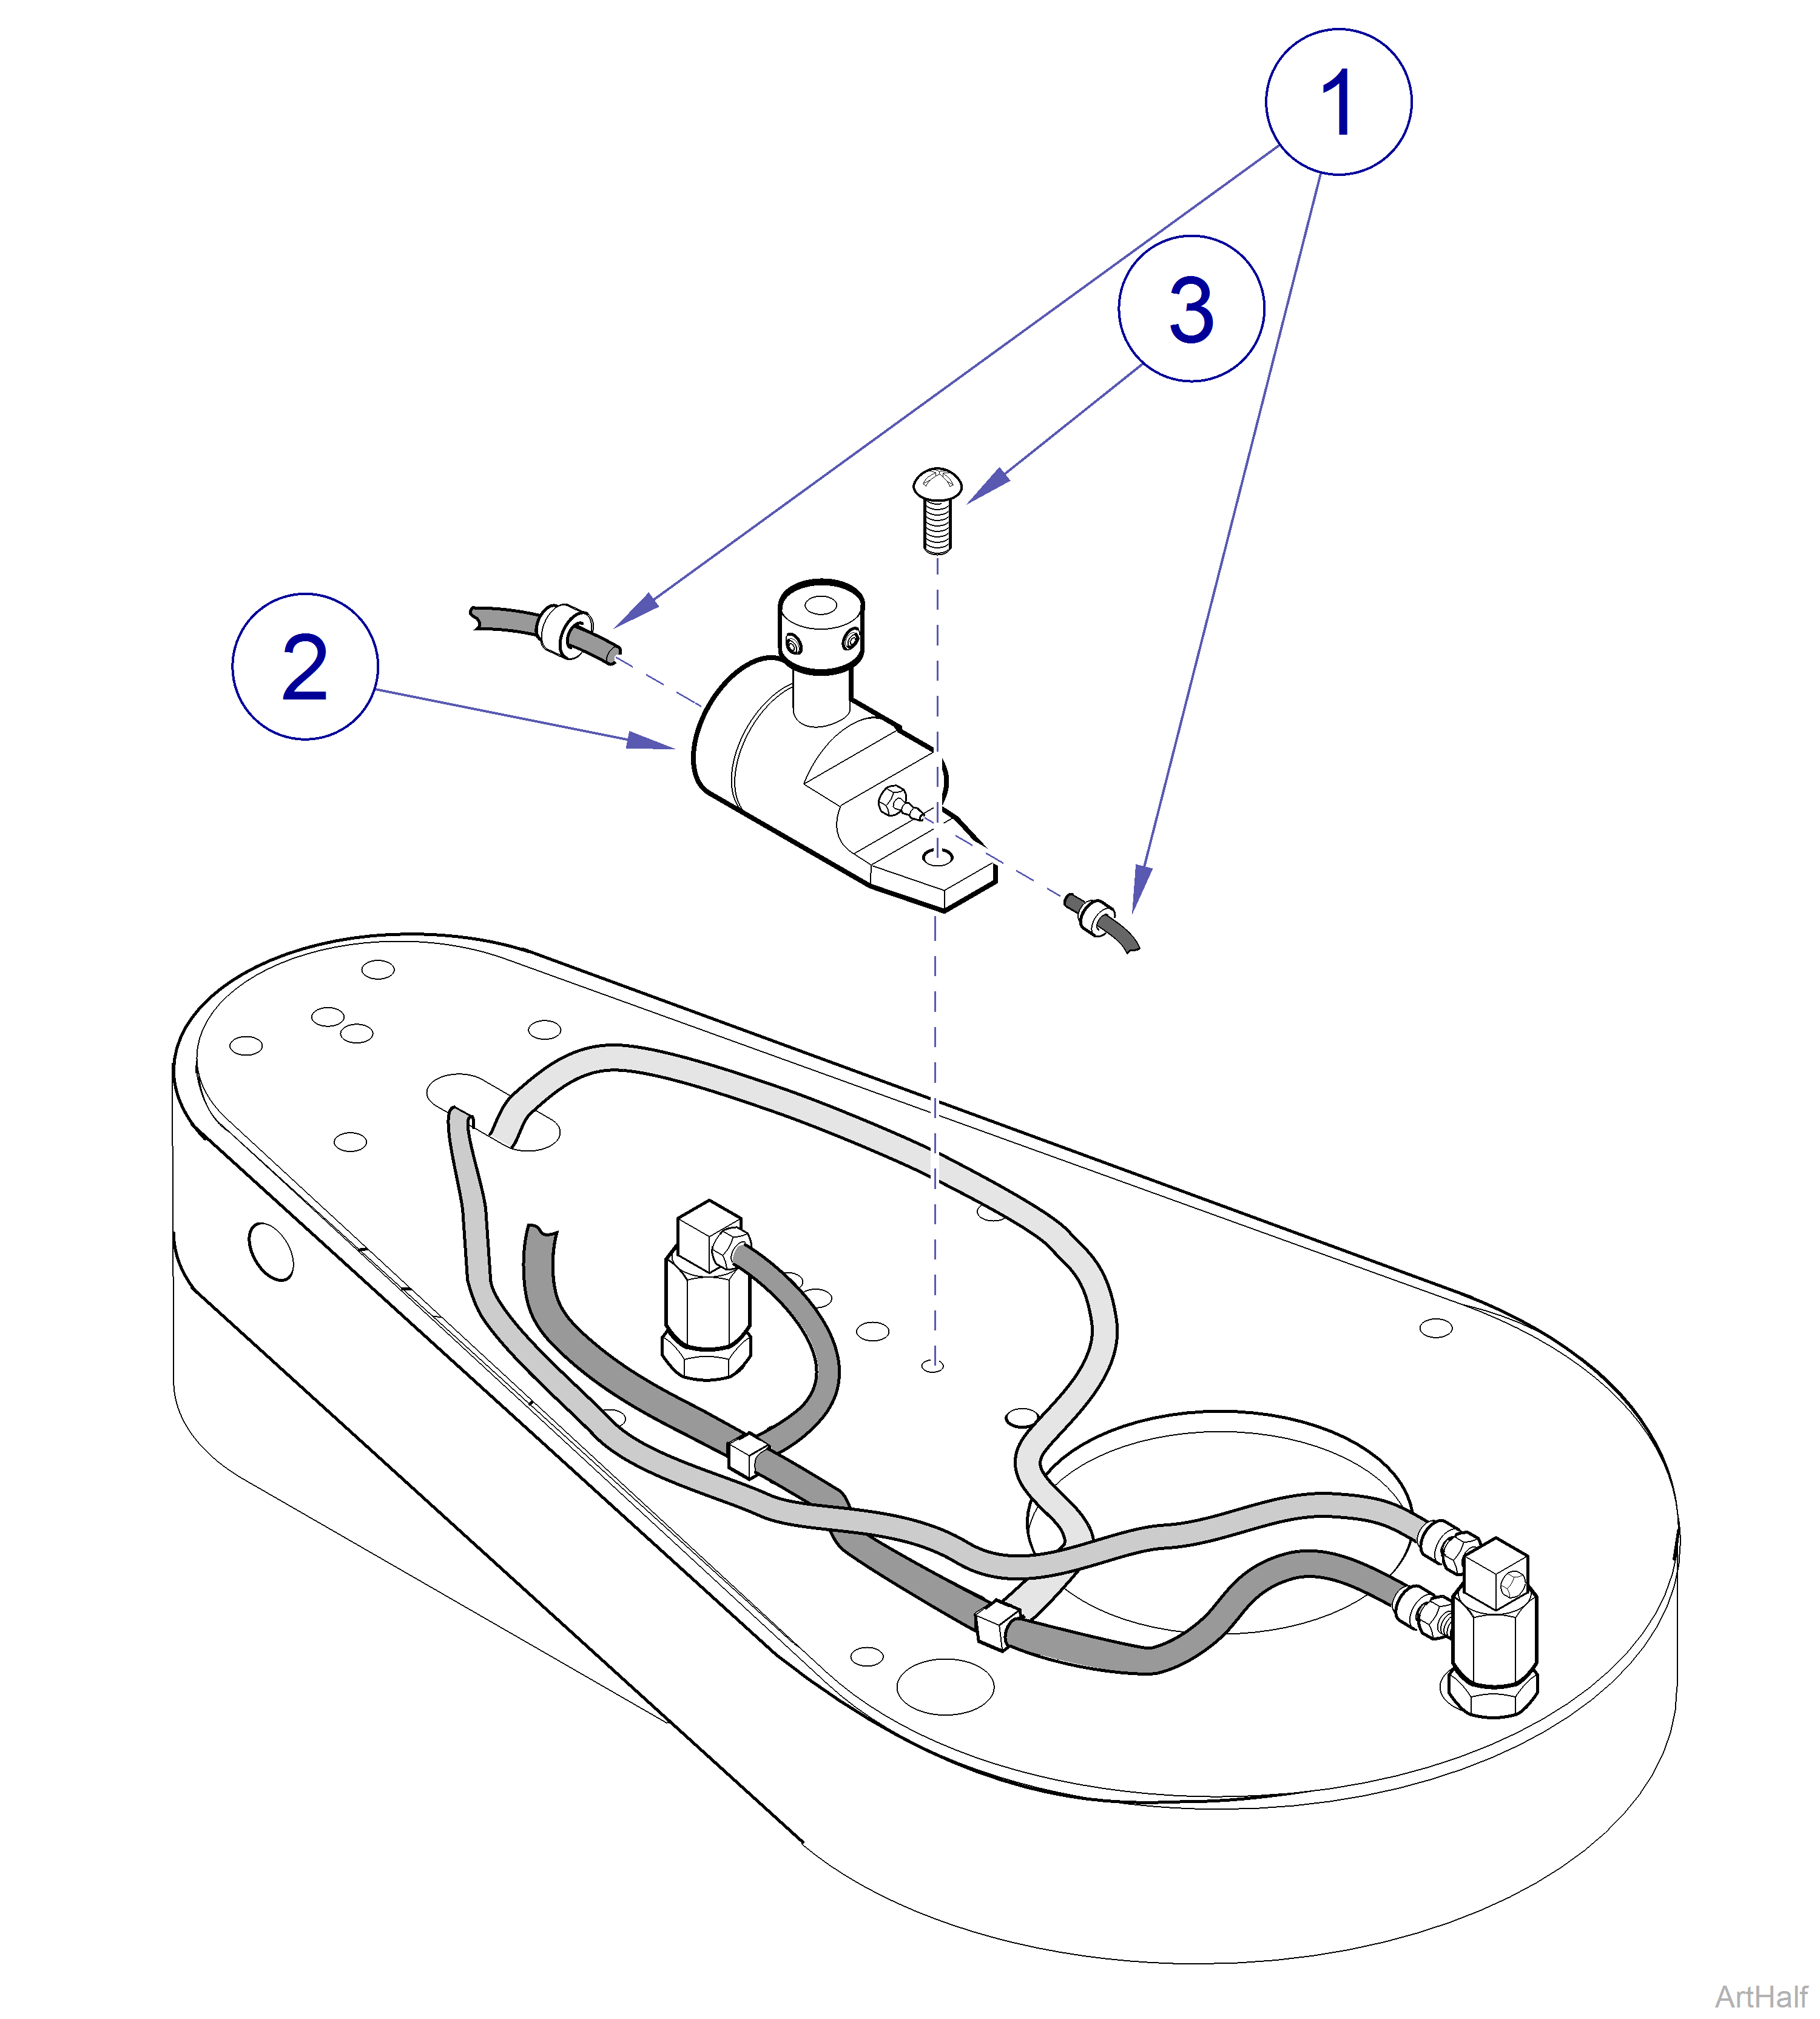
Cuspidor Water Valve - Earlier Model
1.Remove cuspidor bowl.
2.Tag and disconnect tubing (1) from water valve (2). Be sure tubing clamps remain on tubing. They will be used when new valve is installed.
3.Remove screw (3) and water valve (2).
1.Install water valve (2) and secure with screw (3).
2.Connect tubing (1) to water valve (2). Use tubing clamps to secure tubing to water valve fittings.
3.Install cuspidor bowl.
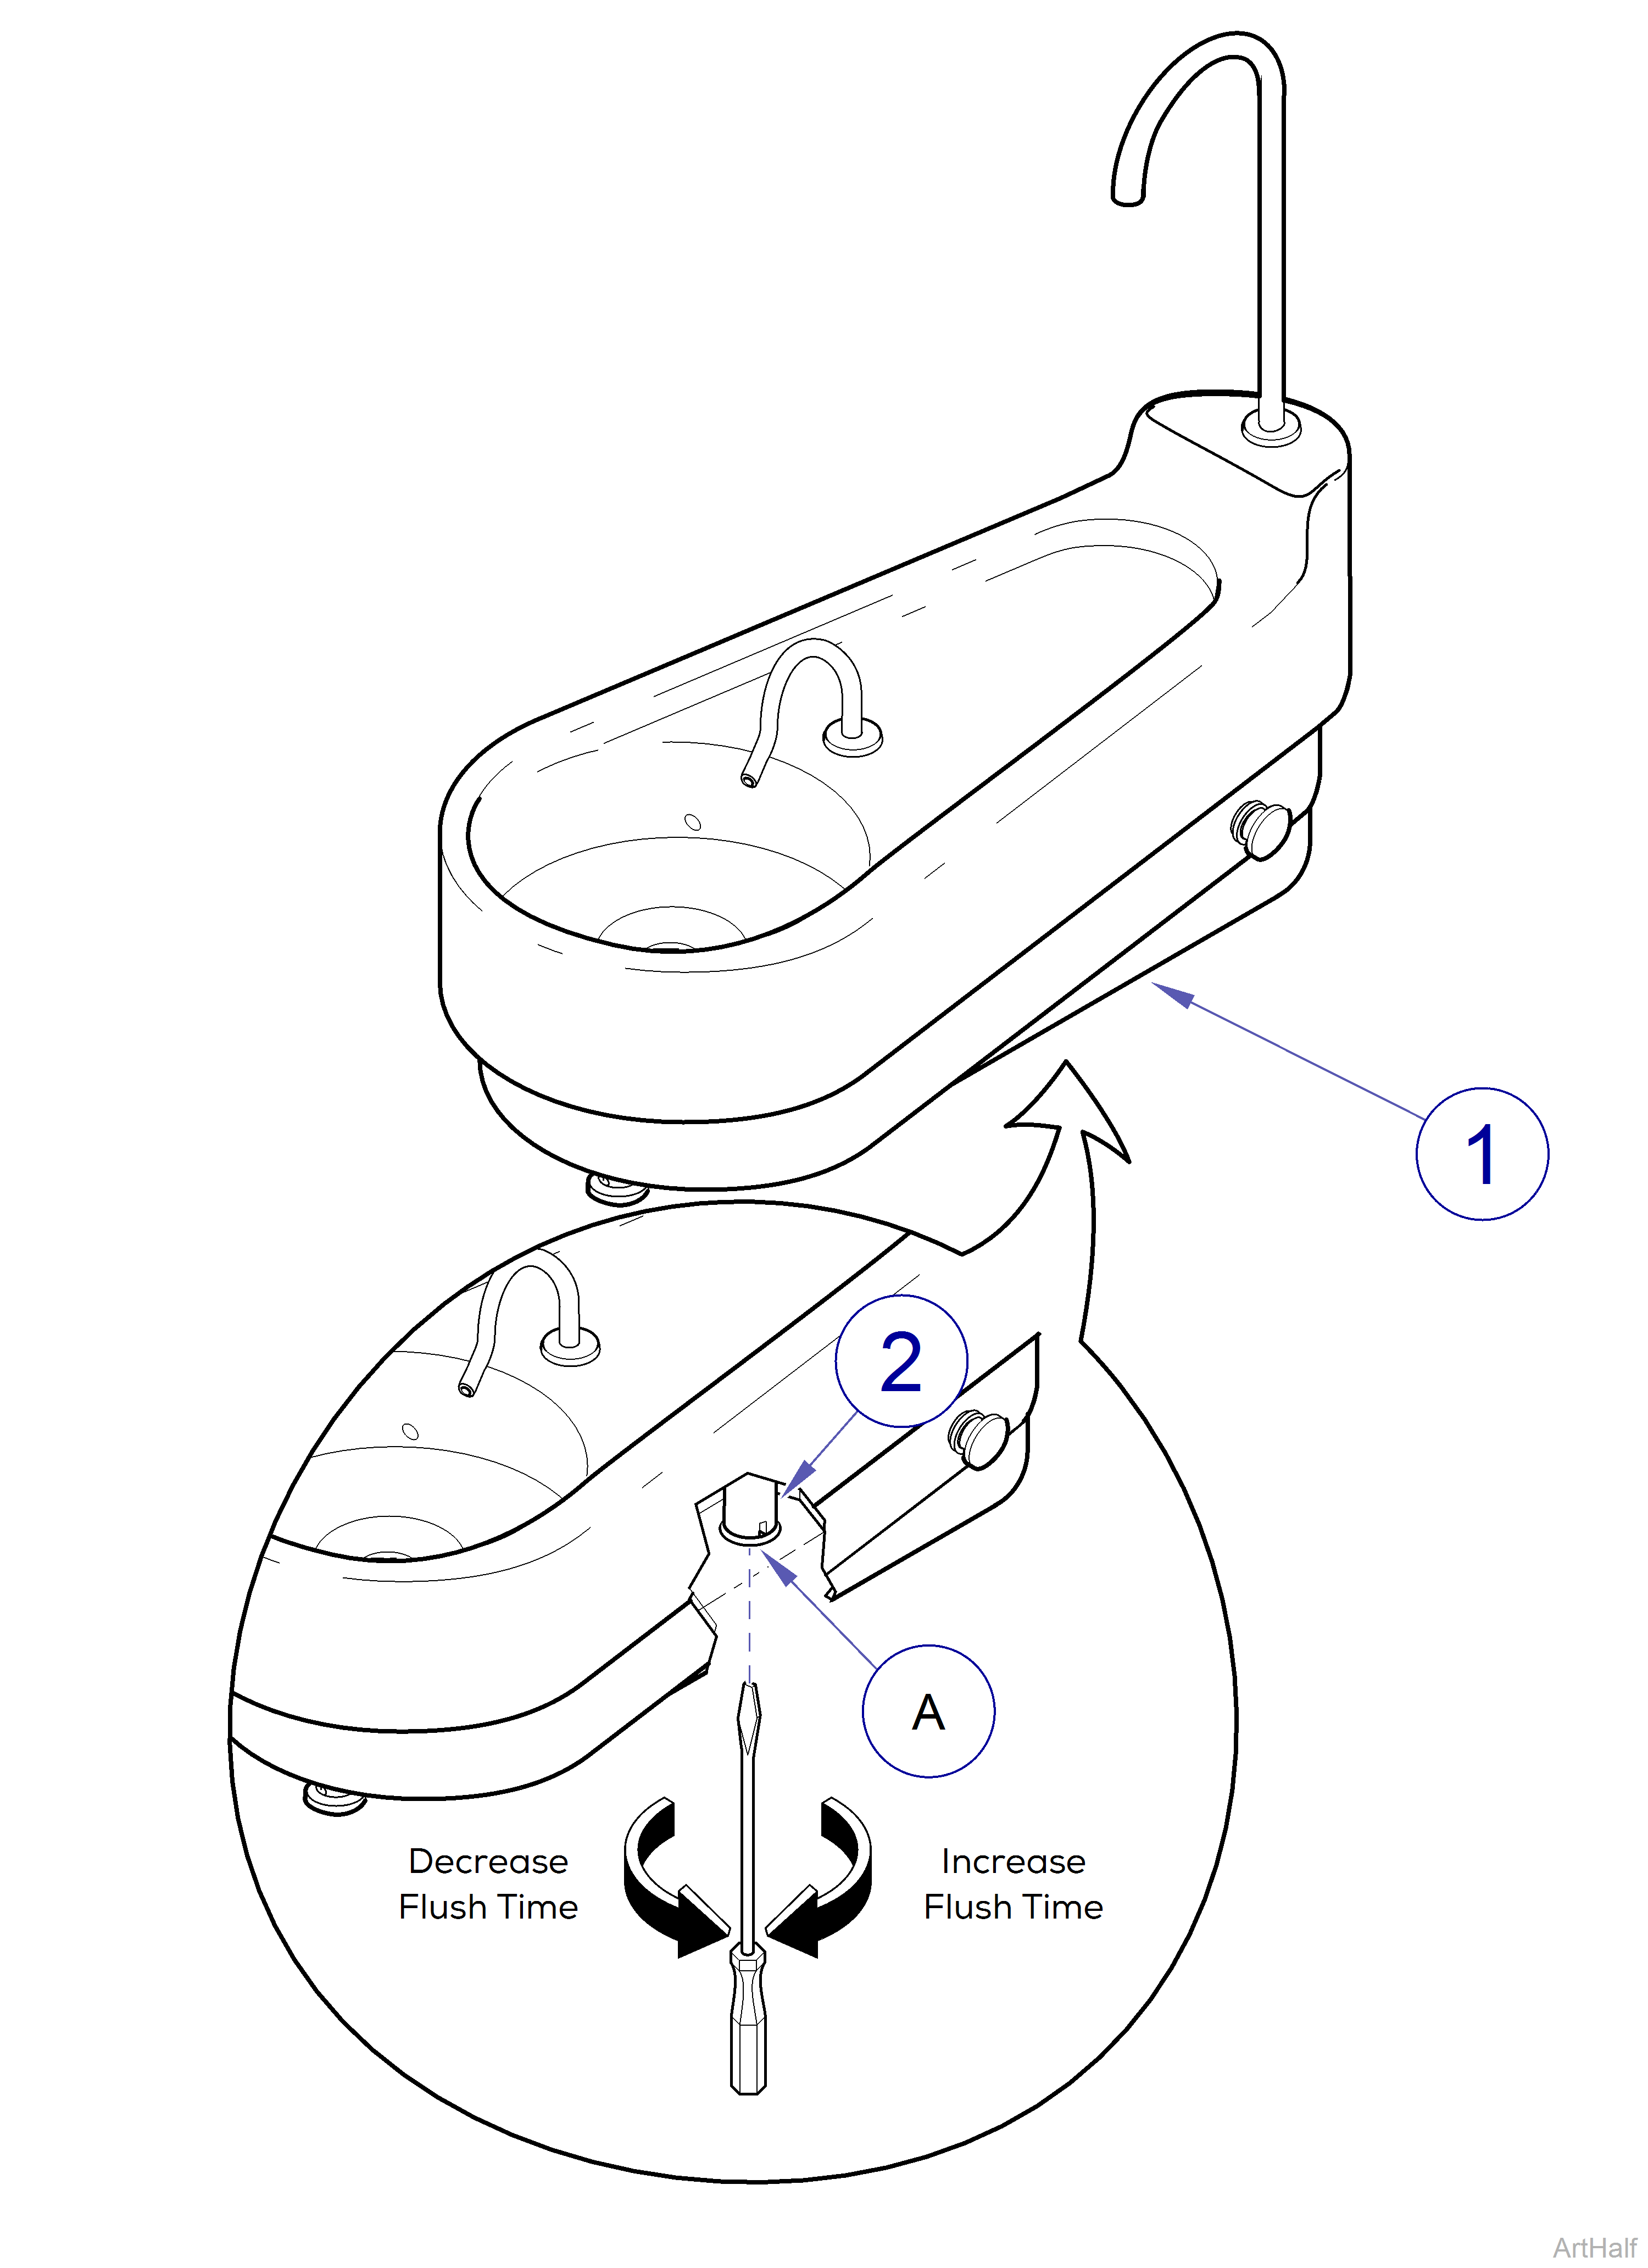
Cuspidor Bowl Flush Valve Adjustment - Earlier Model
Bowl Flush Valve Adjustment
This procedure adjusts the length of time that the cuspidor bowl rinse faucet runs after the flush button is pressed. Factory setting: 20 seconds.
1.Insert a large flat-headed screwdriver thru hole (A) in lower housing (1).
2.To increase cuspidor flush time: Turn bowl flush adjuster (2) counterclockwise.
3.To decrease cuspidor flush time: Turn bowl flush adjuster (2) clockwise.
4.Press flush button (3). Repeat procedure until desired flush time is achieved.
