Biltmore/Knight Chairs Operational Test and Repair
Operational Test
In order to effectively diagnose a malfunction of chair, it may be necessary to perform the following operational test:
Refer to the Operator’s Manual for complete instructions on operating the chair. Failure to do so could result in personal injury.
The Operational Test, for the most part, only describes what should happen when chair is operated. If the chair does something other than described, a problem has been discovered. Refer to: Troubleshooting to determine cause of problem and its correction.
When performing various checks with chair plug in and covers off use extreme care to prevent accidental electrical shock. Failure to comply could cause severe injury.
1.Plug chair power cord into a grounded, non-isolated, correctly polarized outlet, that has proper voltage for chair.
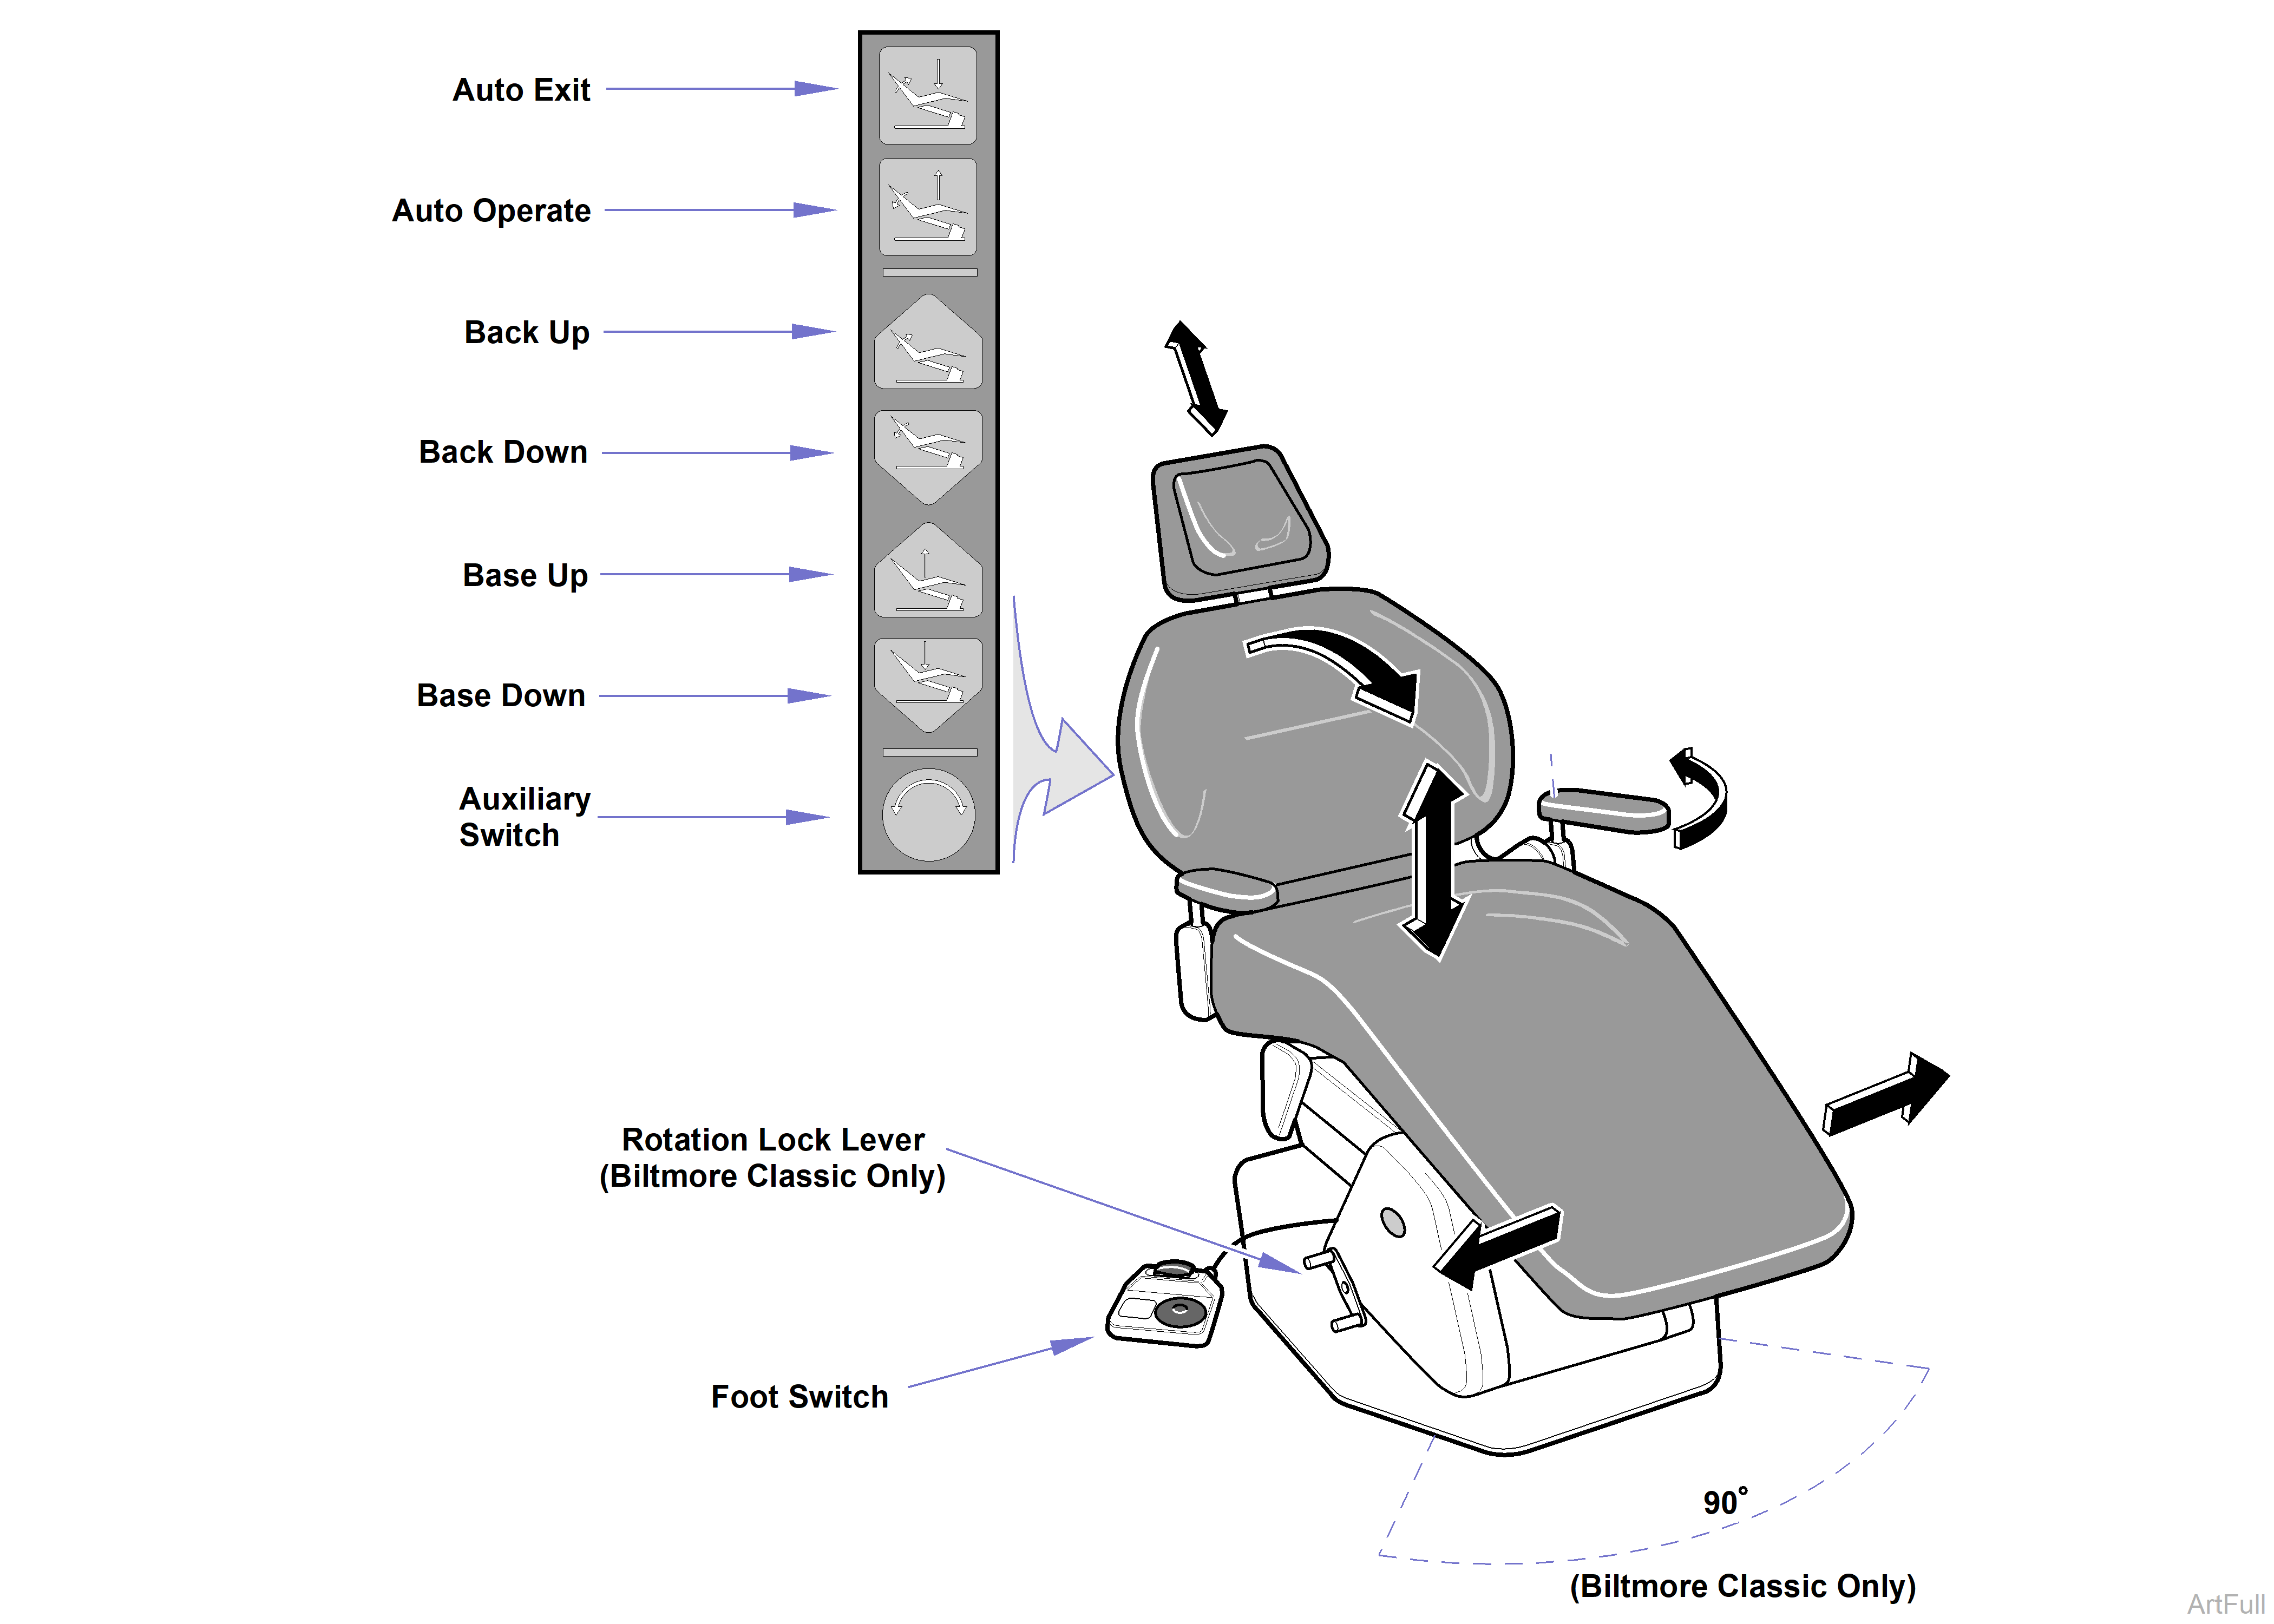
2.Depress Back Up, Back Down, Base Up, and Base Down buttons on membrane switch panel.
Observe. Chair should move in direction corresponding to button being depressed. No motor should make excessive squealing noises. Movement should be steady and should match speed and range of motions listed below:
| Movement | Chair Speeds +/- 3 seconds |
|---|---|
| Back Up to Back Down | 15 seconds |
| Back Down to Back Up | 15 seconds |
| Base Up to Base Down | 15 seconds |
| Base Down to Base Up | 15 seconds |
| Range of Motion | +/- 2 degrees |
|---|---|
| Back Up | up to 82 degrees above horizontal |
| Back Down | down to 14 degrees above horizontal |
3.Place a 325 lb. (147.4 kg.) weight on center of seat section of chair.
Observe. Seat section should not drift downward under weight.
4.Depress Base Up and Base Down buttons on membrane switch panel.
Observe. Base motor should not squeal or make excessive noise when lifting weight. Base motor should be able to lift weight. Movement should be steady.
5.Remove weights from chair. Then, place a 100 lb. (45.4 kg.) weight on center of back section of chair (with back section at approximately 45º above horizontal).
6.Depress Back Up and Back Down buttons on membrane switch panel.
Observe. Back motor should not squeal or make excessive noise when lifting weight. Back motor should be able to lift weight. Movement should be steady.
7.Remove weights from chair.
8.Run Back Up function all the way up and Base Down function all the way down.
Both Back Down Program and Base Up Program limit switches are manually adjustable limit switches which allow an operator to “manually program” where chair will stop when using Auto Operate function.
9.Depress Auto Operate button on membrane switch panel.
Observe. Back Down function should run until its limit switch is tripped (Back Down Program limit switch), stopping it. Base Up function should run until its limit switch is tripped (Base Up Program limit switch), stopping it. Check both limit switches to verify that they were tripped.
10.Depress Auto Exit button on membrane switch panel.
Observe. Back Up function should run until its limit switch trips (Back Up limit switch), stopping it. Base Down function should run until its limit switch trips (Base Down limit switch), stopping it. Check both limit switches to verify that they were tripped.
11.Slide headrest in and out stopping at different positions. Push gently against headrest at each position.
Observe. Headrest should not require excessive force to position. When in a position, headrest should not move when a slight pressure is applied.
12.Rotate chair top until it hits a stop. Then rotate chair top in opposite direction until it hits a stop.
Observe. Chair top should rotate smoothly and easily; not requiring excessive force. The chair top should be able to be rotated from stop to stop which is 90° or 45° in each direction from centerline of chair.
13.Depress Rotation Lock lever to locked position. Attempt to rotate chair top.
Observe. Chair top should not be able to be rotated when Rotation Lock lever is engaged.
14.Rotate armrests out of way to side. Return each armrest back to normal position.
Observe. Armrests should be able to be rotated out of way easily and should not require excessive force. When armrests are returned they should detente into their normal position without excessive side-to-side play.
15.Depress Back Up, Back Down, Base Up, Base Down, Auto Exit, and Auto Operate buttons on foot control.
Observe. When each of the buttons on foot control are depressed, appropriate function should activate.
16.Depress Auto Exit (Yellow) and /or Base Down membrane or foot switch. As chair descends, push upward on bottom lift arm cover until one or both of the Safety Bail Limit switches operate.
Observe. When bottom lift arm cover contacts and operates Safety Bail Limit switch(es) chair should immediately stop its descent. Releasing bottom lift arm cover, returning Safety Bail Limit switch(es) to normally closed position, chair should continue to descend.
When in Auto Exit, after Back Section reaches its upward program position, returning Safety Bail switch(es) to the normally closed (NC) position will not cause Base to descend. Operating Base Down membrane or foot switch will cause chair to descend.
