PowerVac® P Motor Test and Repair
On some units the electric motor is located on an adjustable motor mount, but in all cases is easily accessible. On some units a thermal overload switch is located on the side of the motor. The belt drive motor is a 2 HP single phase, 208-230 volt motor.
Unit may start without warning.
The On/Off switch controls only the secondary circuit power. The main power source must be turned off to remove all power in the control box. Capacitors must be discharged before touching to remove.
1.Turn off power at on/off switch and power supply box.
2.Remove front cover. Remove belt and verify motor pulley spins freely. If it doesn't, replace motor, bearing is out in motor. If it does, continue checks. Refer to: Front Cover
3.Check belt tension on earlier models. Refer to:Belt Adjustment
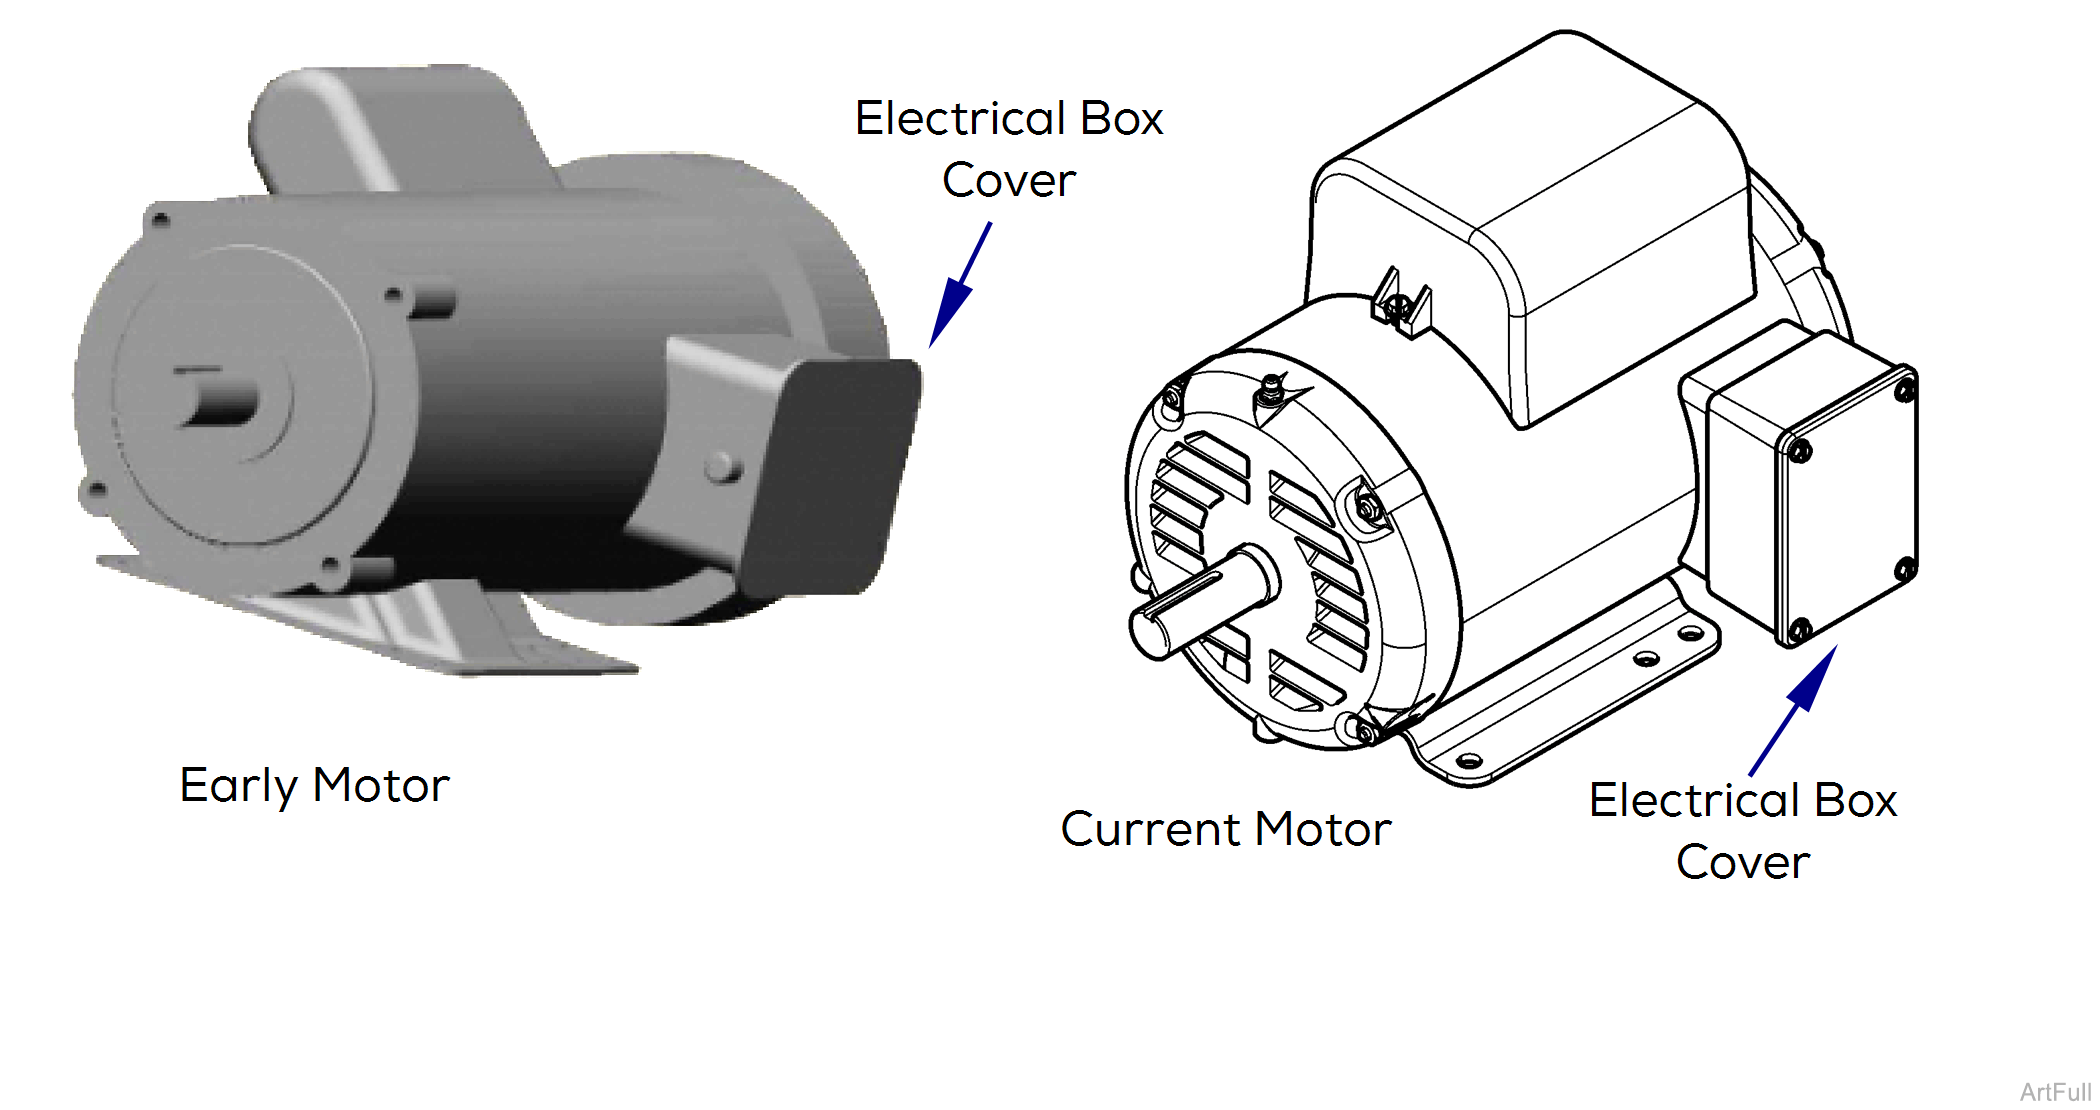
4.Remove electrical cover from motor. Verify all wires are connected.
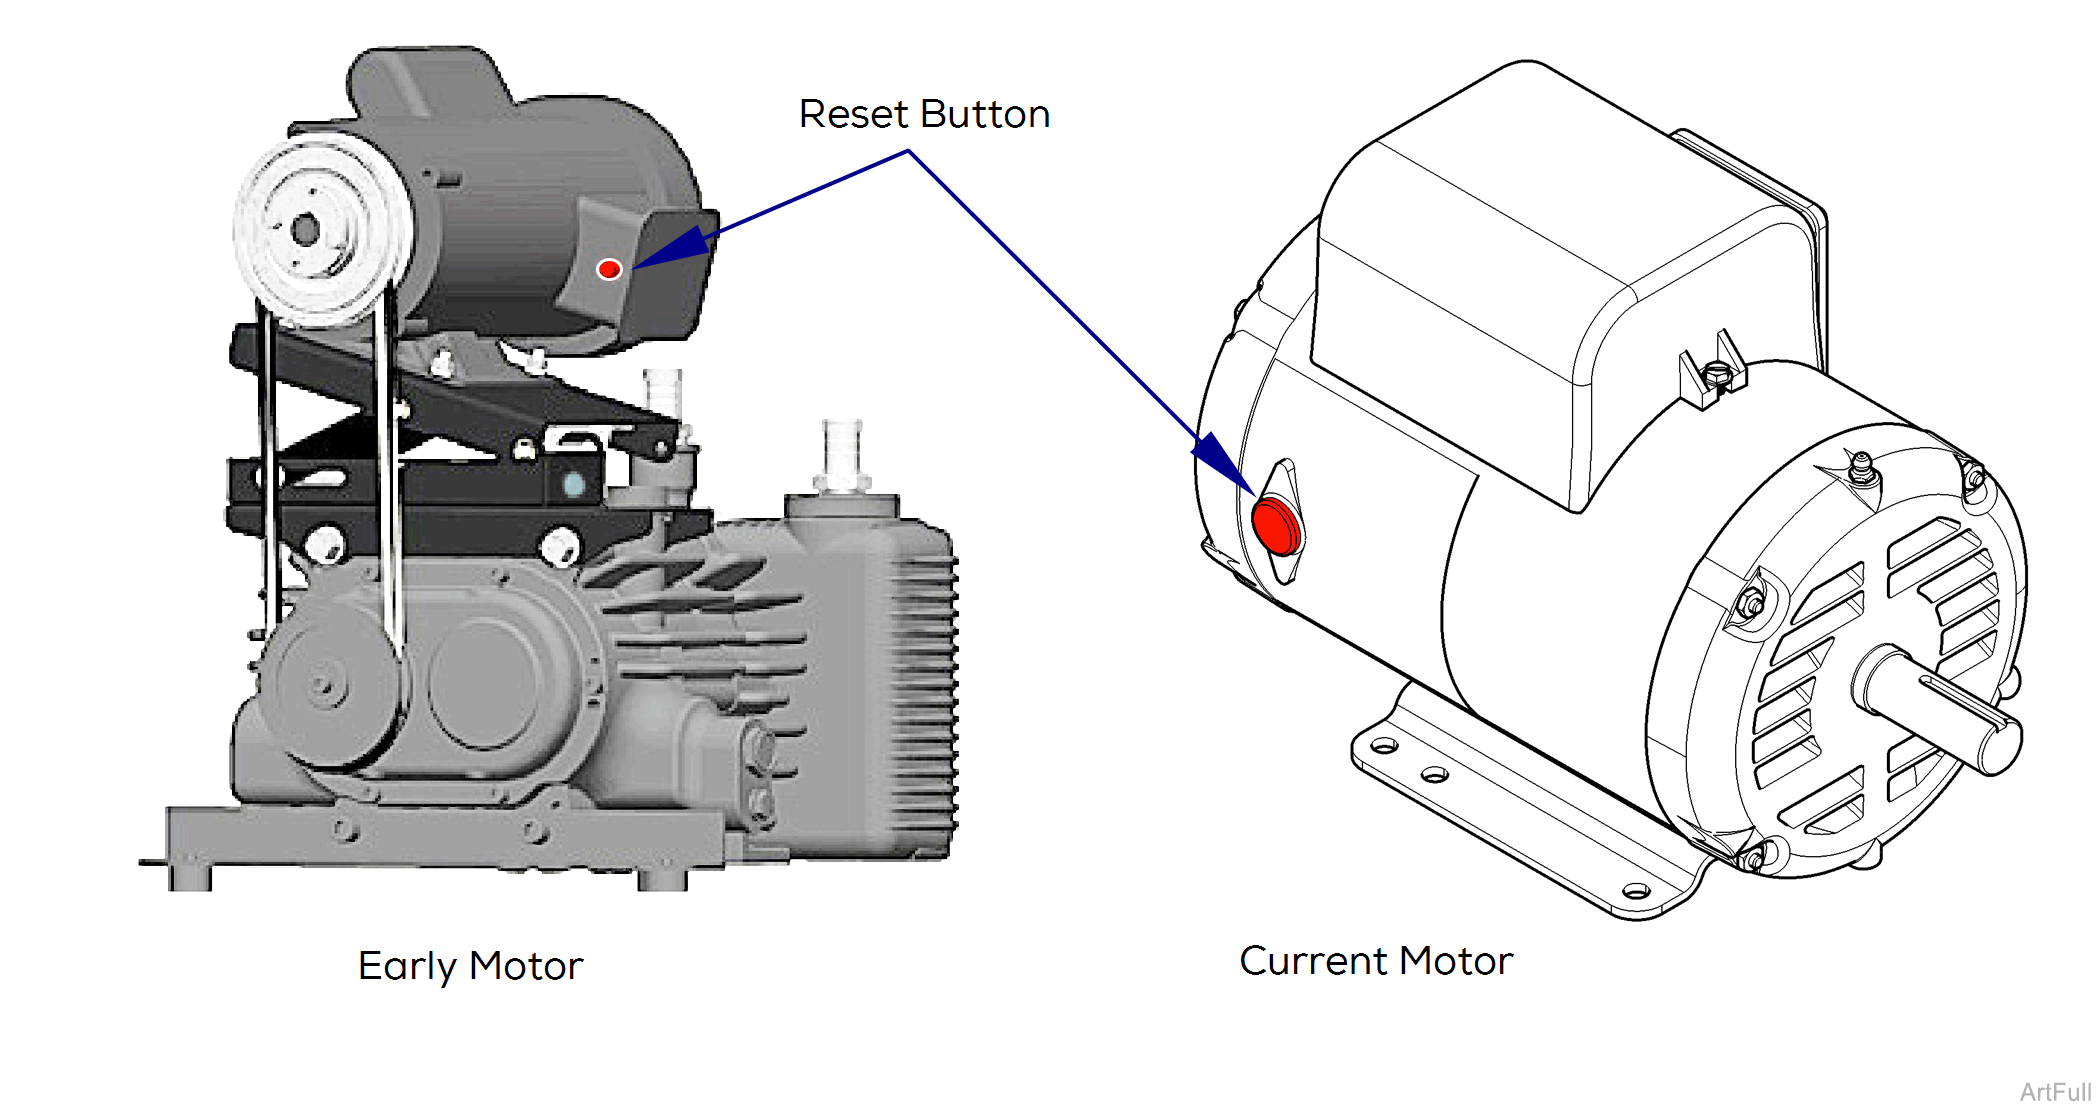
5.Reset Thermal Overload - Some versions.
Manual reset button on some versions. Other versions have automatic reset.
a. Allow motor to cool.
b.Press thermal overload button.
c.Install front cover.
d. Connect Power.
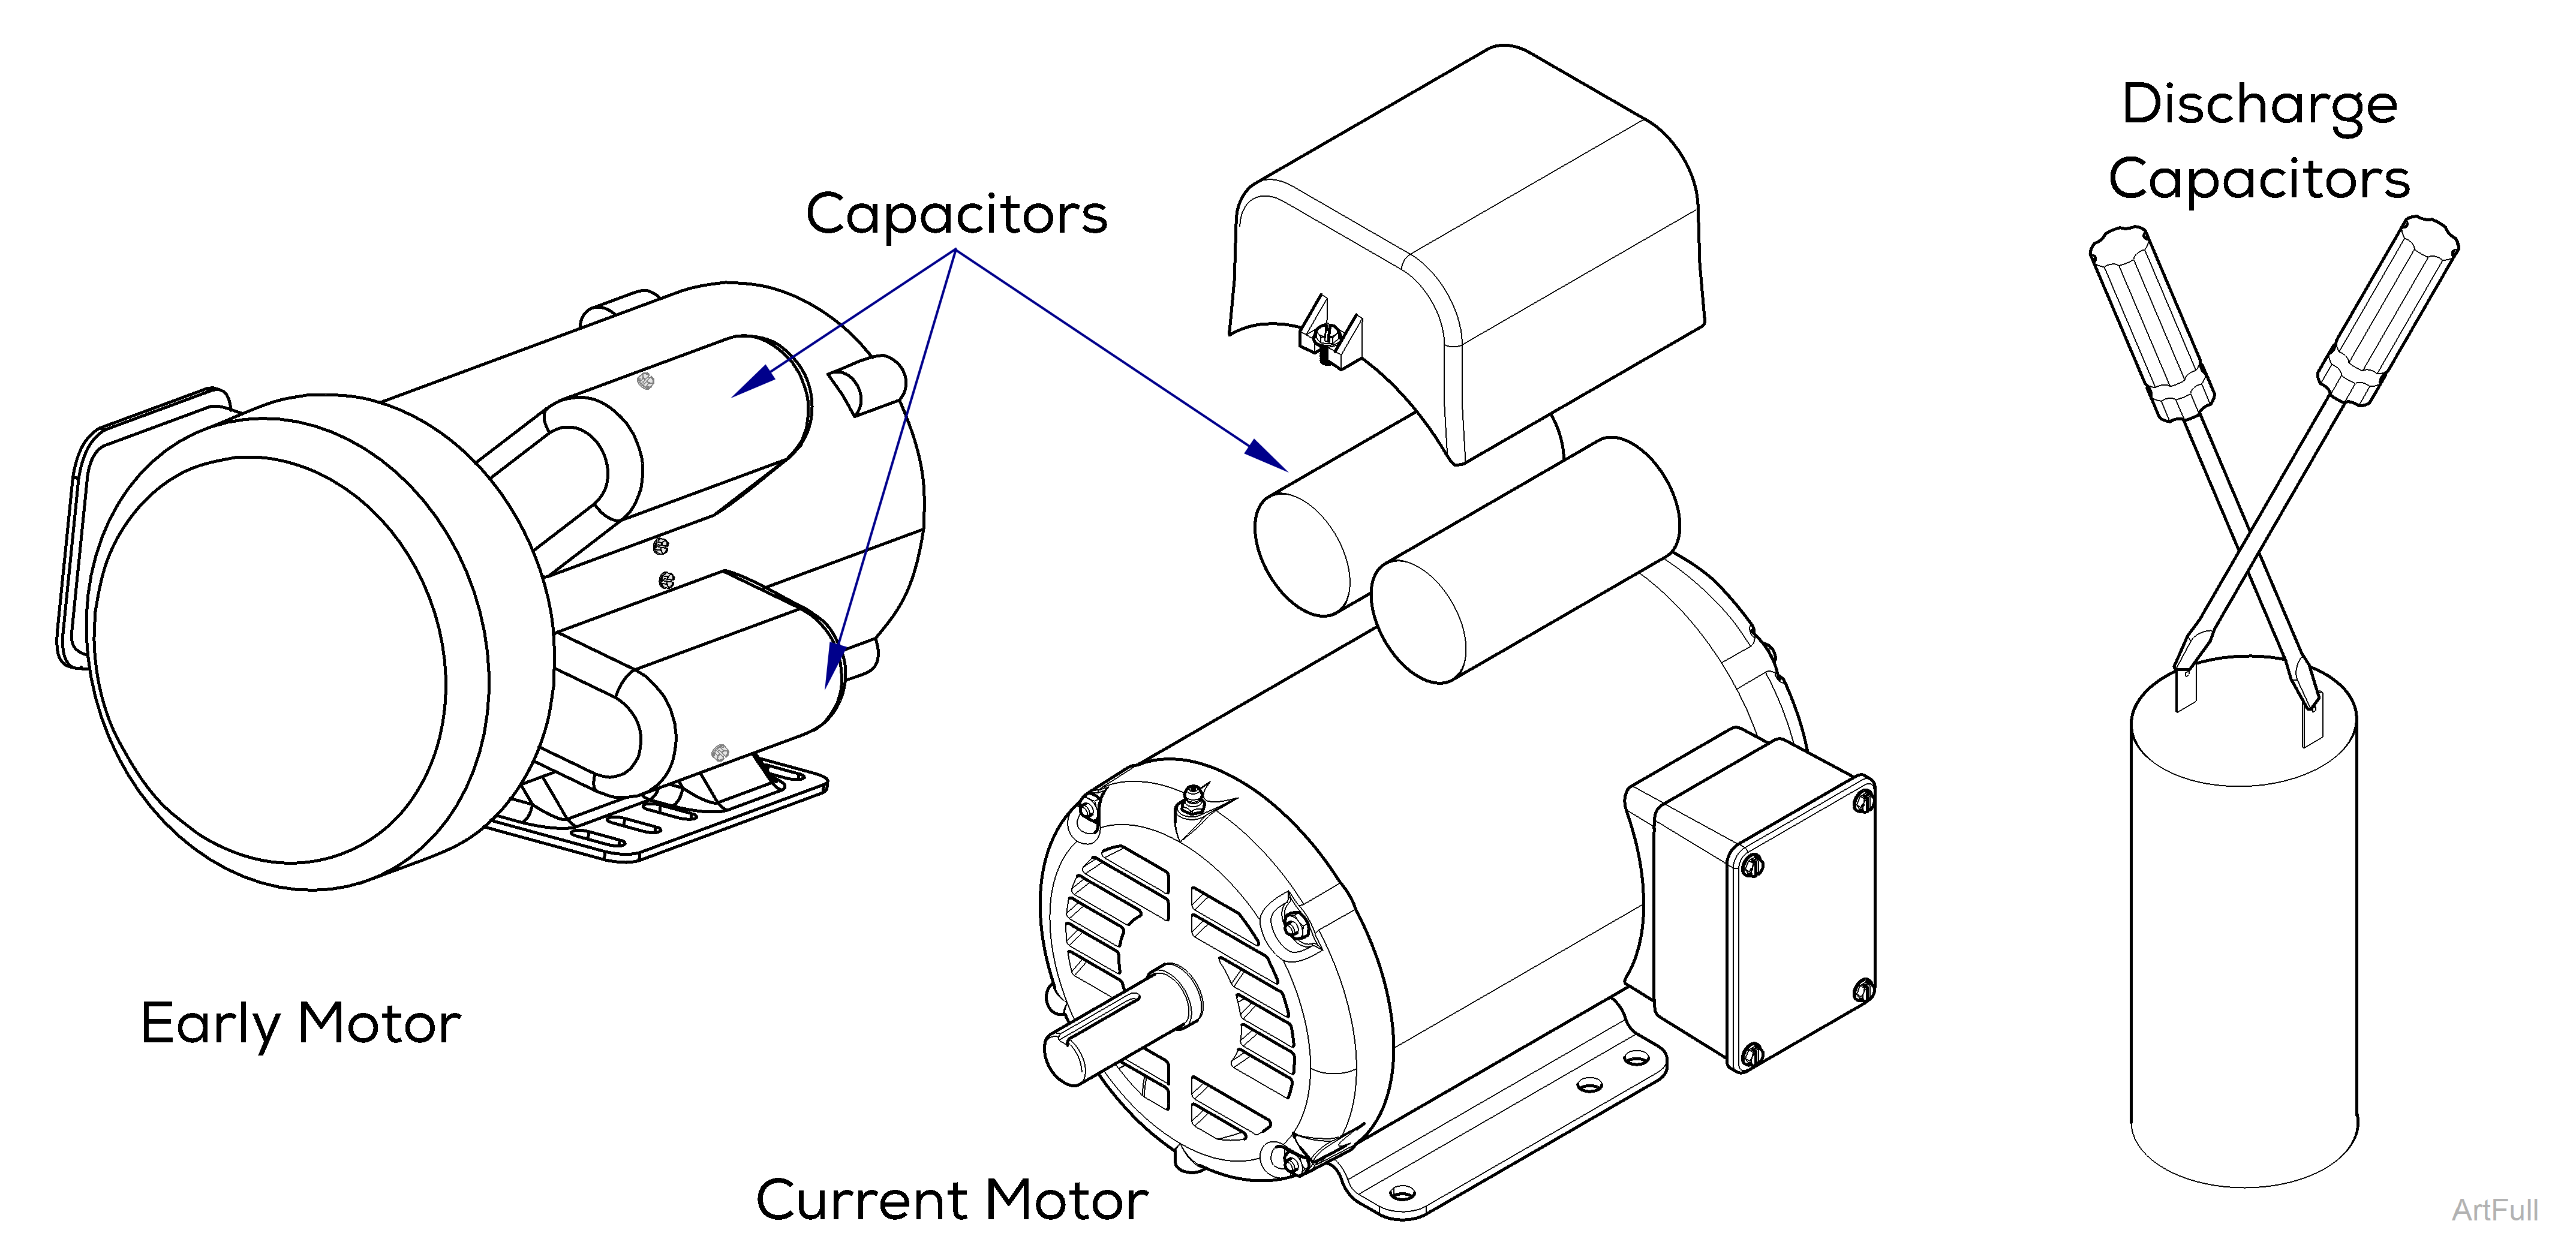
6.Replace Capacitor.
a.Access start and run capacitor by removing top cover and capacitor covers from motor.
b.Discharge capacitors by touching two screwdrivers to two contacts on a capacitor and to each other. Refer to: Top Cover
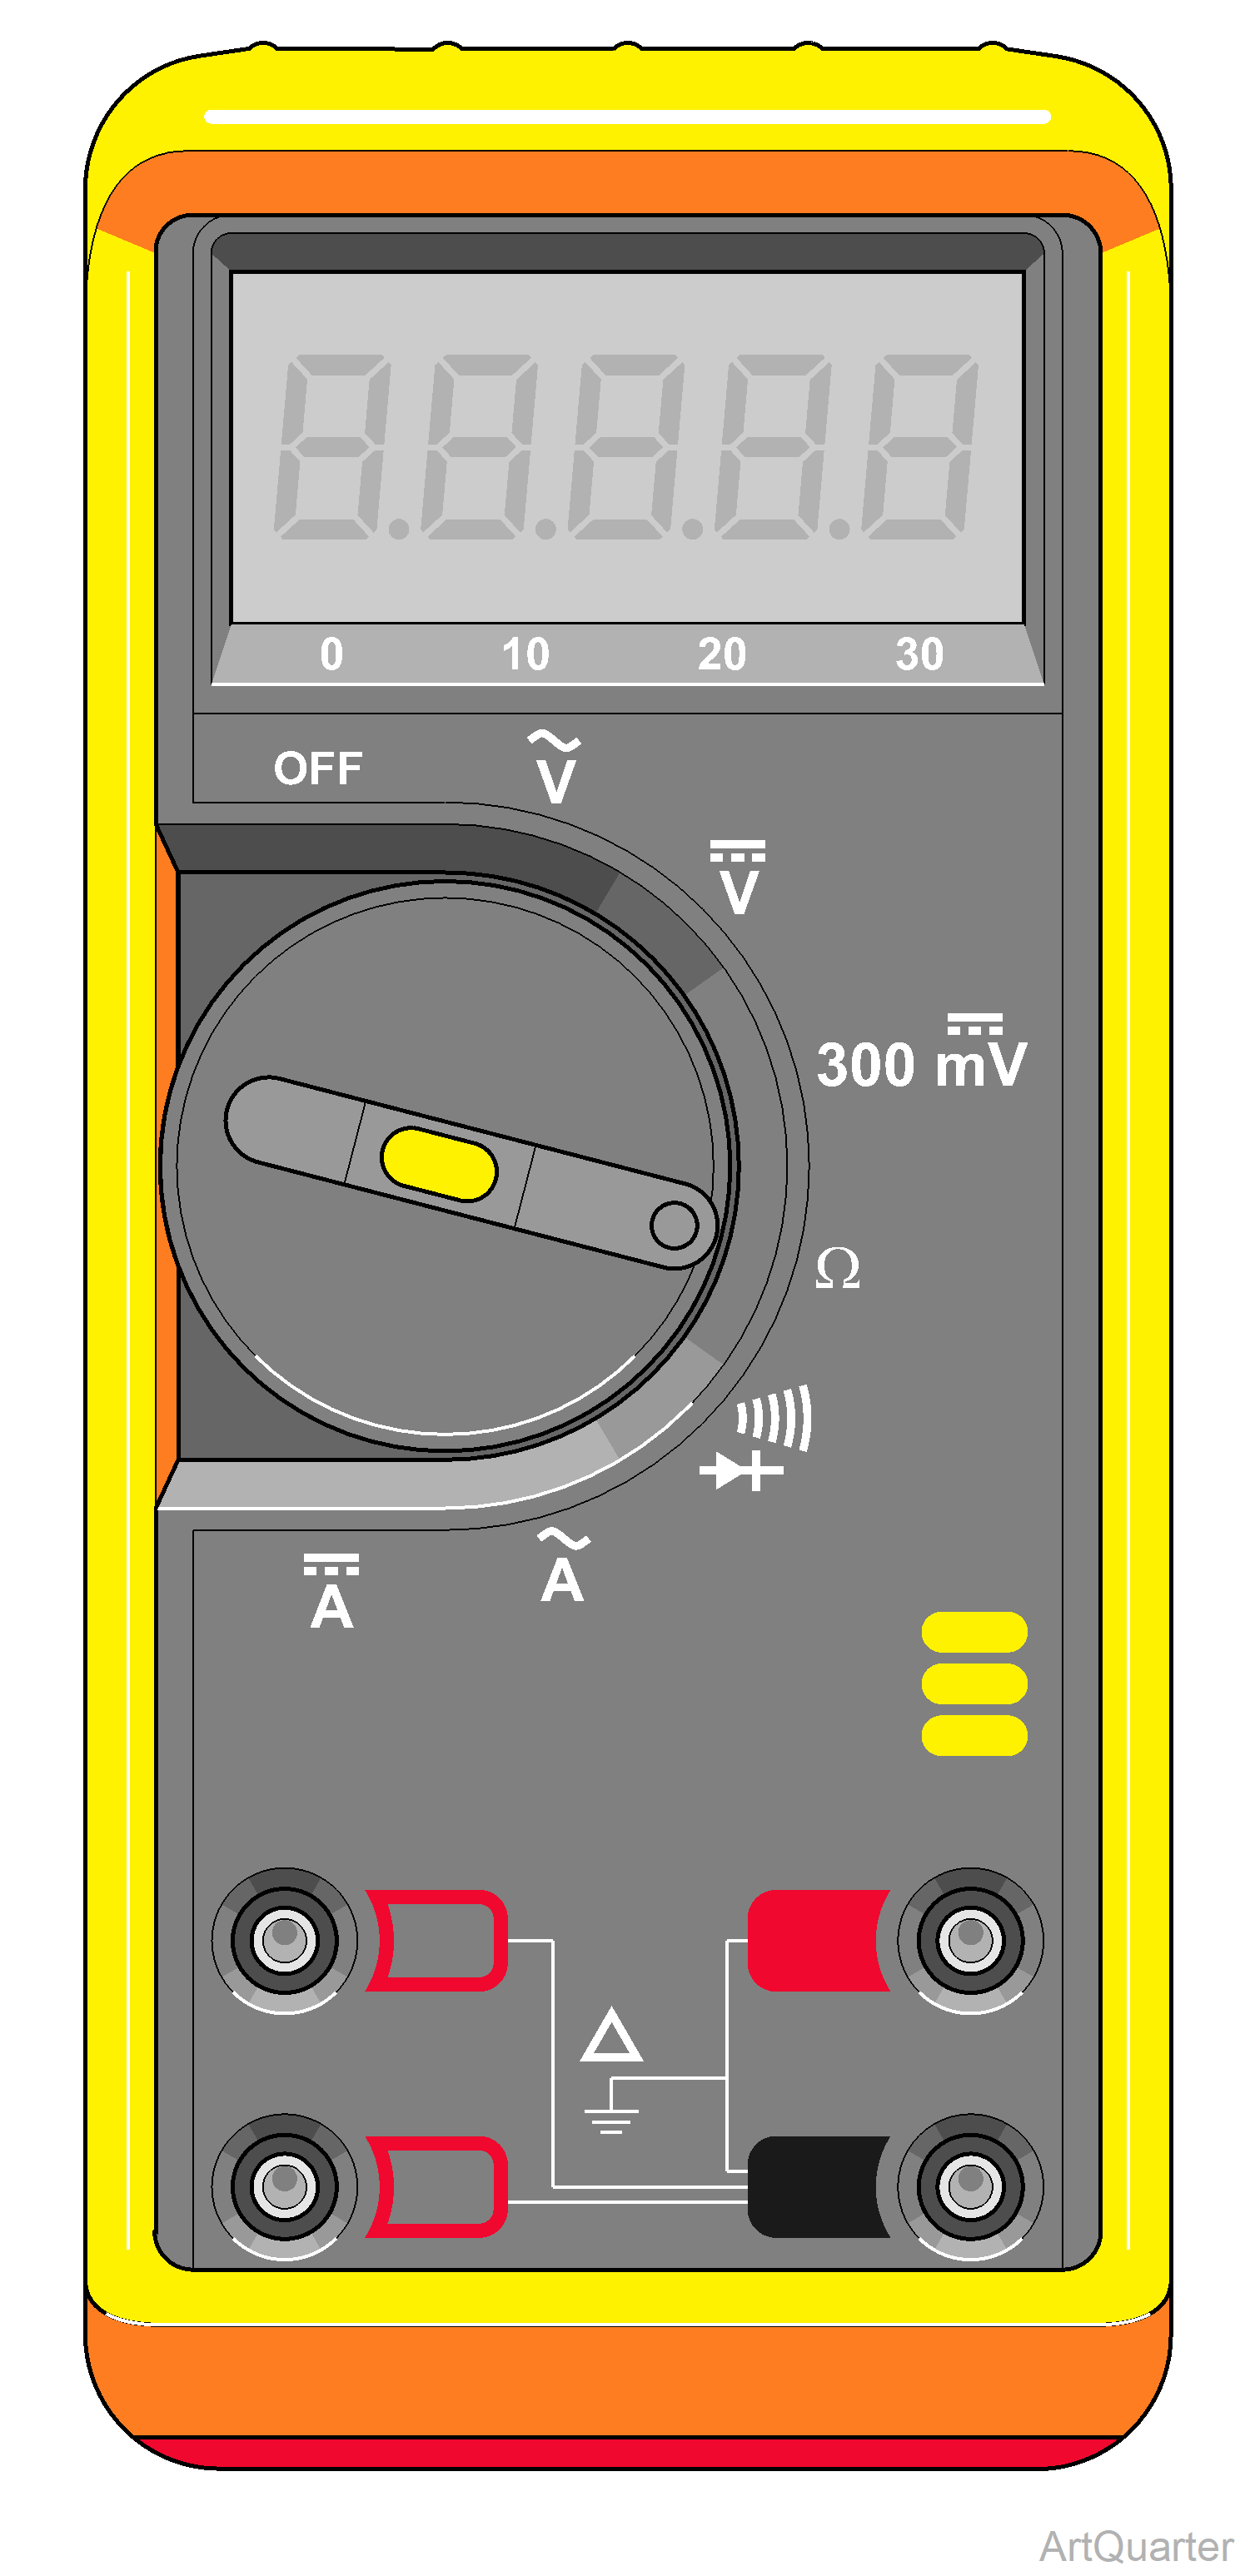
7.Set meter to highest Ω reading.
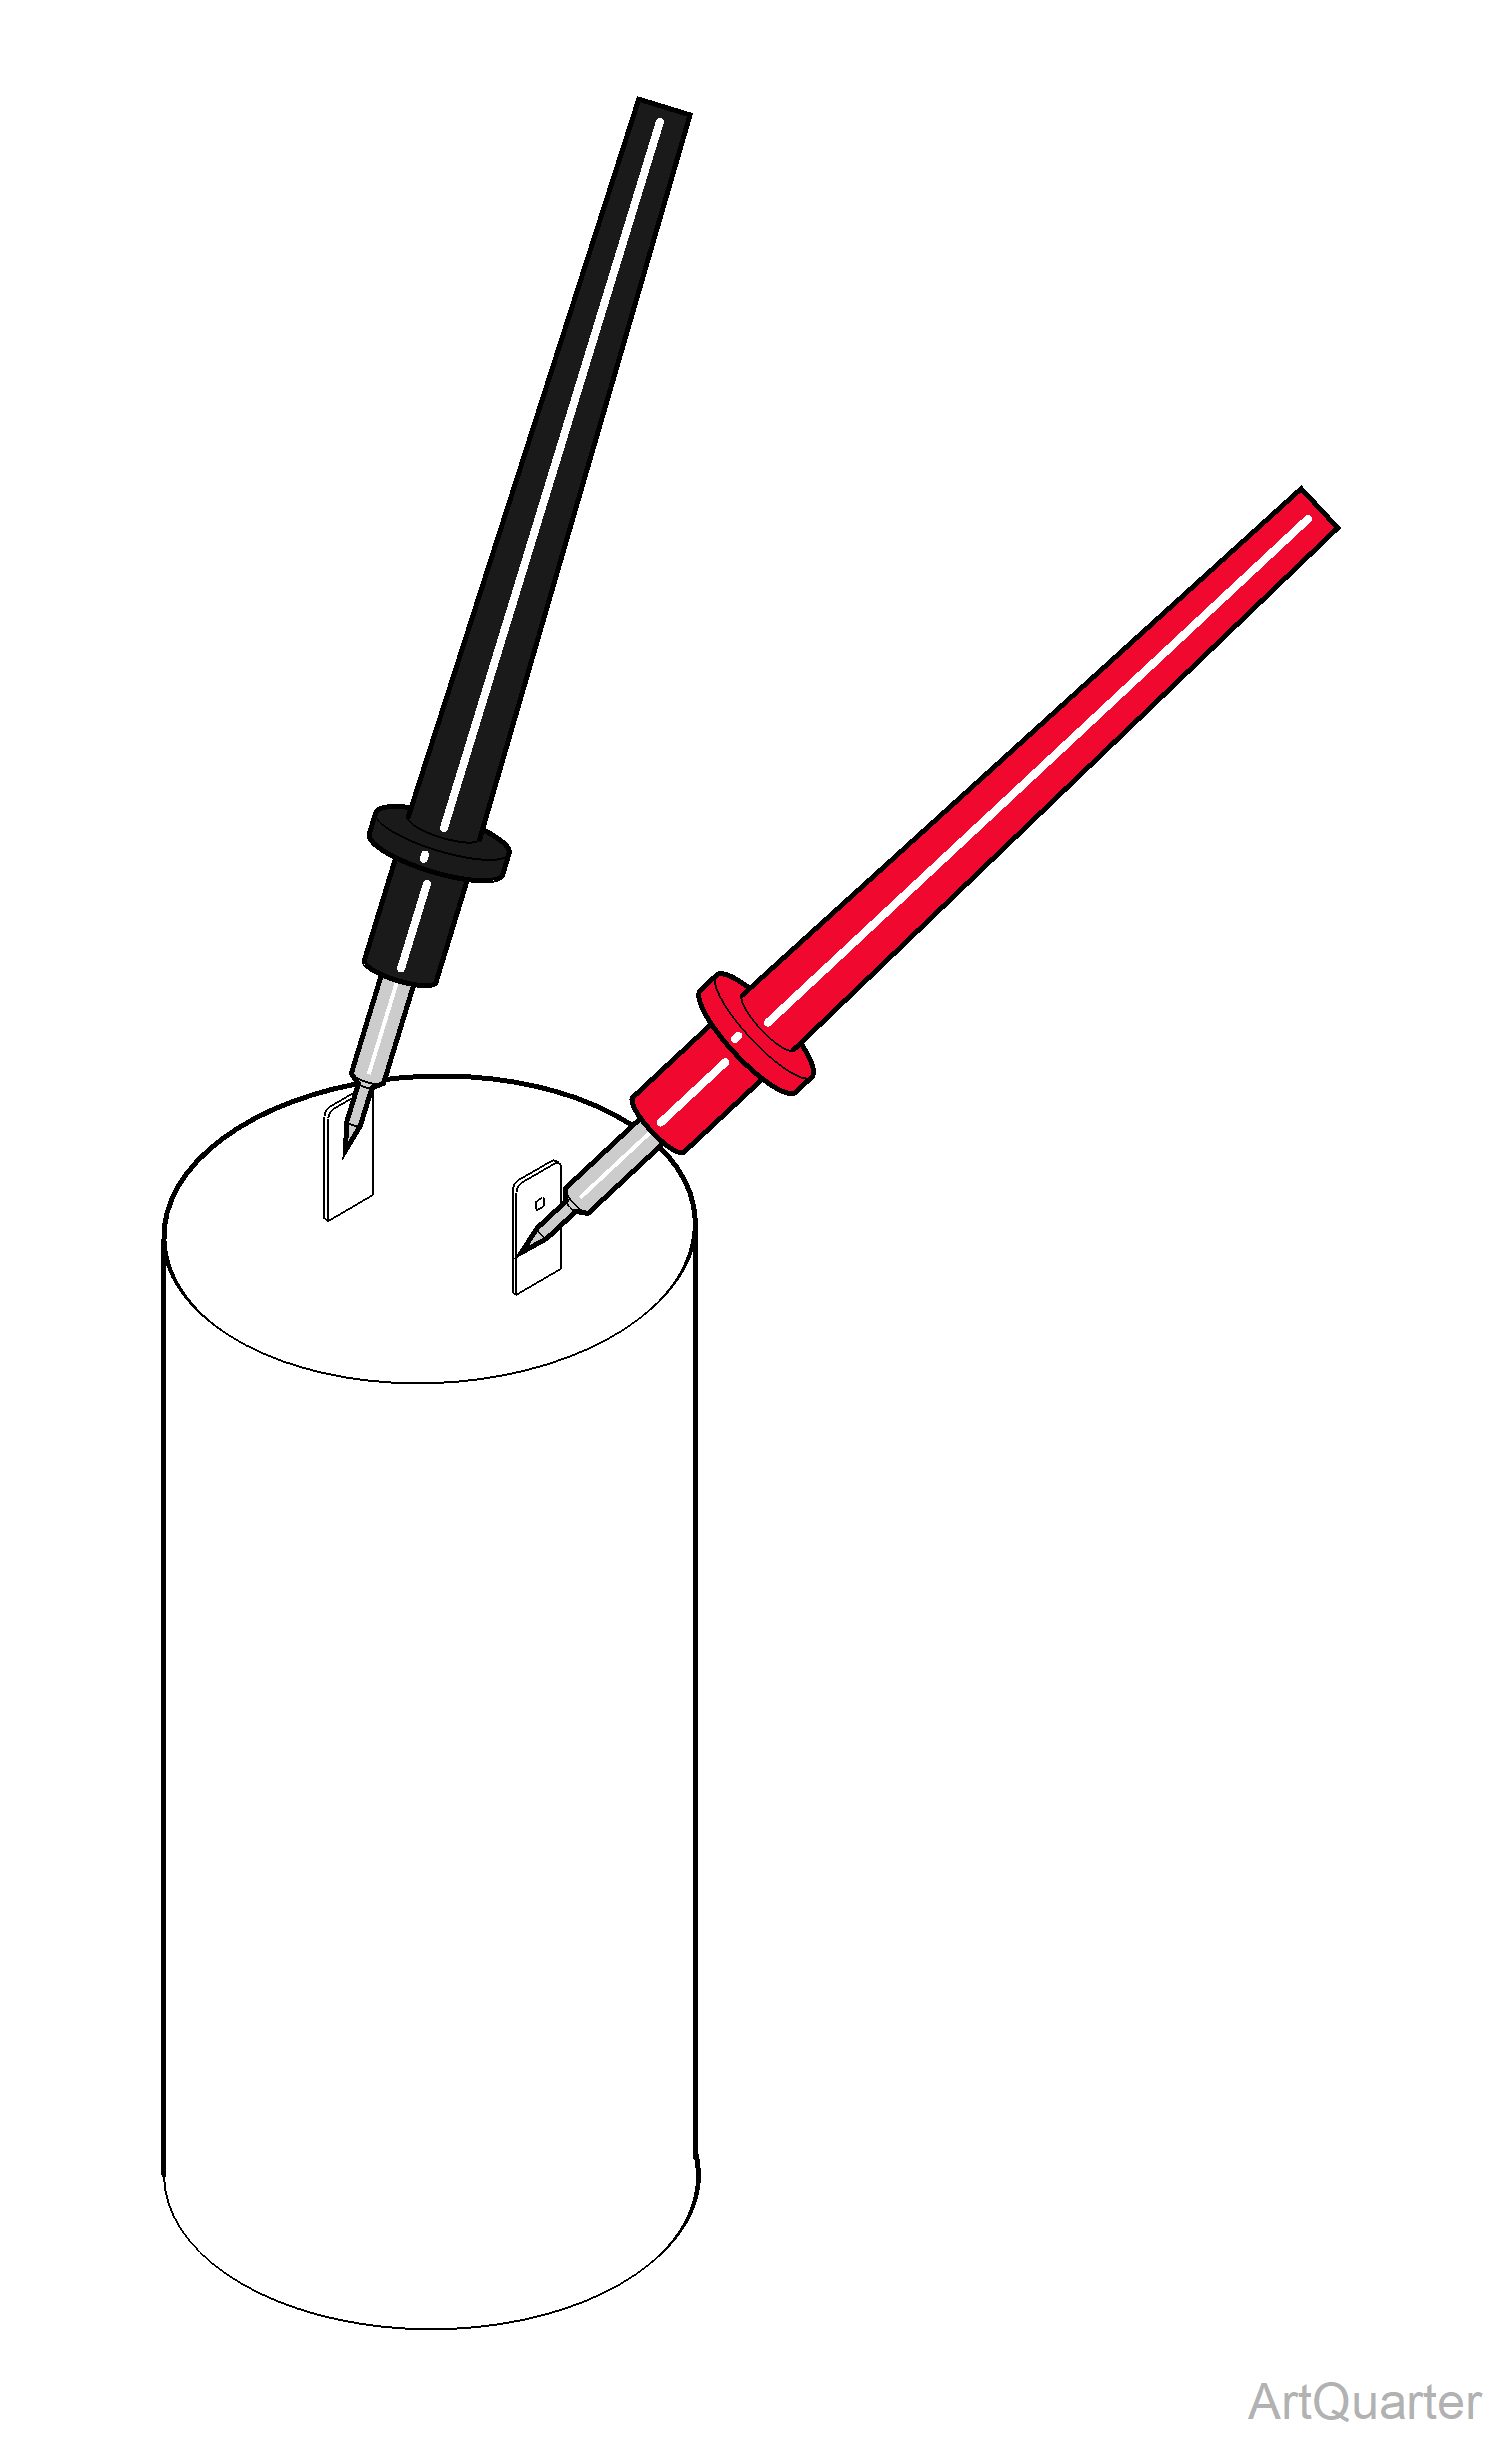
8.Place meter probes on capacitor connectors.
| Meter Reading | Status | Required Action |
|---|---|---|
| "O" or Open Reading |

|
Replace Capacitor. |
| Start Low and Increases |

|
Capacitor is Good. |
|
Model |
P3 | P5 | P7 |
| Serial Number | V245092 thru V784999 and 0611P3P0000 thru 0801P3P0611 | V245092 thru V784999 and 0611P5P0000 thru 0801P5P0240 | V245092 thru V784999 and 0611P7P0000 thru 0712P7P0104 |
The On/Off switch controls only the secondary circuit power. The main power source must be turned off to remove all power in the control box.
1.Disconnect power at on/off switch and main power supply box.
2.Remove front cover. Refer to: Front Cover
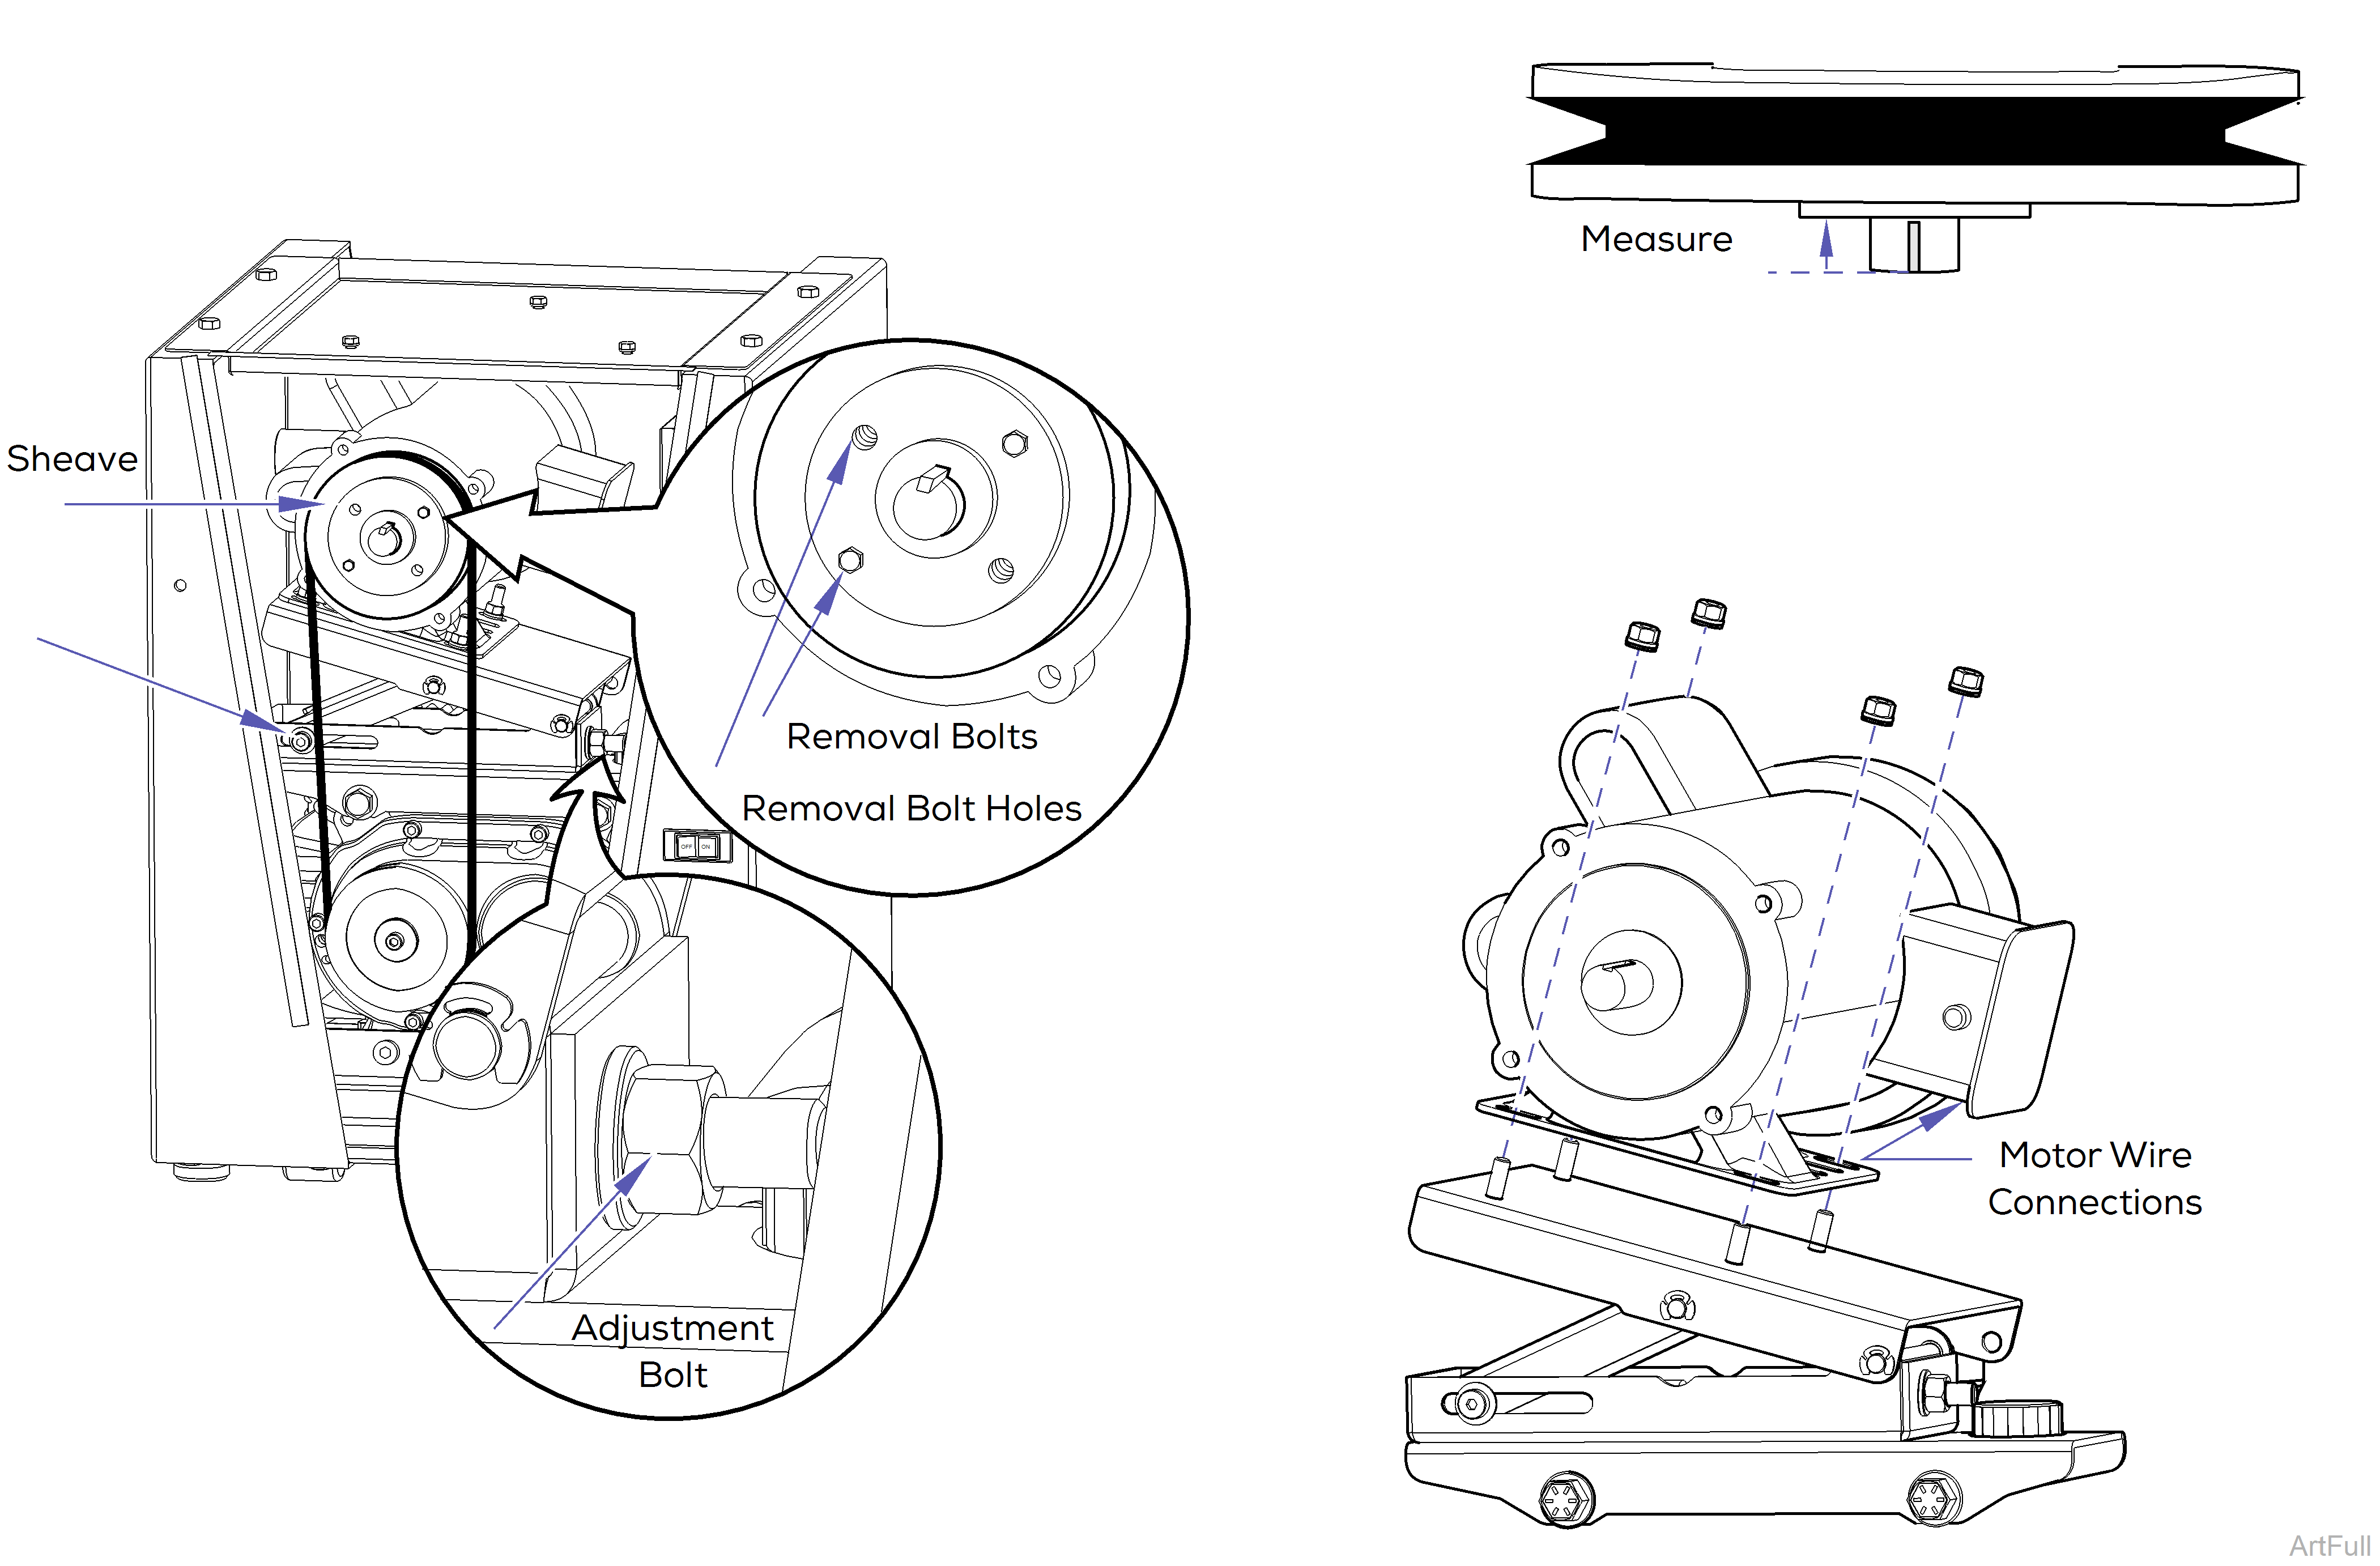
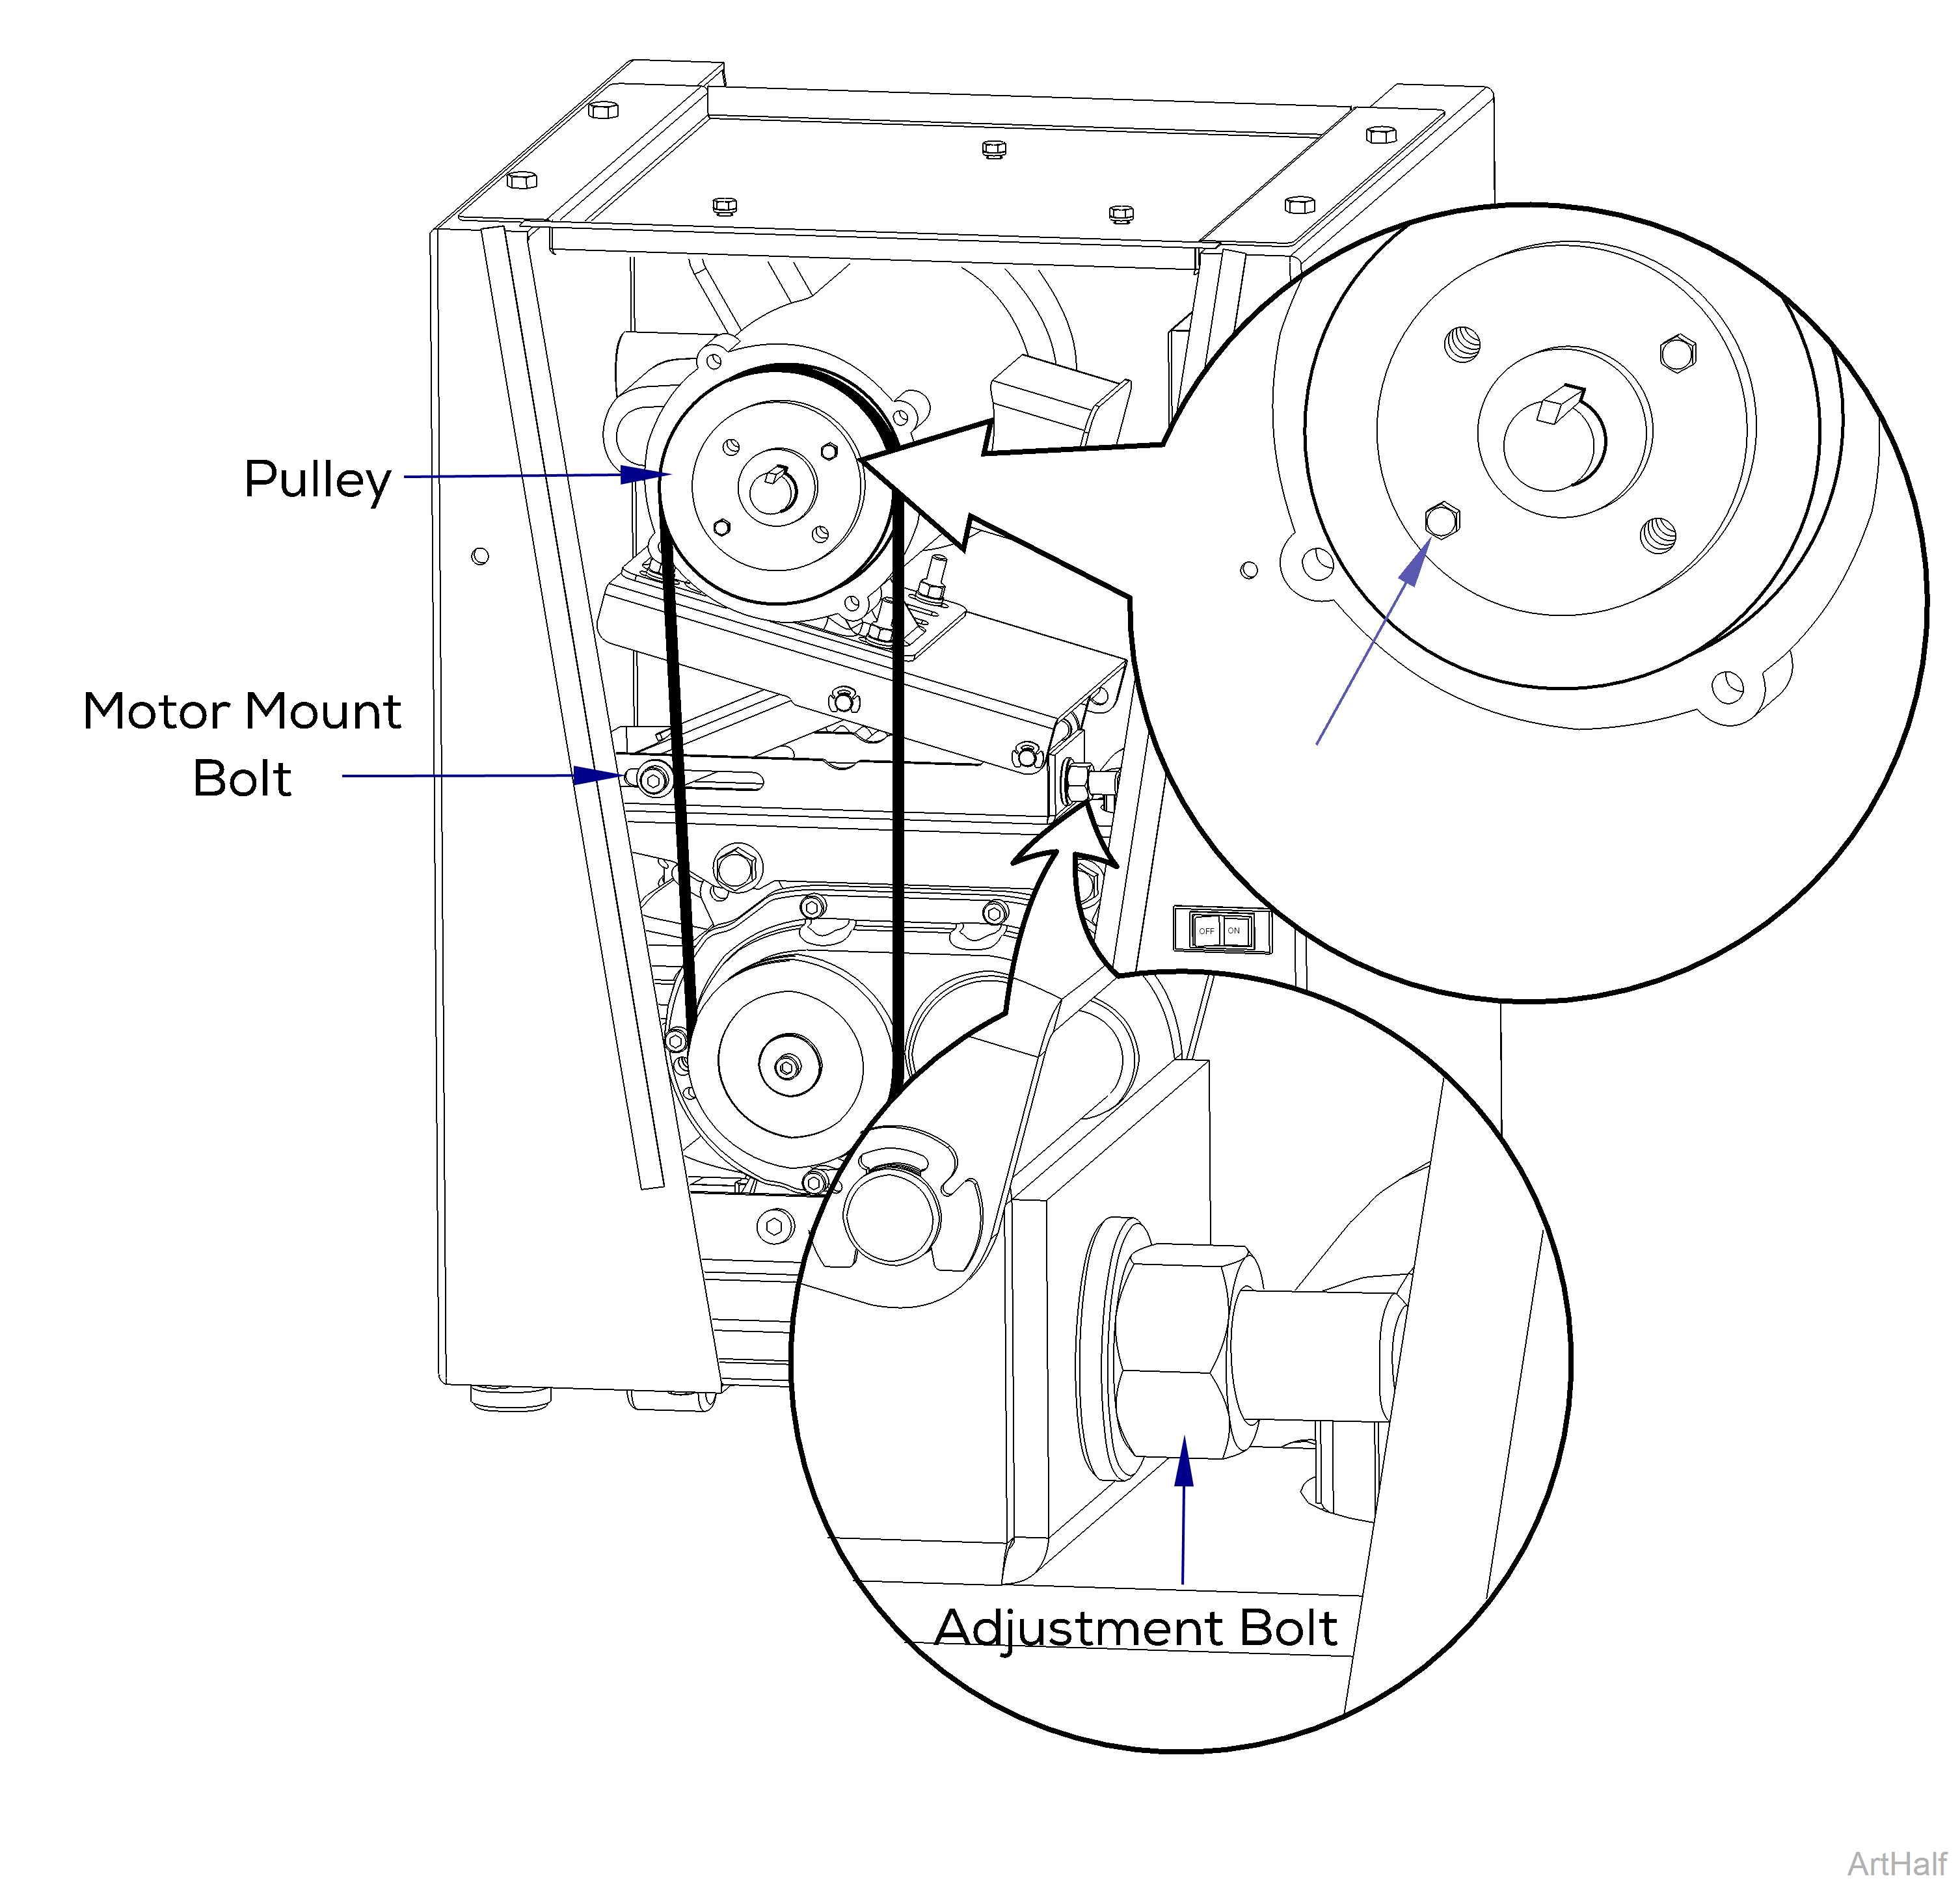
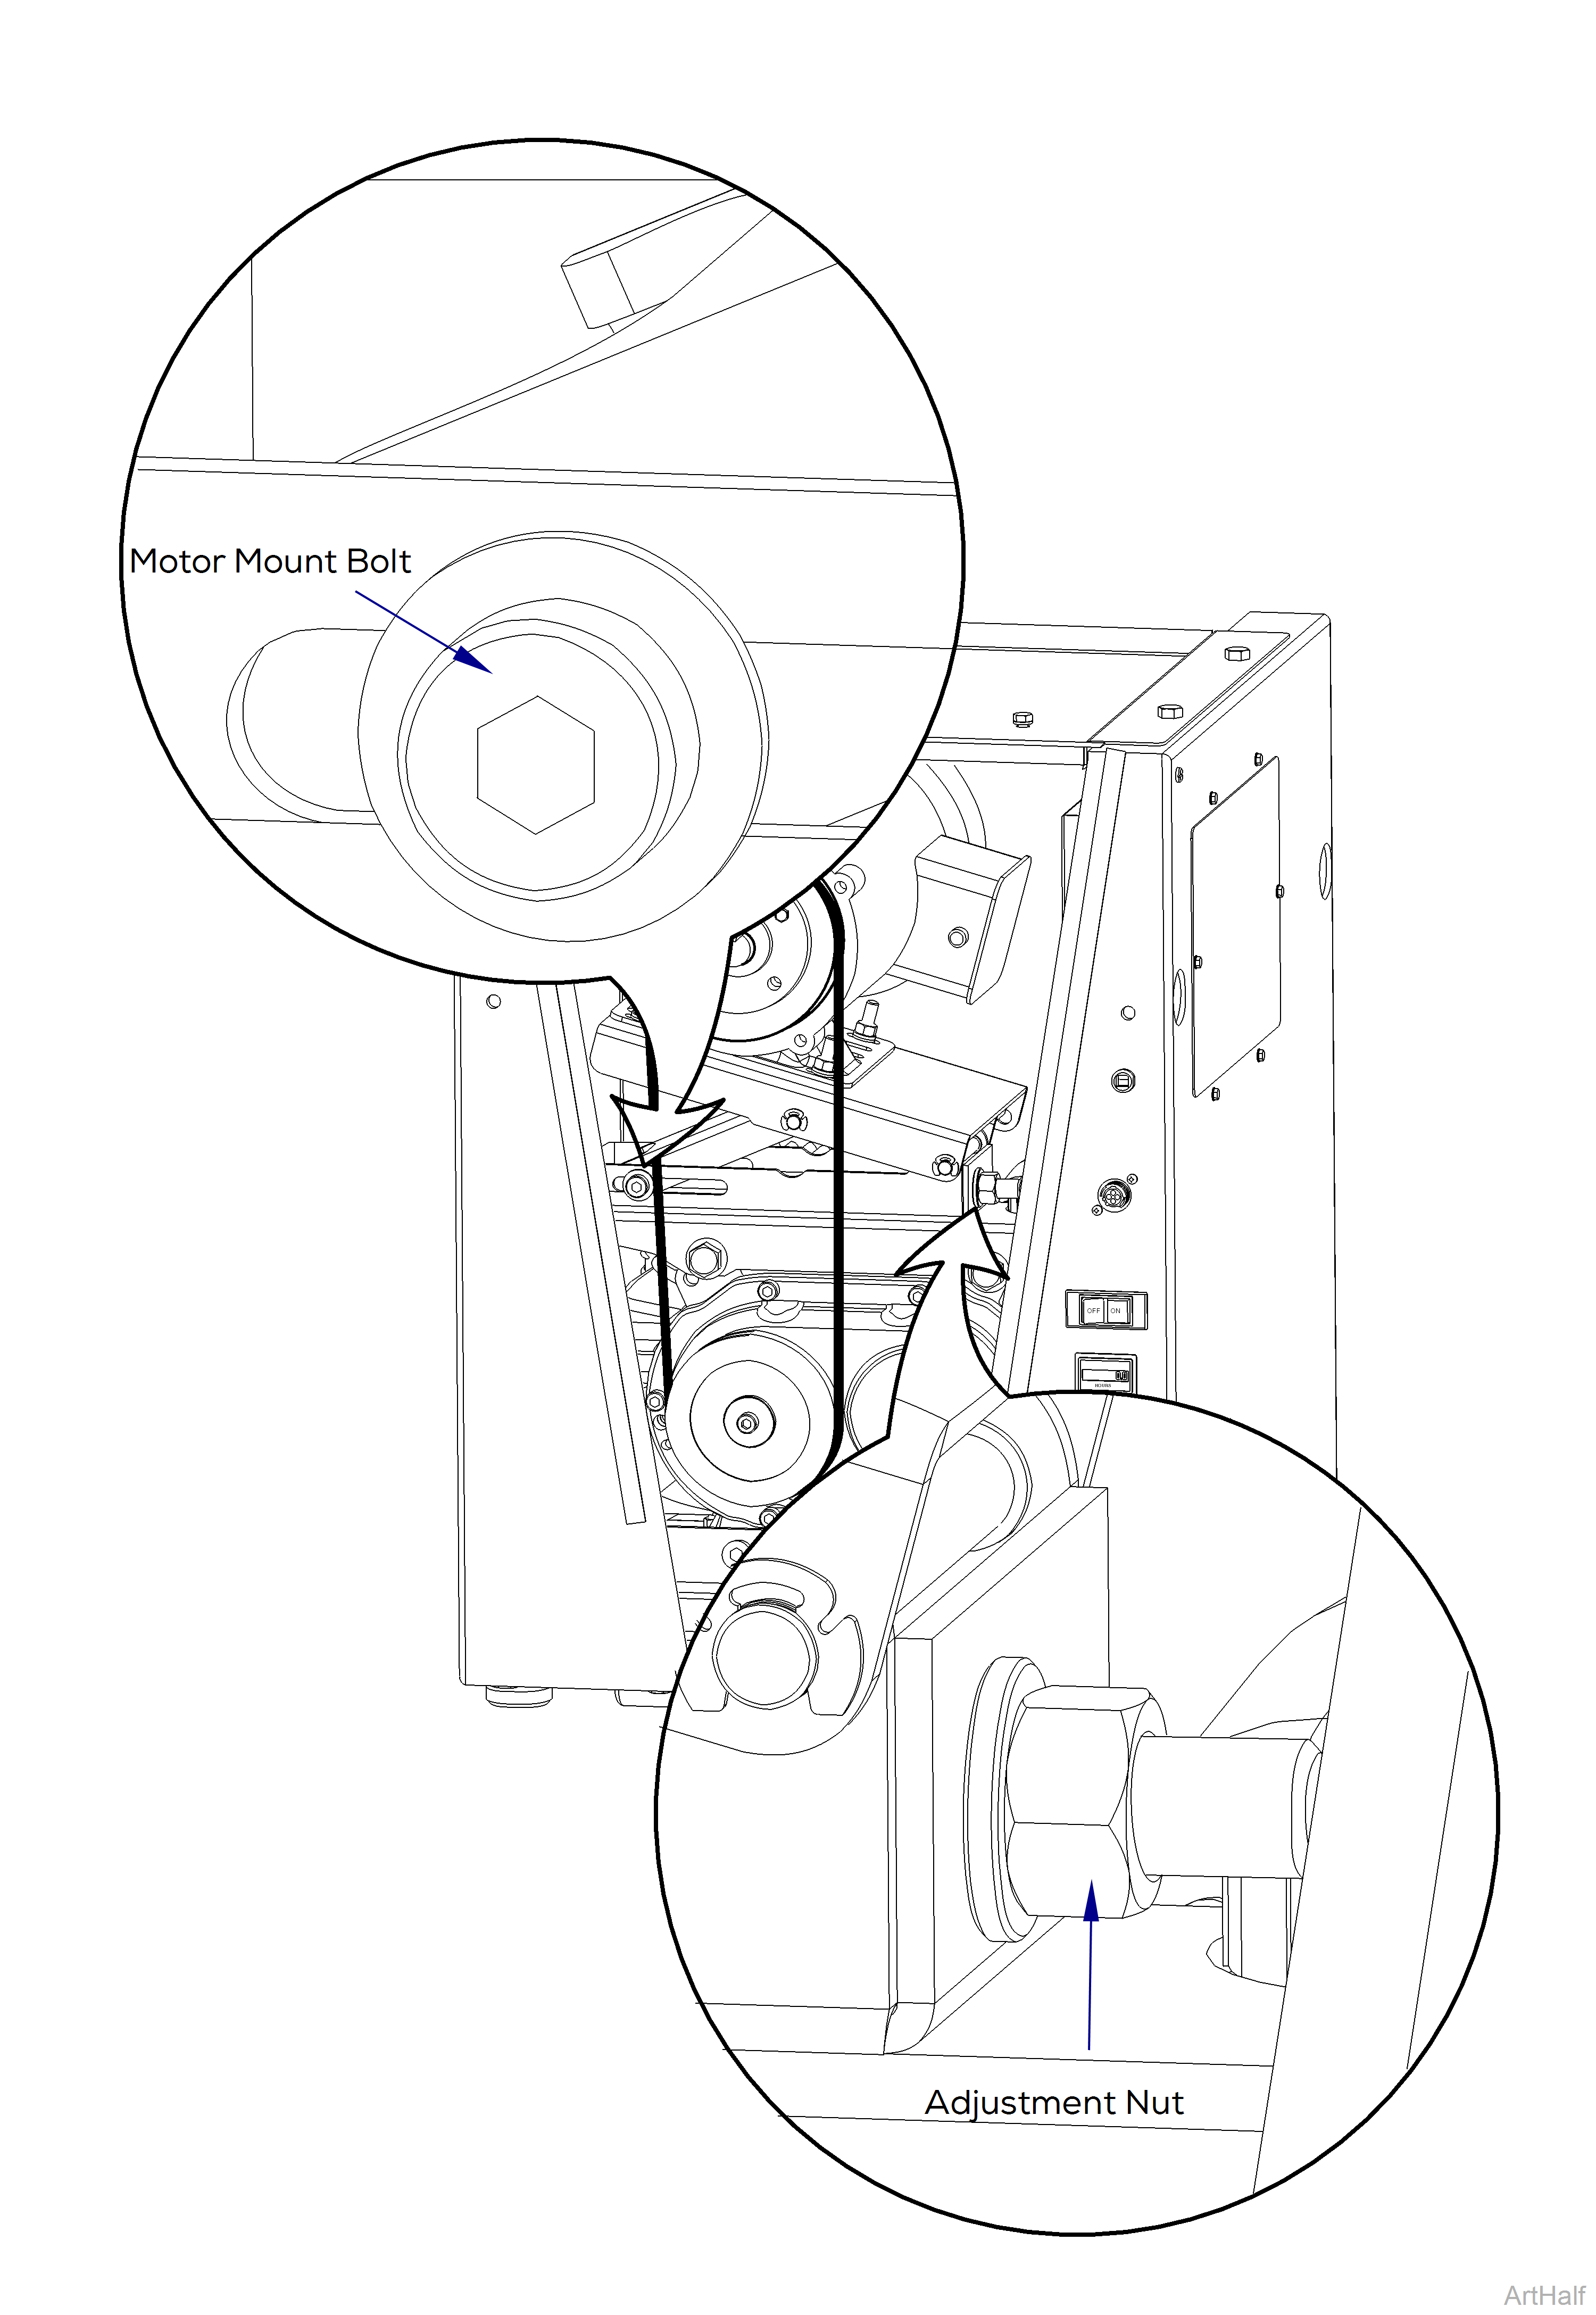
3.Loosen motor mount bolt and adjustment bolt.
4.Remove belt.
5.Measure end of shaft to face of top pulley. Write dimension down.
6.Unscrew removal bolts from hub through holes. Screw bolts into threaded removal holes alternately to pull sheave off tapered hub.
7.Disconnect motor wires from vac unit.
8.Remove motor nuts and washers. Remove motor.
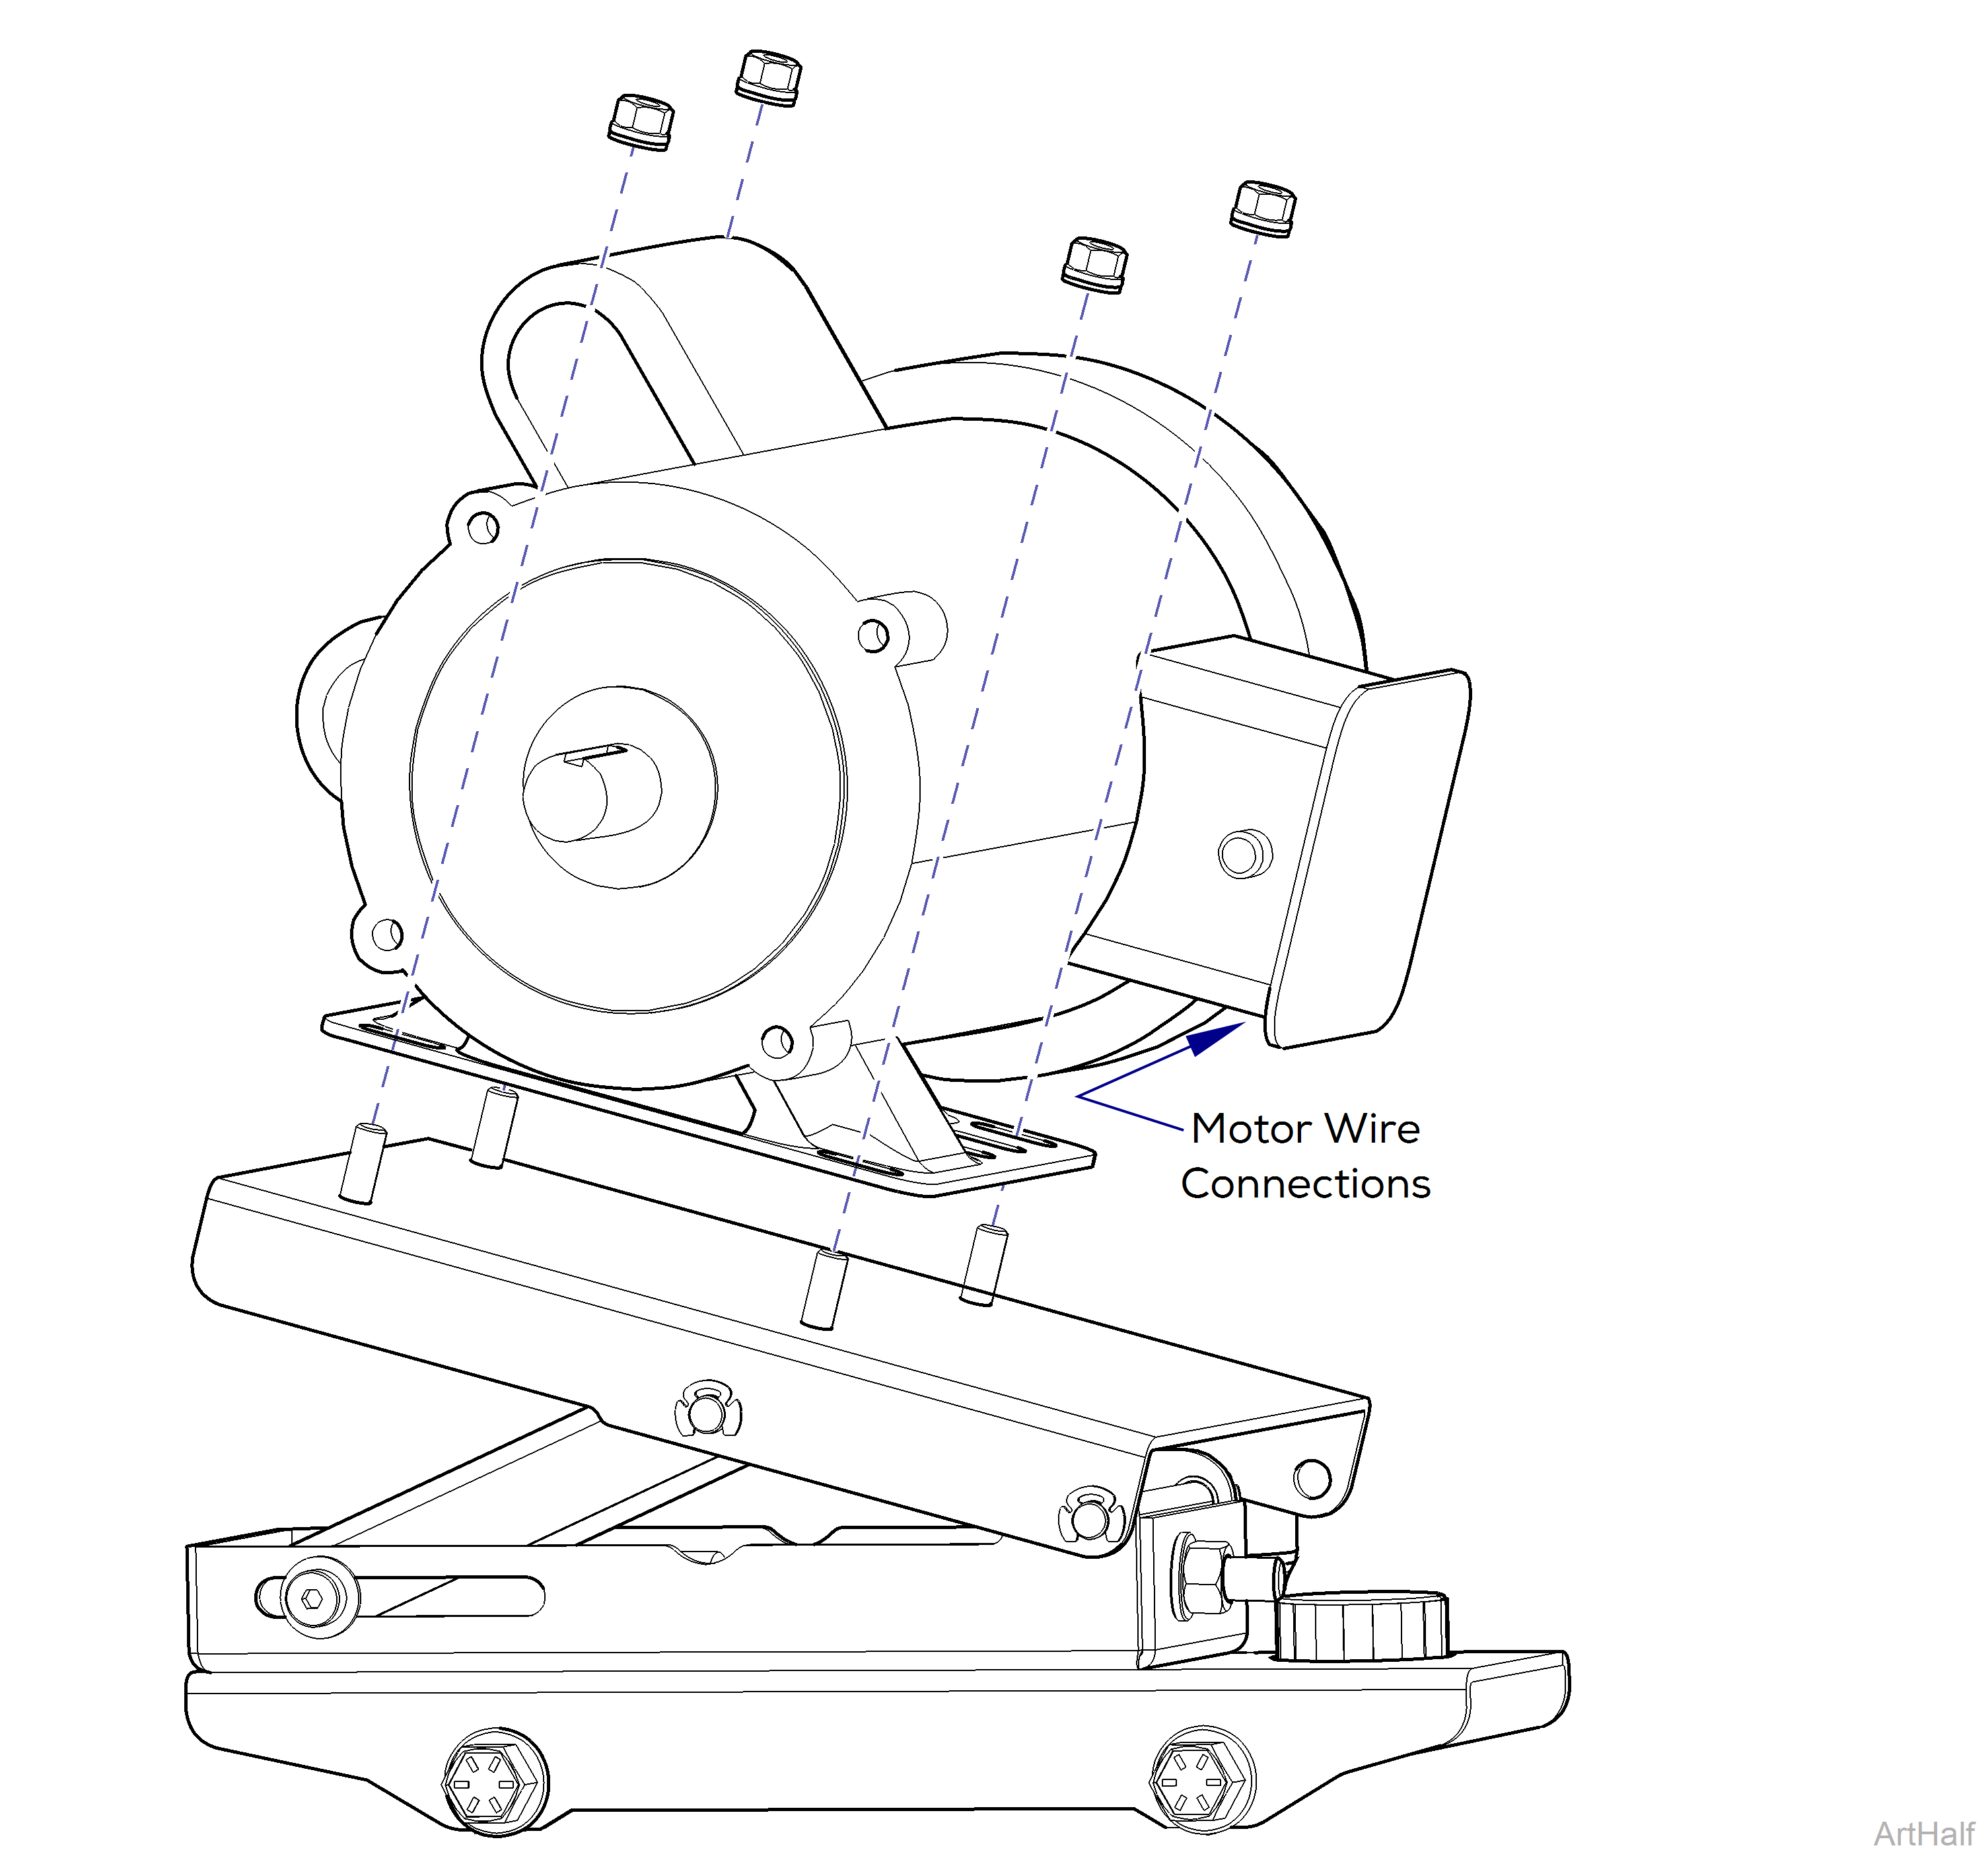
9.Install new motor, nuts and washers onto motor mount.
10.Connect motor wires from vac unit to motor.
For proper pulley alignment and function dimension measured should equal what you measured with the old pulley.
11.Align key stock and install pulley and belt. Measure end of shaft to face to sheave.
12.Tighten adjustment bolt and motor mount bolt.
13.Check belt tension. Refer to: Belt Adjustment
14.Replace front cover.
15.Restore power.
|
Model |
P3 | P5 | P7 |
| Serial Number | V245092 thru V784999 and 0611P3P0000 thru 0801P3P0611 | V245092 thru V784999 and 0611P5P0000 thru 0801P5P0240 | V245092 thru V784999 and 0611P7P0000 thru 0712P7P0104 |
1.Disconnect power at on/off switch and main power supply box.
2.Remove front cover. Refer to: Front Cover
3.Loosen motor mount bolt.
4.Move adjustment nut clockwise to tighten belt or counter clockwise to loosen belt.
5.Check belt tension. Refer to: Belt Adjustment
6.Tighten motor mount bolt.
7.Replace front cover. Restore power.
|
Model |
All |
| Serial Number | V785000 thru V2604824 |
1.Disconnect power at on/off switch and main power supply box.
2.Remove front cover. Refer to: Front Cover
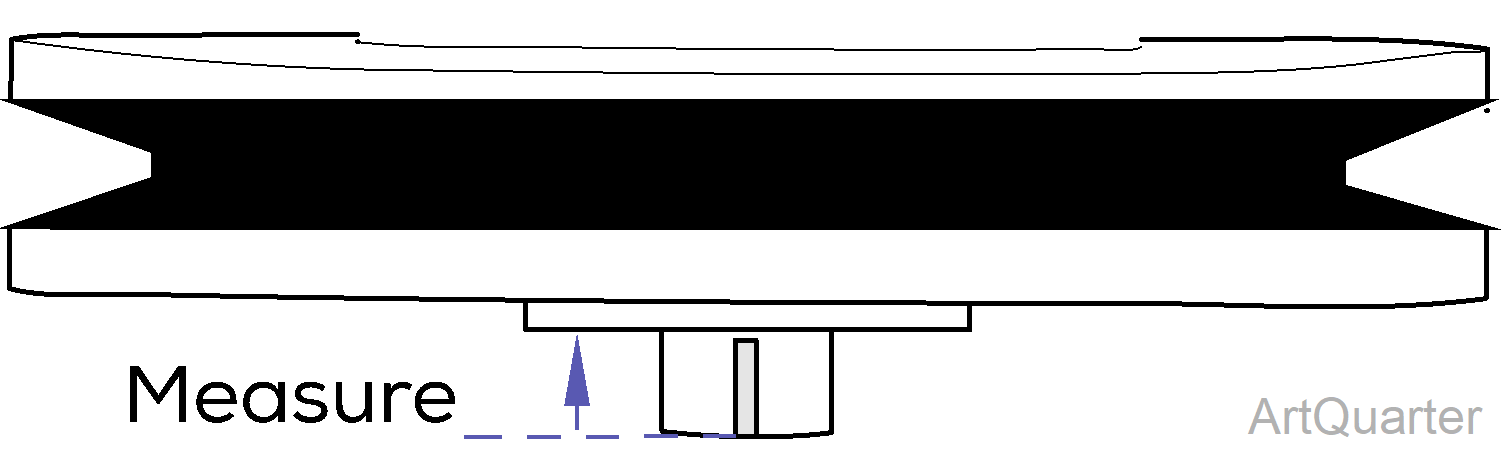
3.Measure end of shaft to face of top pulley. Write dimension down.
4.Slightly push tension arm up toward the pulley and remove belt with other hand.
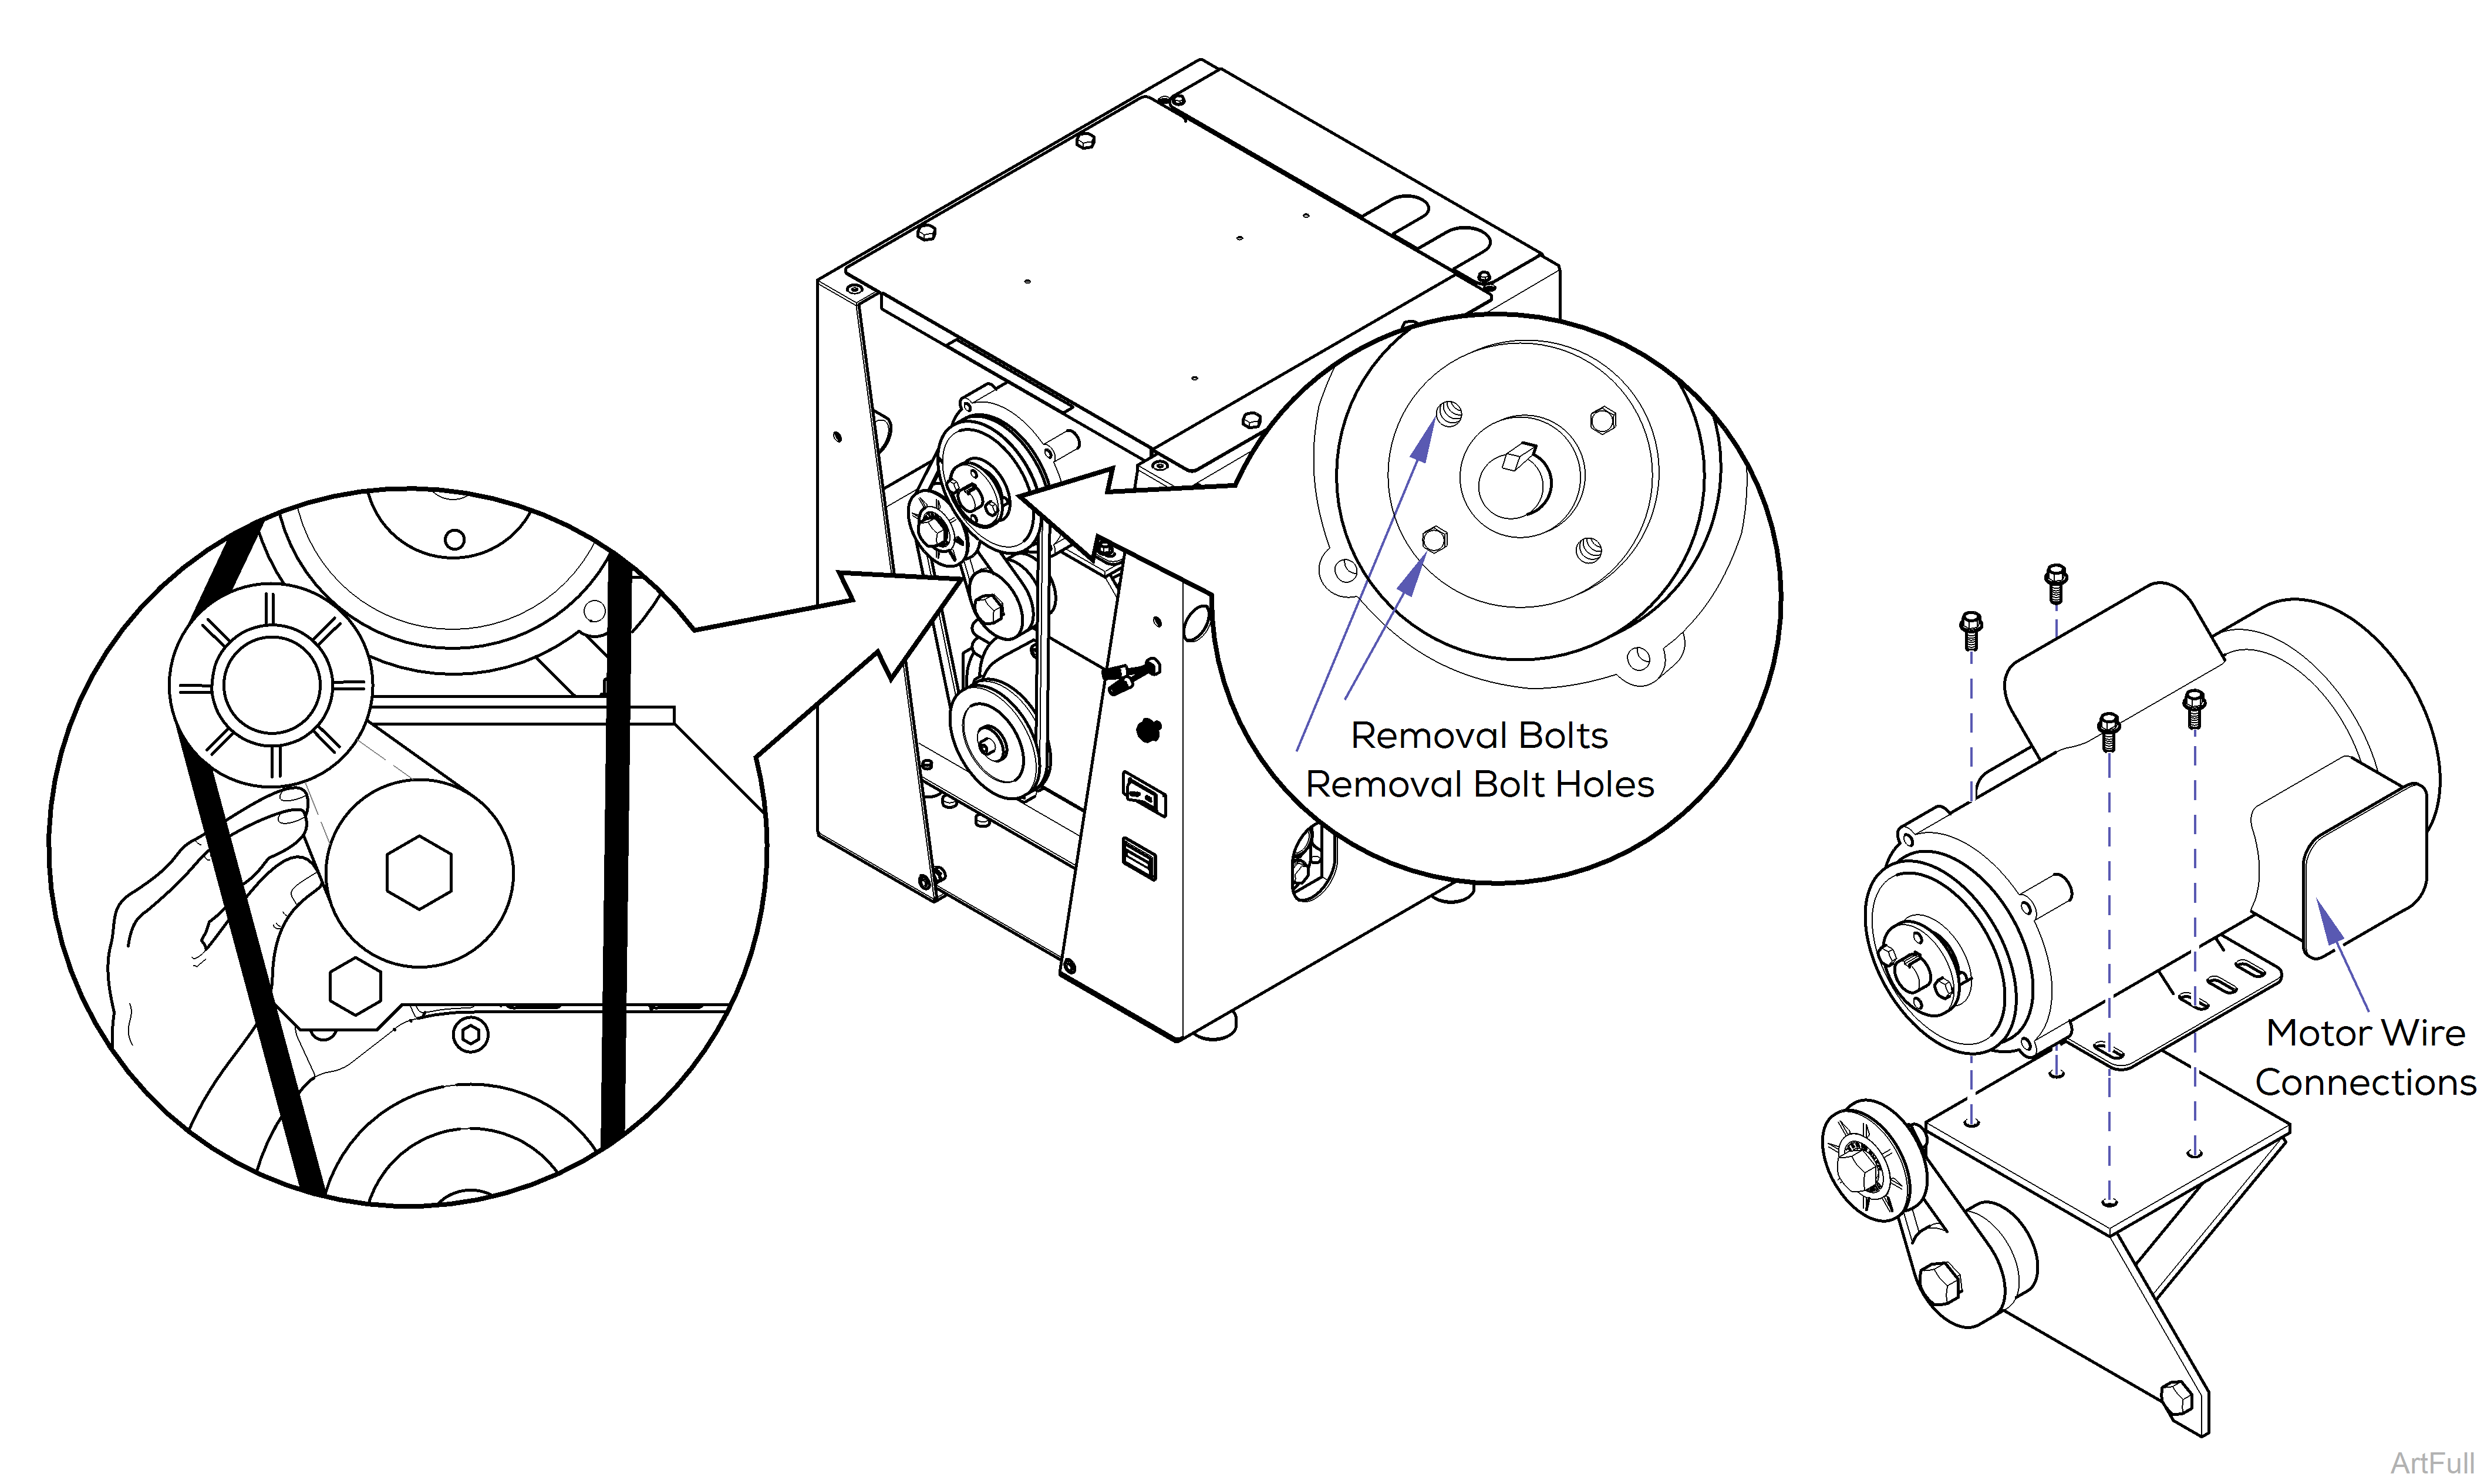
5.Remove pulley from motor. Unscrew removal bolts from hub through holes. Screw bolts into threaded removal holes alternately to pull sheave off tapered hub.
6.Disconnect motor wires from vac unit.
7.Remove motor from motor mount.
8.Install new motor, nuts and washers onto motor mount.
9.Connect motor wires from vac unit to motor.
For proper pulley alignment and function dimension measured should equal what you measured with the old pulley.
10.Align key stock and install pulley and belt. Measure end of shaft to face to pulley.
11.Slightly push tension arm up toward the pulley and install belt with other hand.
12.Replace front cover. Refer to: Front Cover
13.Connect power.
|
Model |
All |
| Serial Number | V2604825 thru Present |
1.Disconnect power at on/off switch and main power supply box.
2.Remove front cover. Refer to: Front Cover
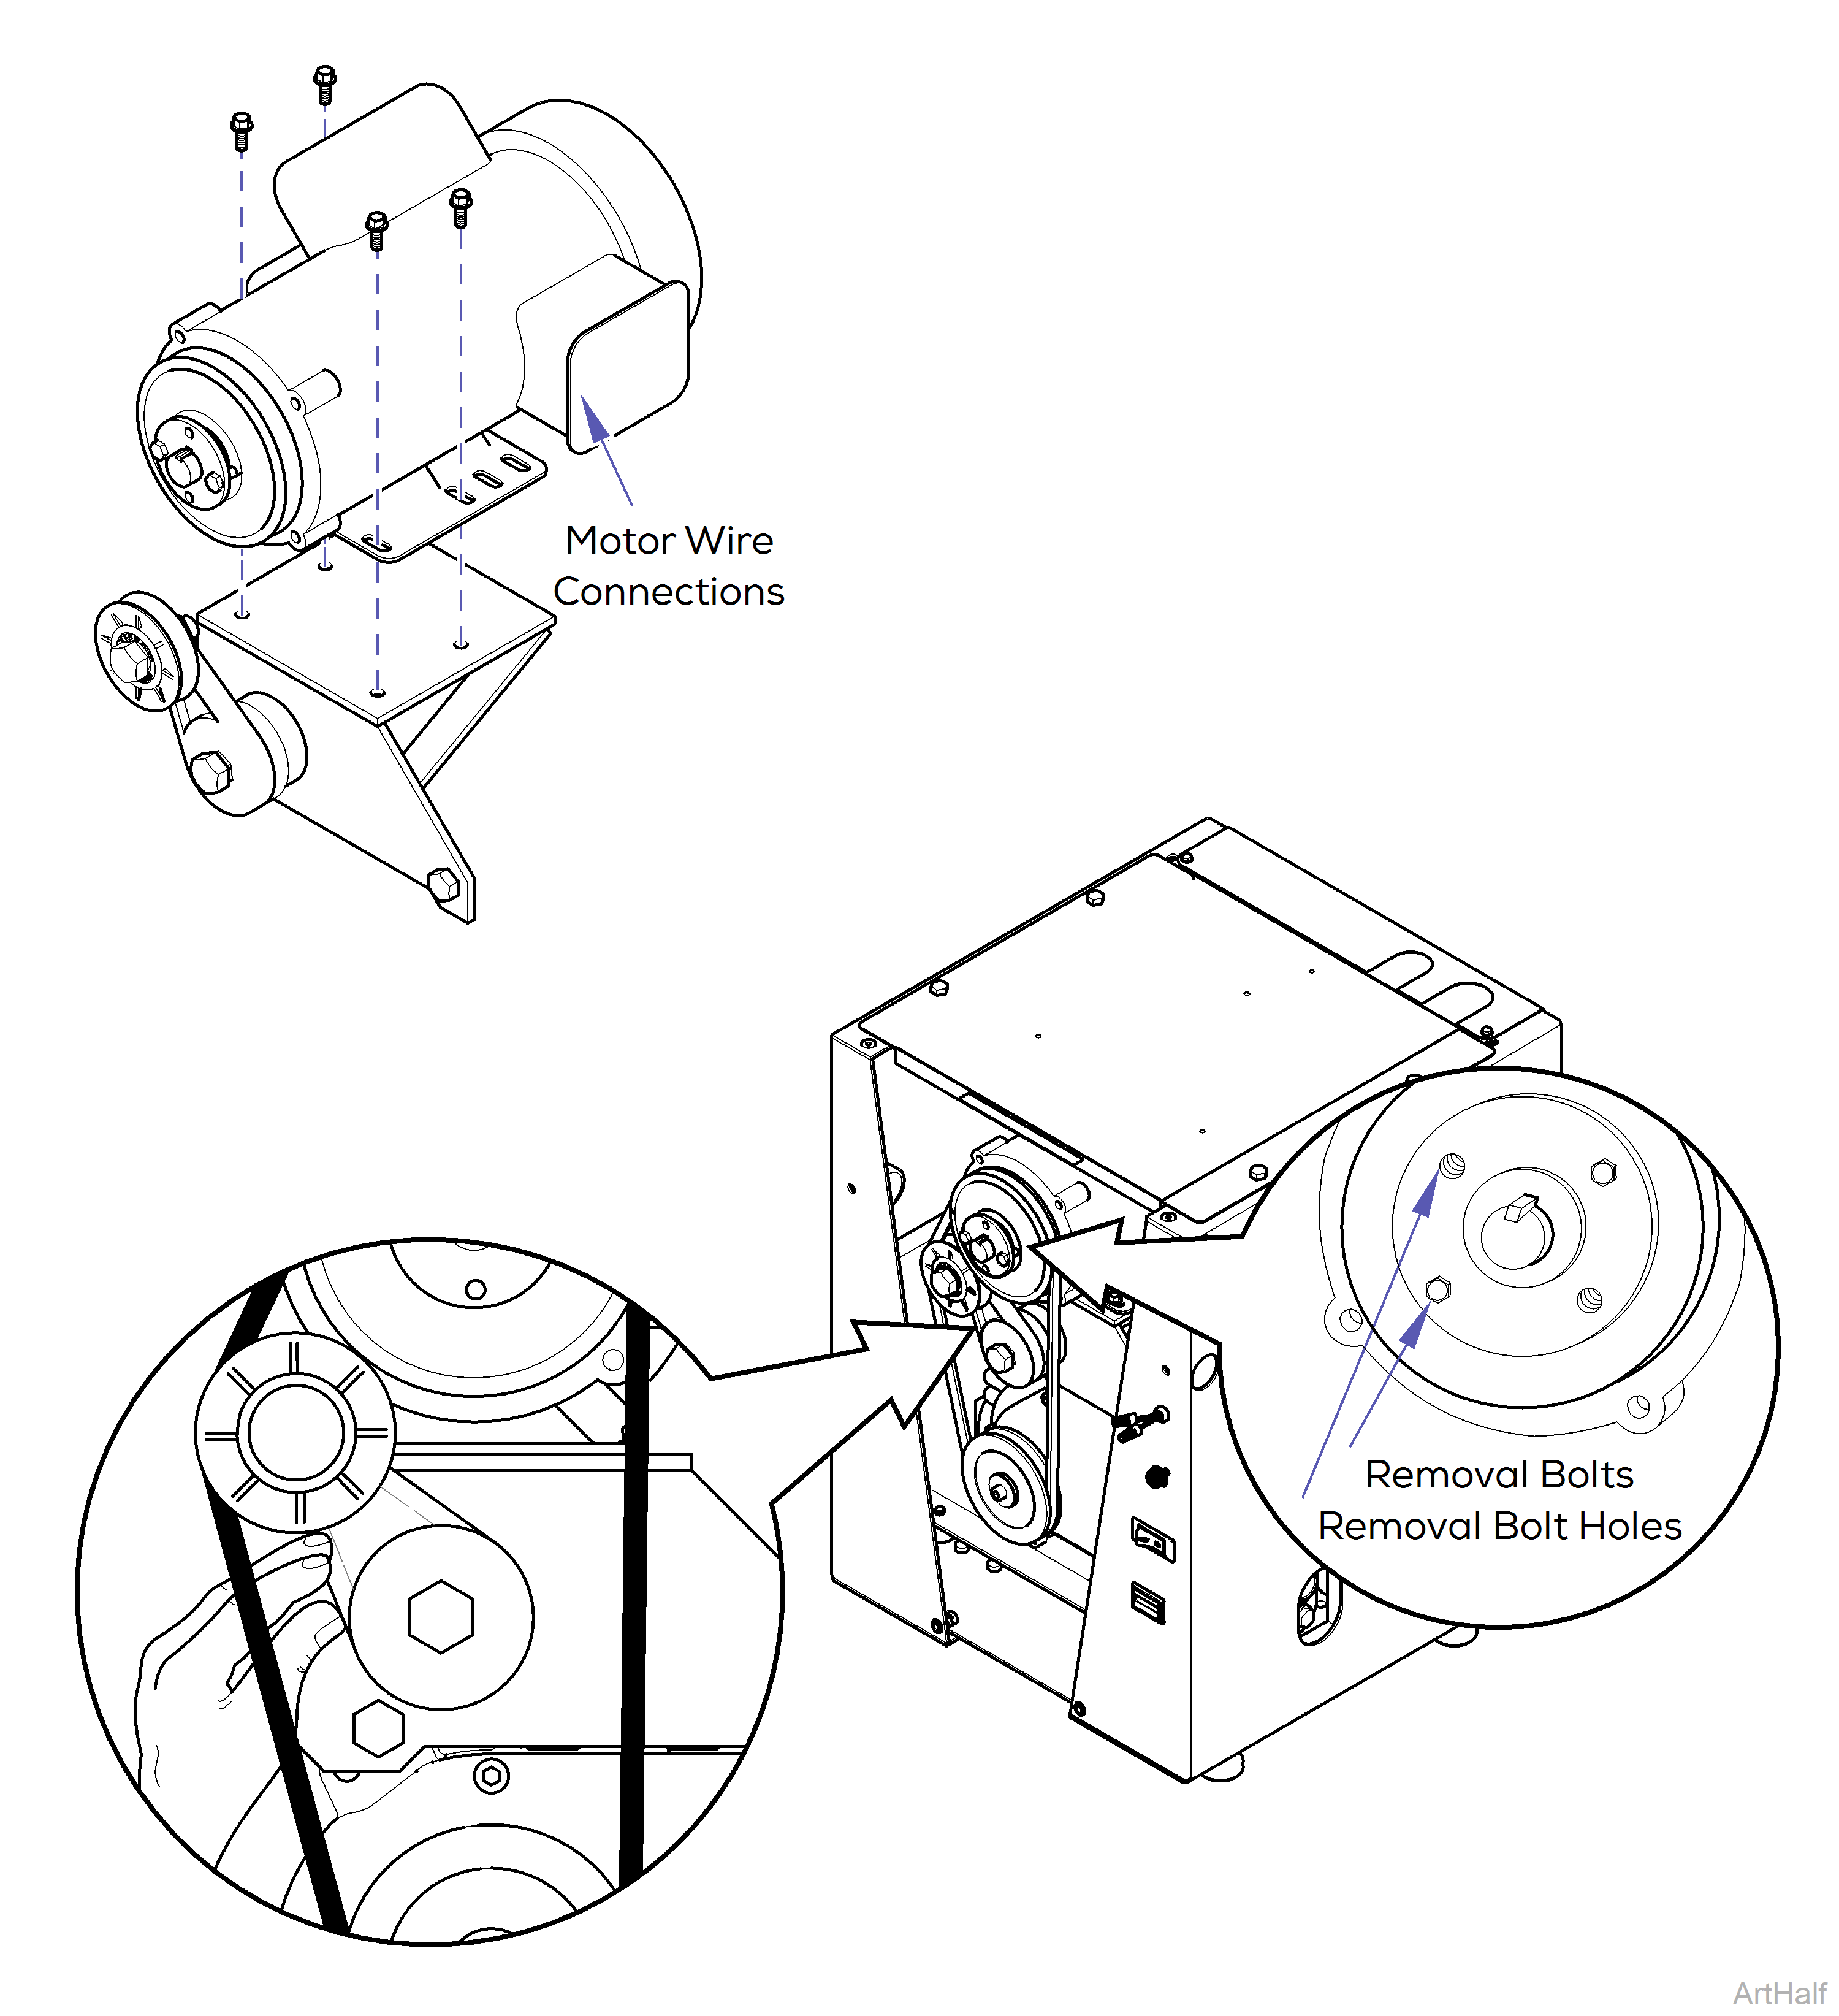
3.Remove belt. Push up on spring loaded auto tensioner and remove belt from pulleys.

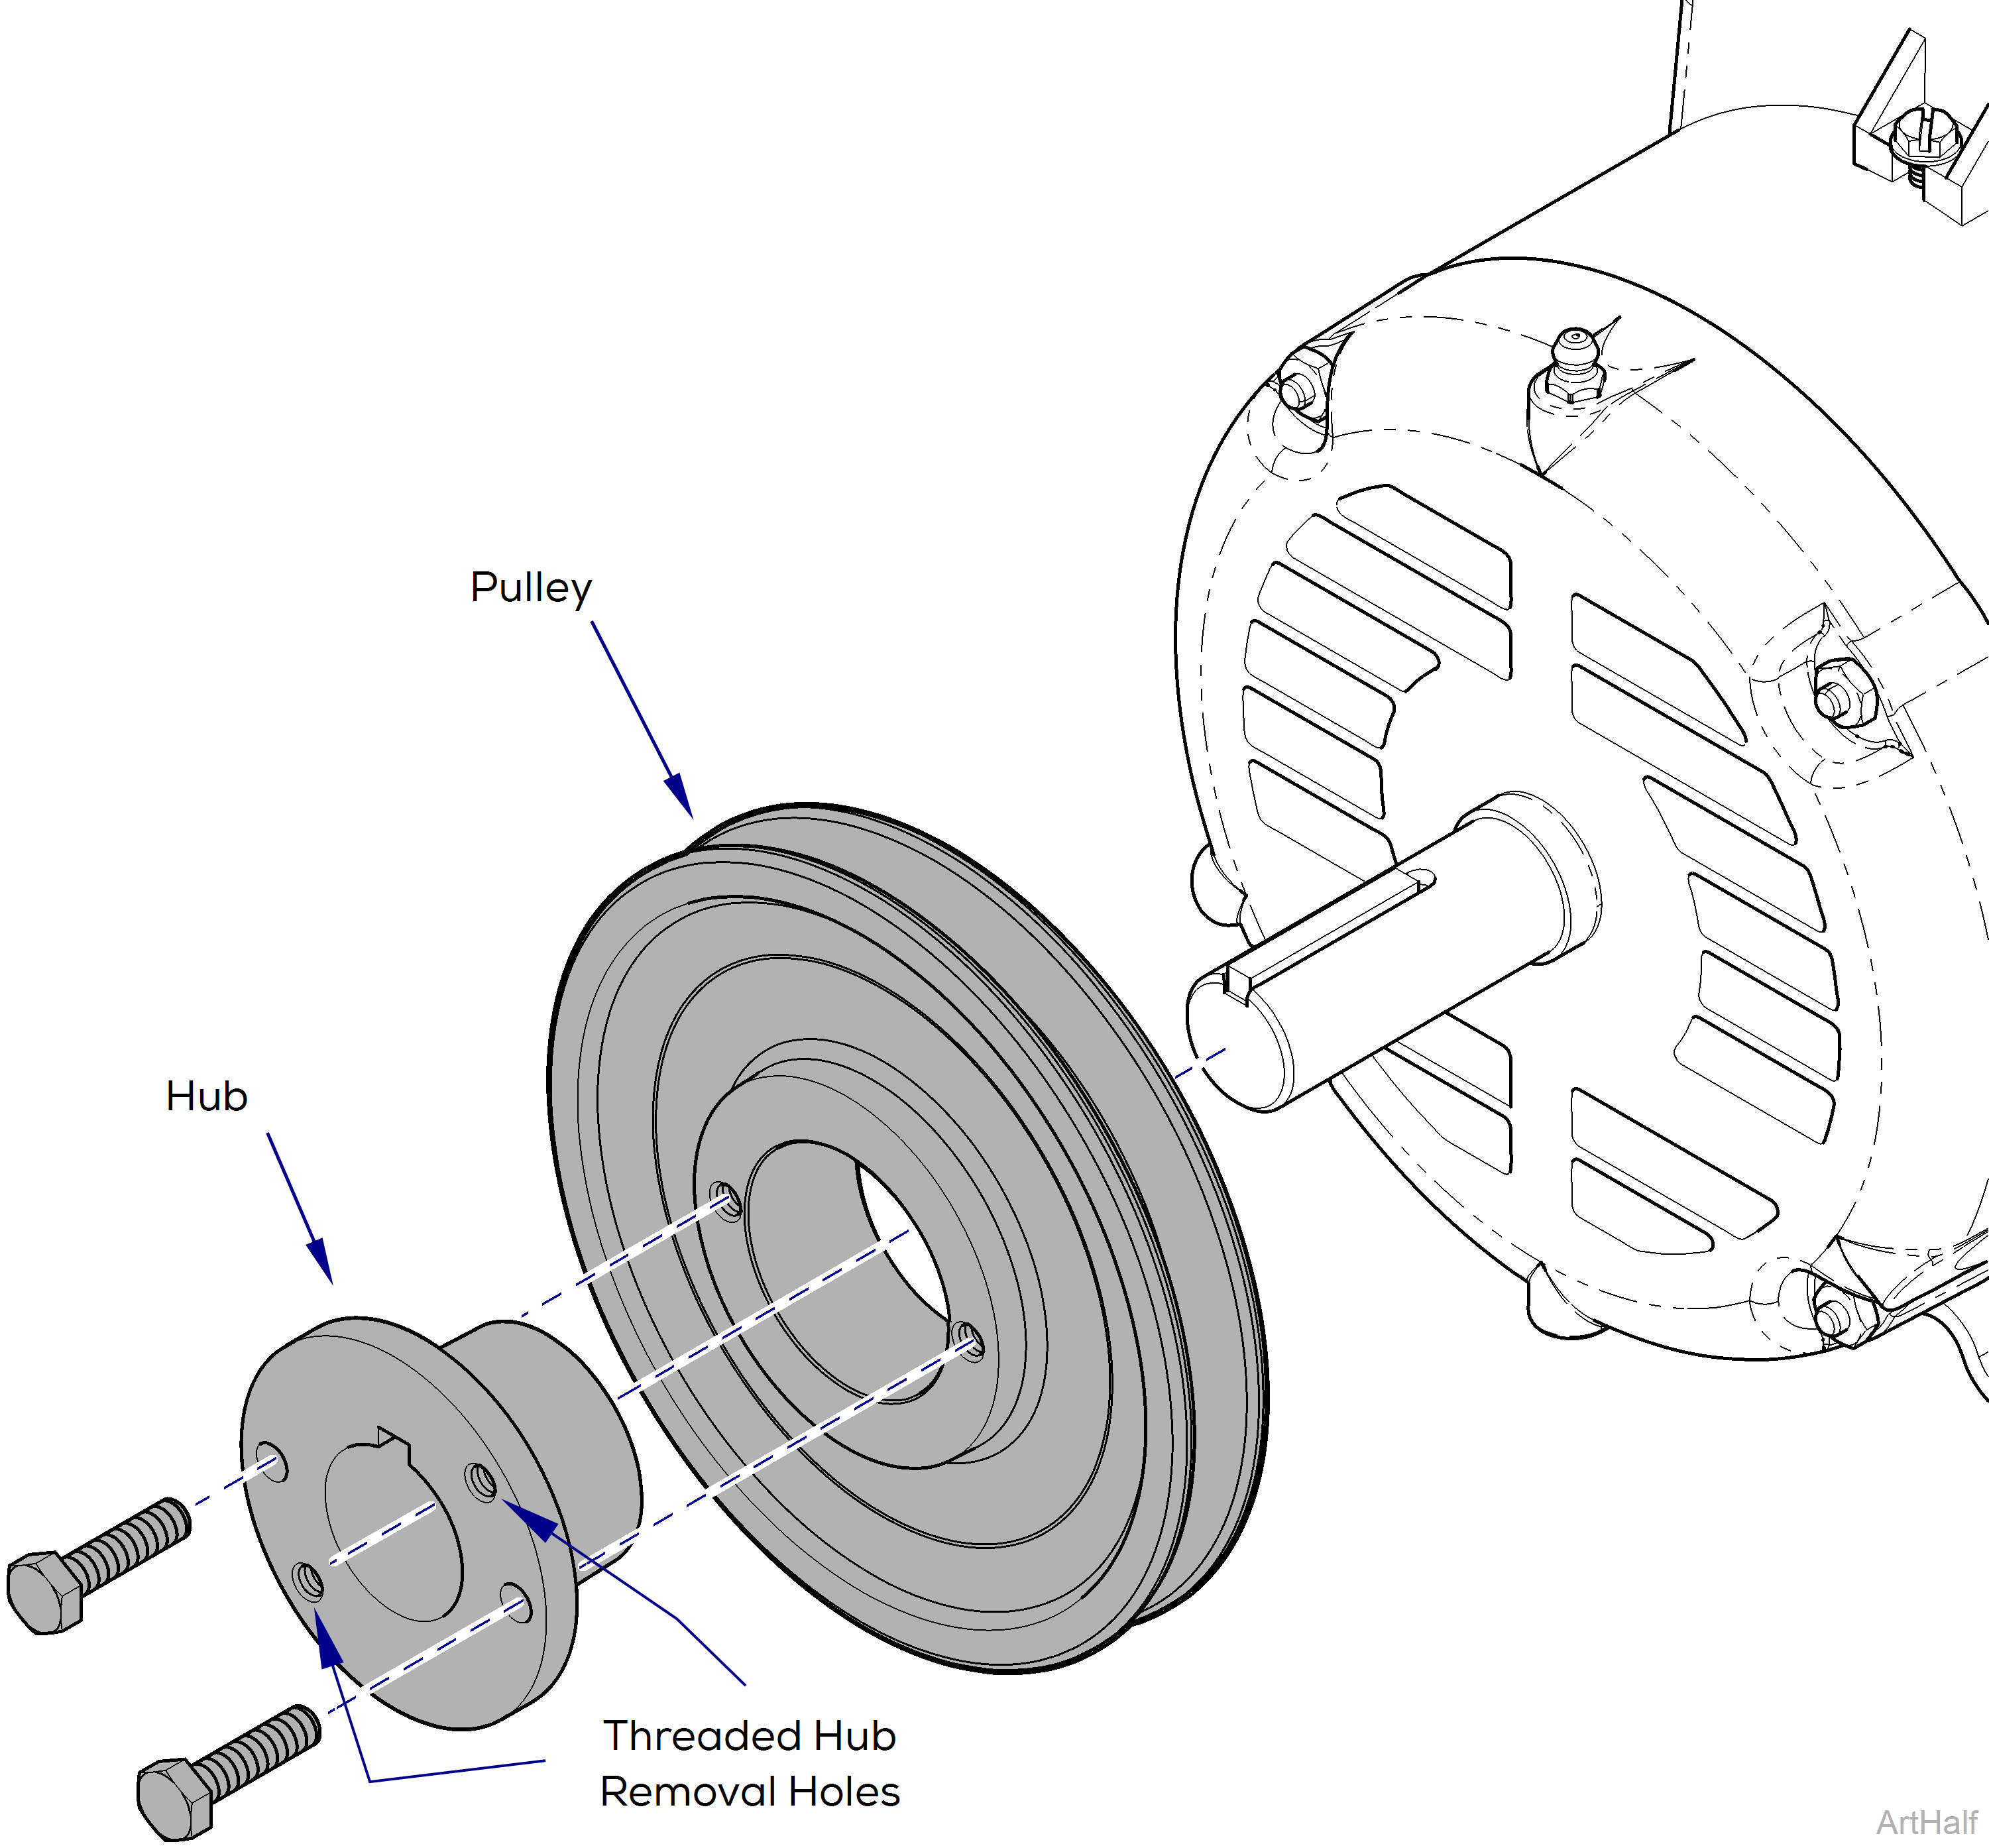
4.Remove motor pulley. Unscrew mounting bolts from hub and insert them into threaded removal holes on hub. Alternately tighten bolts to separate pulley from hub, remove both pieces from motor shaft.
The pulley and hub will be installed on the new motor.
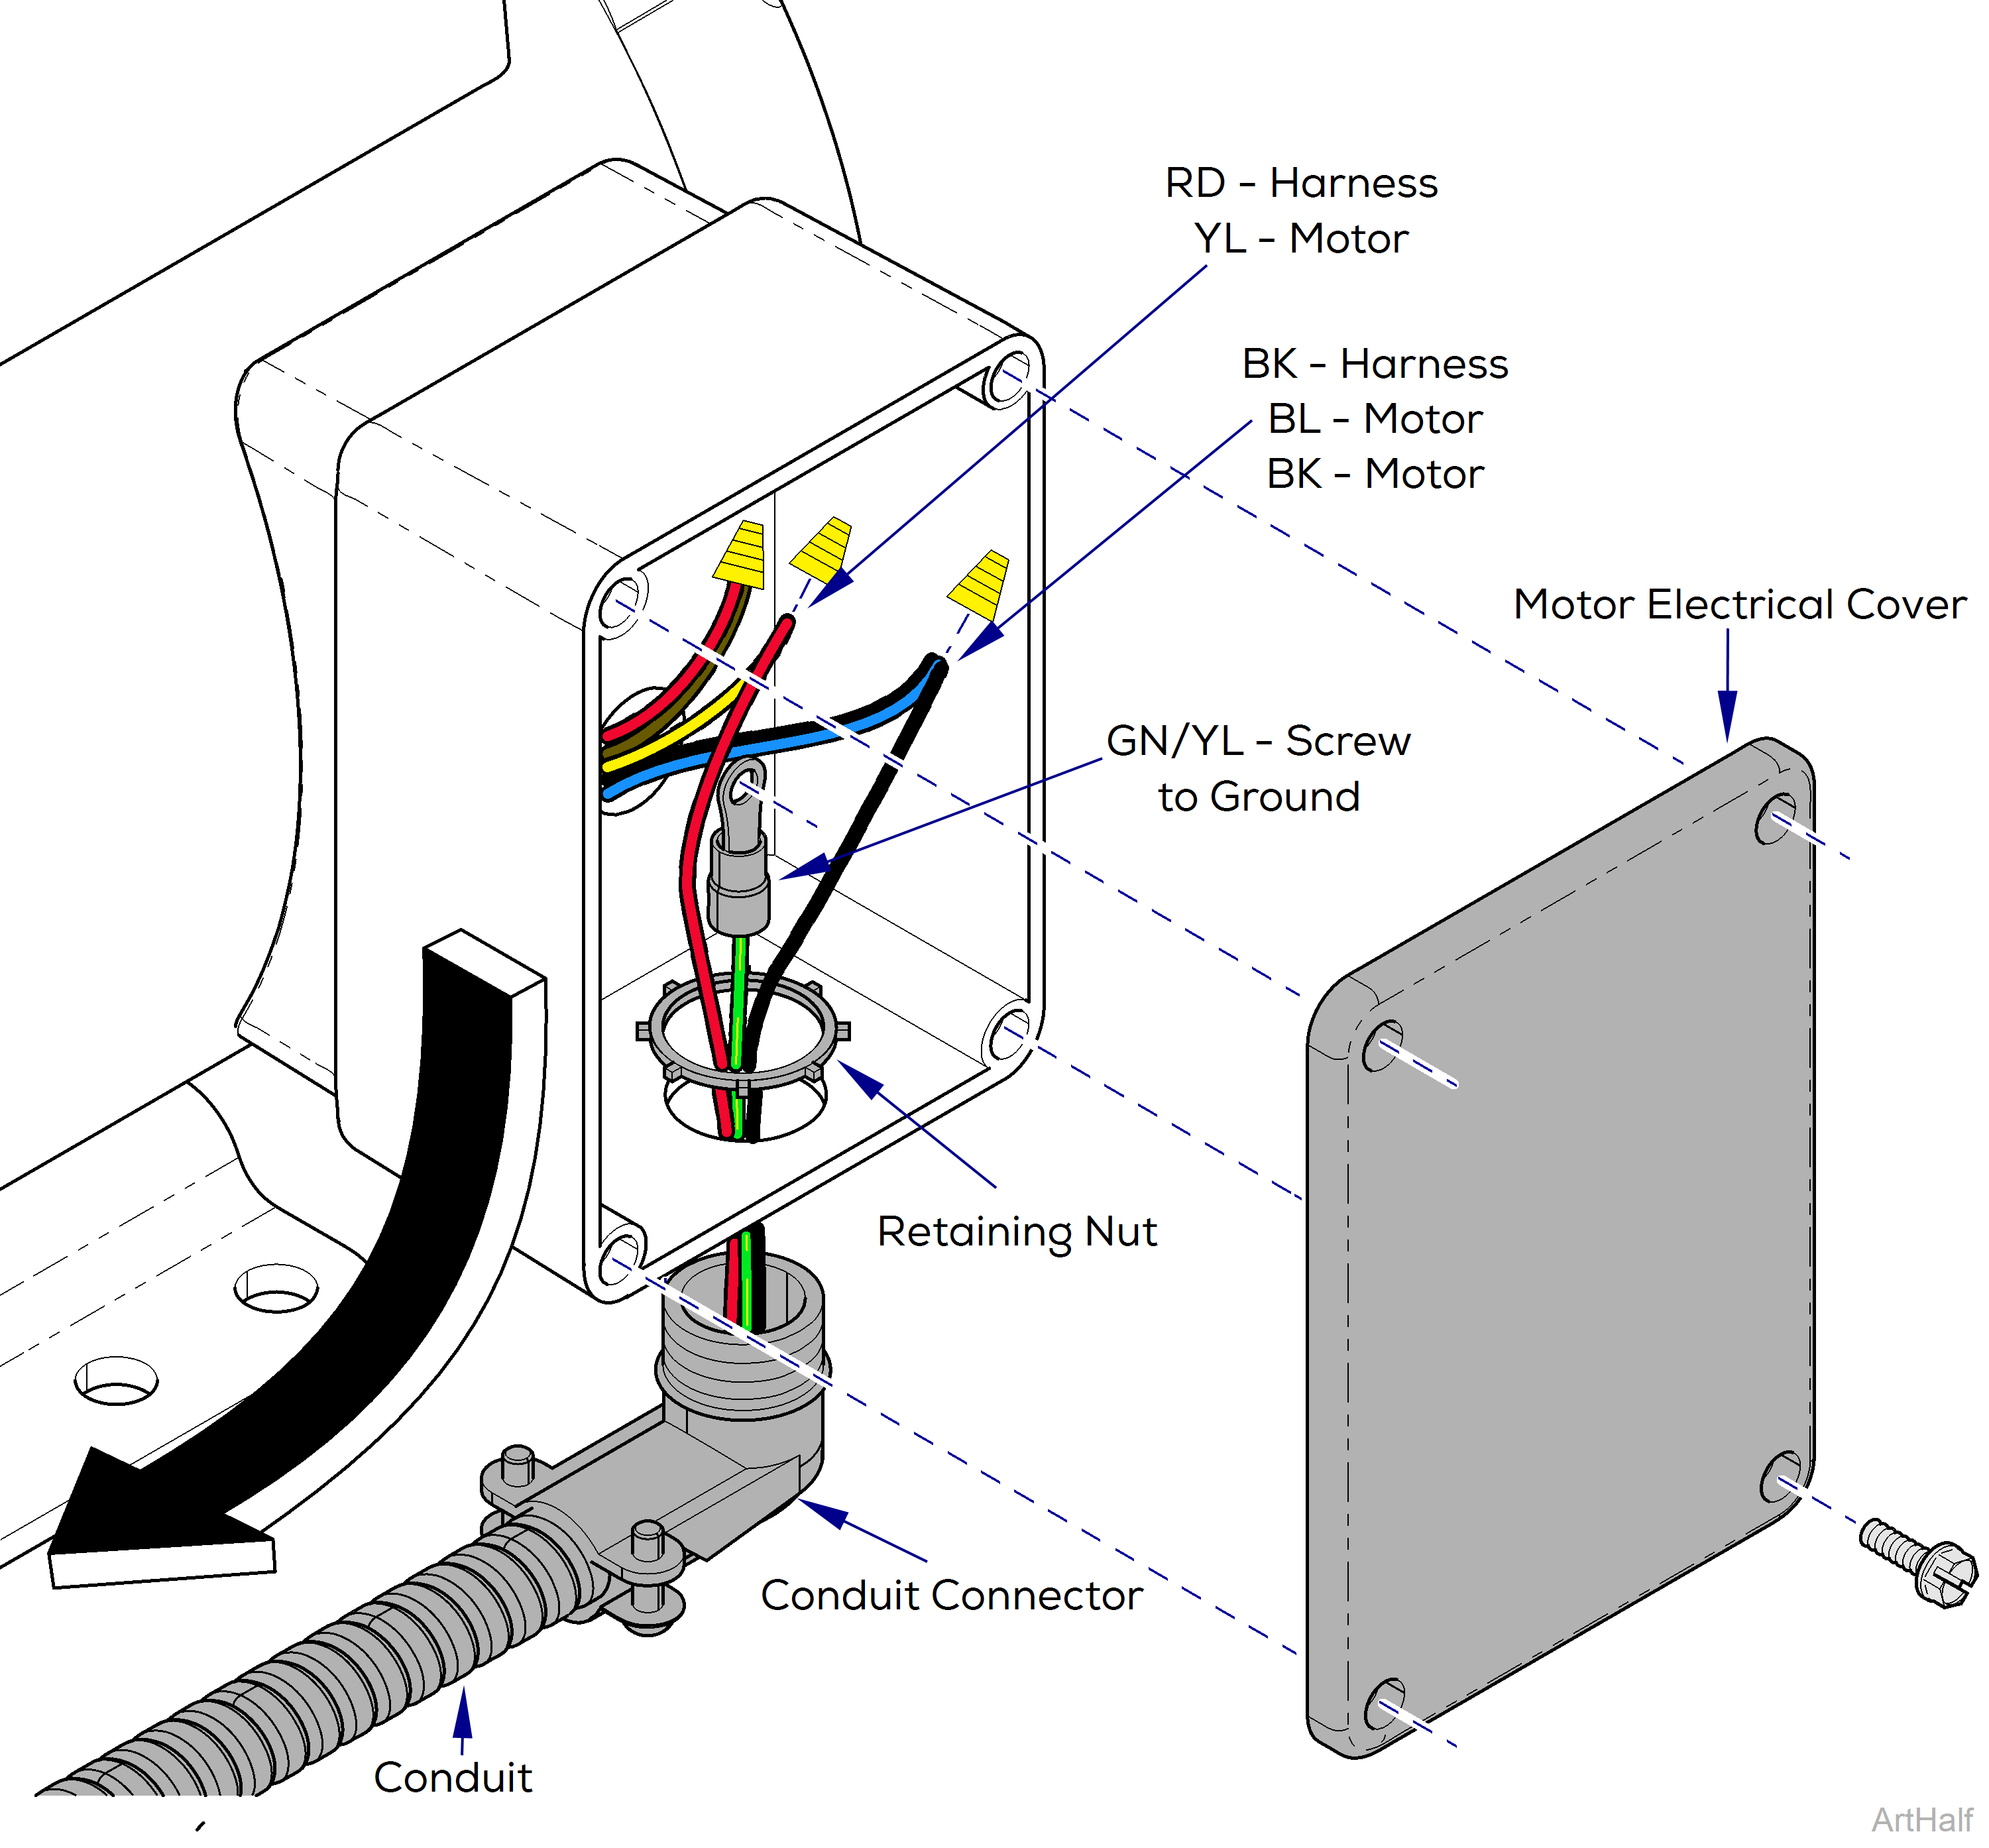
5.Remove wiring from motor. Remove four screws from motor electrical cover and remove cover. Remove ground terminal screw and wire nuts from conduit wires. Unthread retaining nut from conduit connector. Remove electrical conduit, connector and wires from motor.
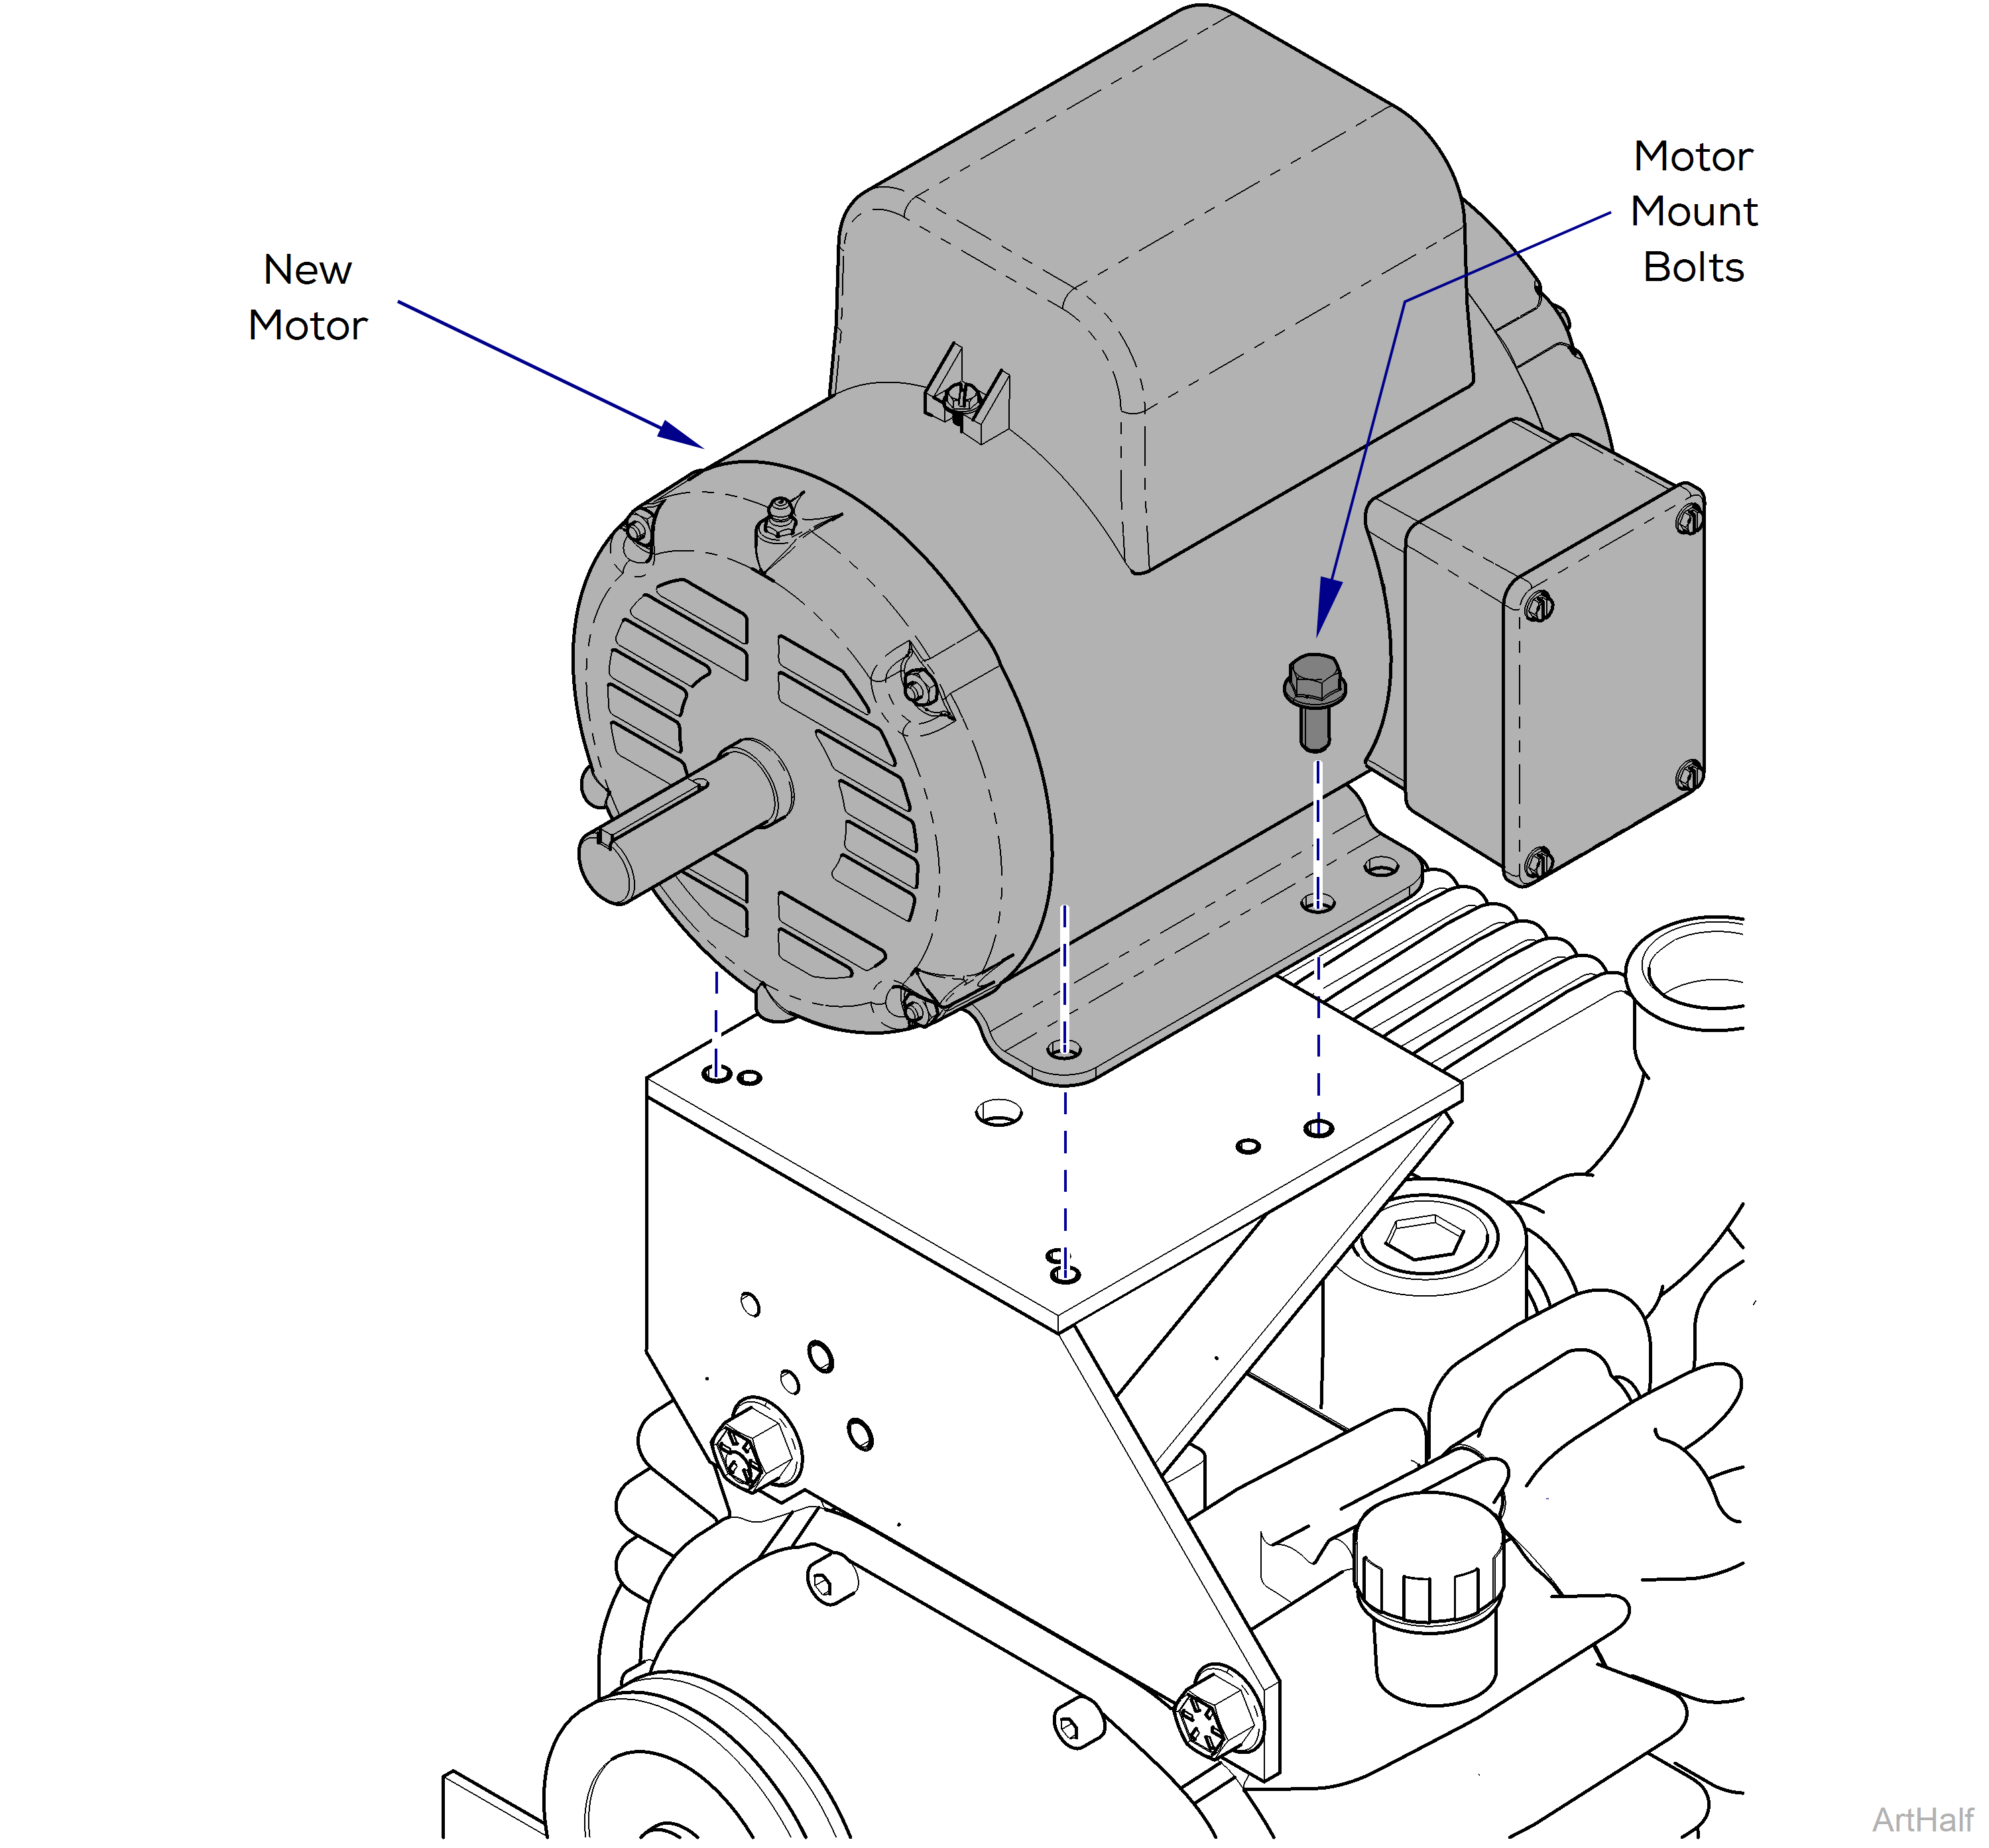
6.Remove old motor and Install new motor. Remove four motor mounting bolts from motor base and remove motor. Install new motor to mount using four motor mounting bolts.
7.Install motor wiring. Remove motor electrical box cover. Route wires into electrical box and secure the electrical conduit connector to motor with the retaining nut. Connect motor wires as shown and reinstall motor electrical box cover.
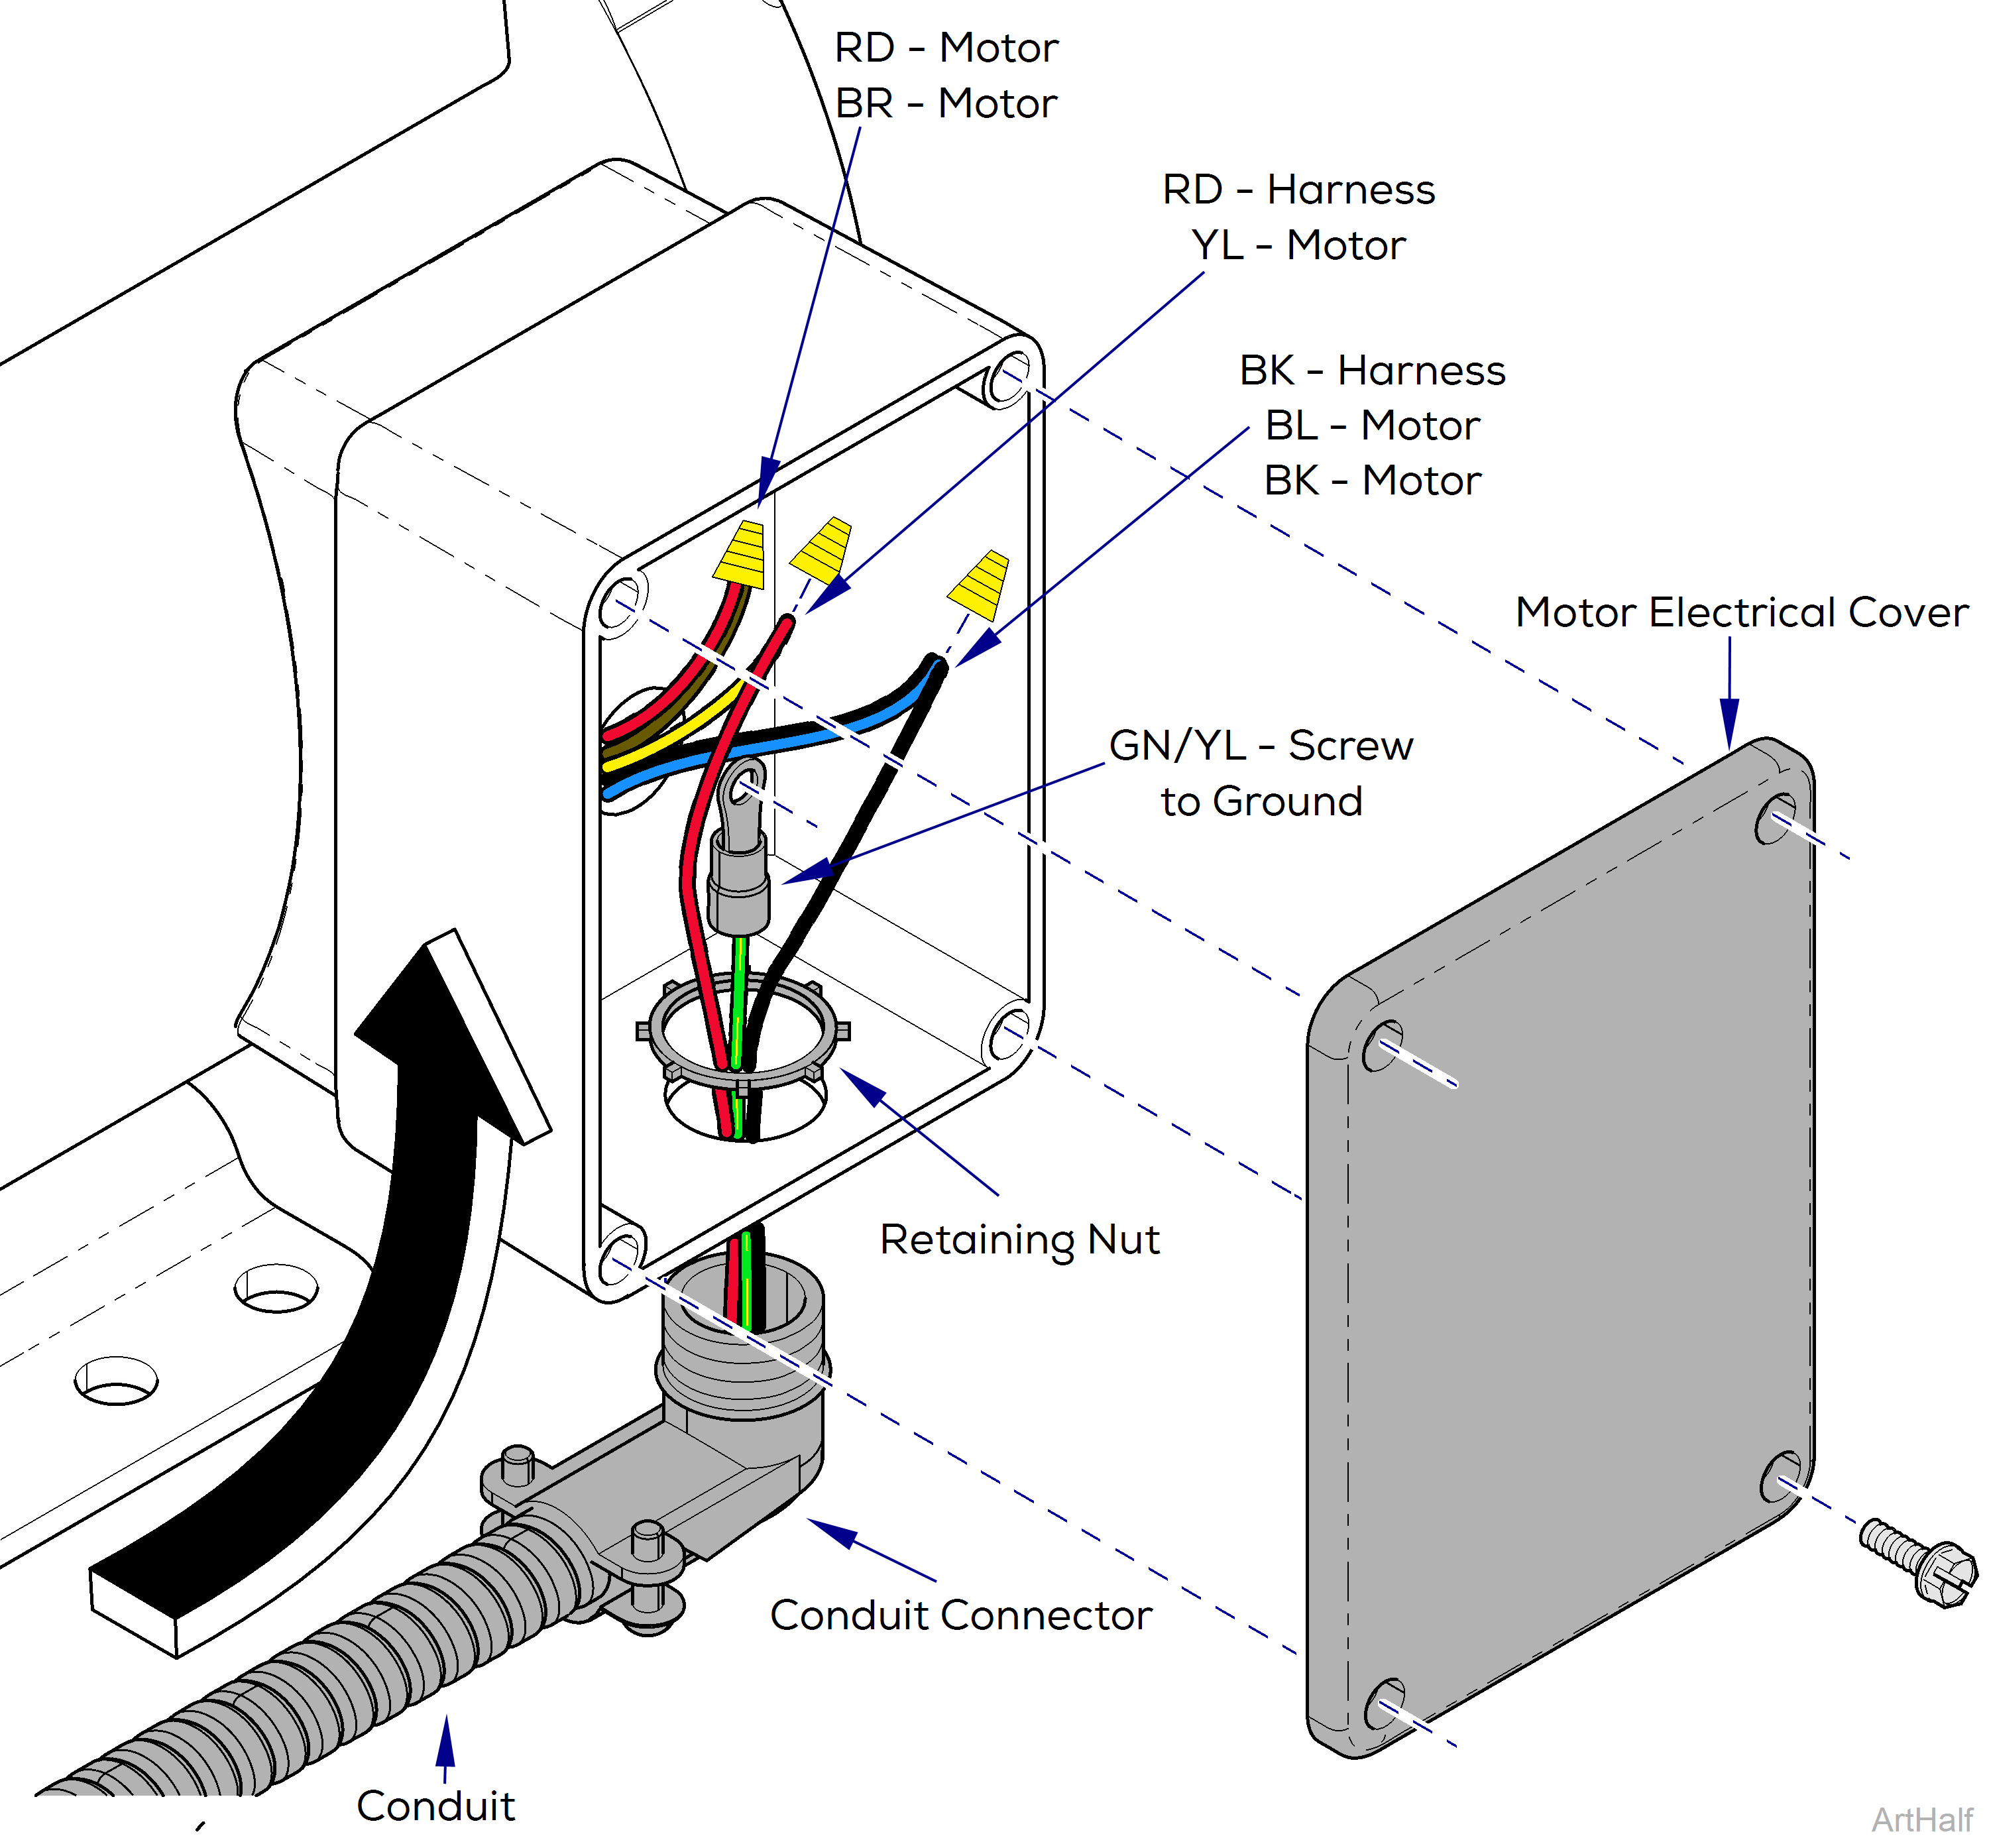
| Motor Harness To Controller | Motor Wires |
|---|---|
| Black | Blue / Black |
| Red | Yellow |
| Green | Screw to GND |
| - | Red-Brown |
8.Install hub and pulley on new motor. Position hub and pulley on to new motor shaft. Insert mounting bolts through unthreaded holes of hub and into threaded holes of pulley.

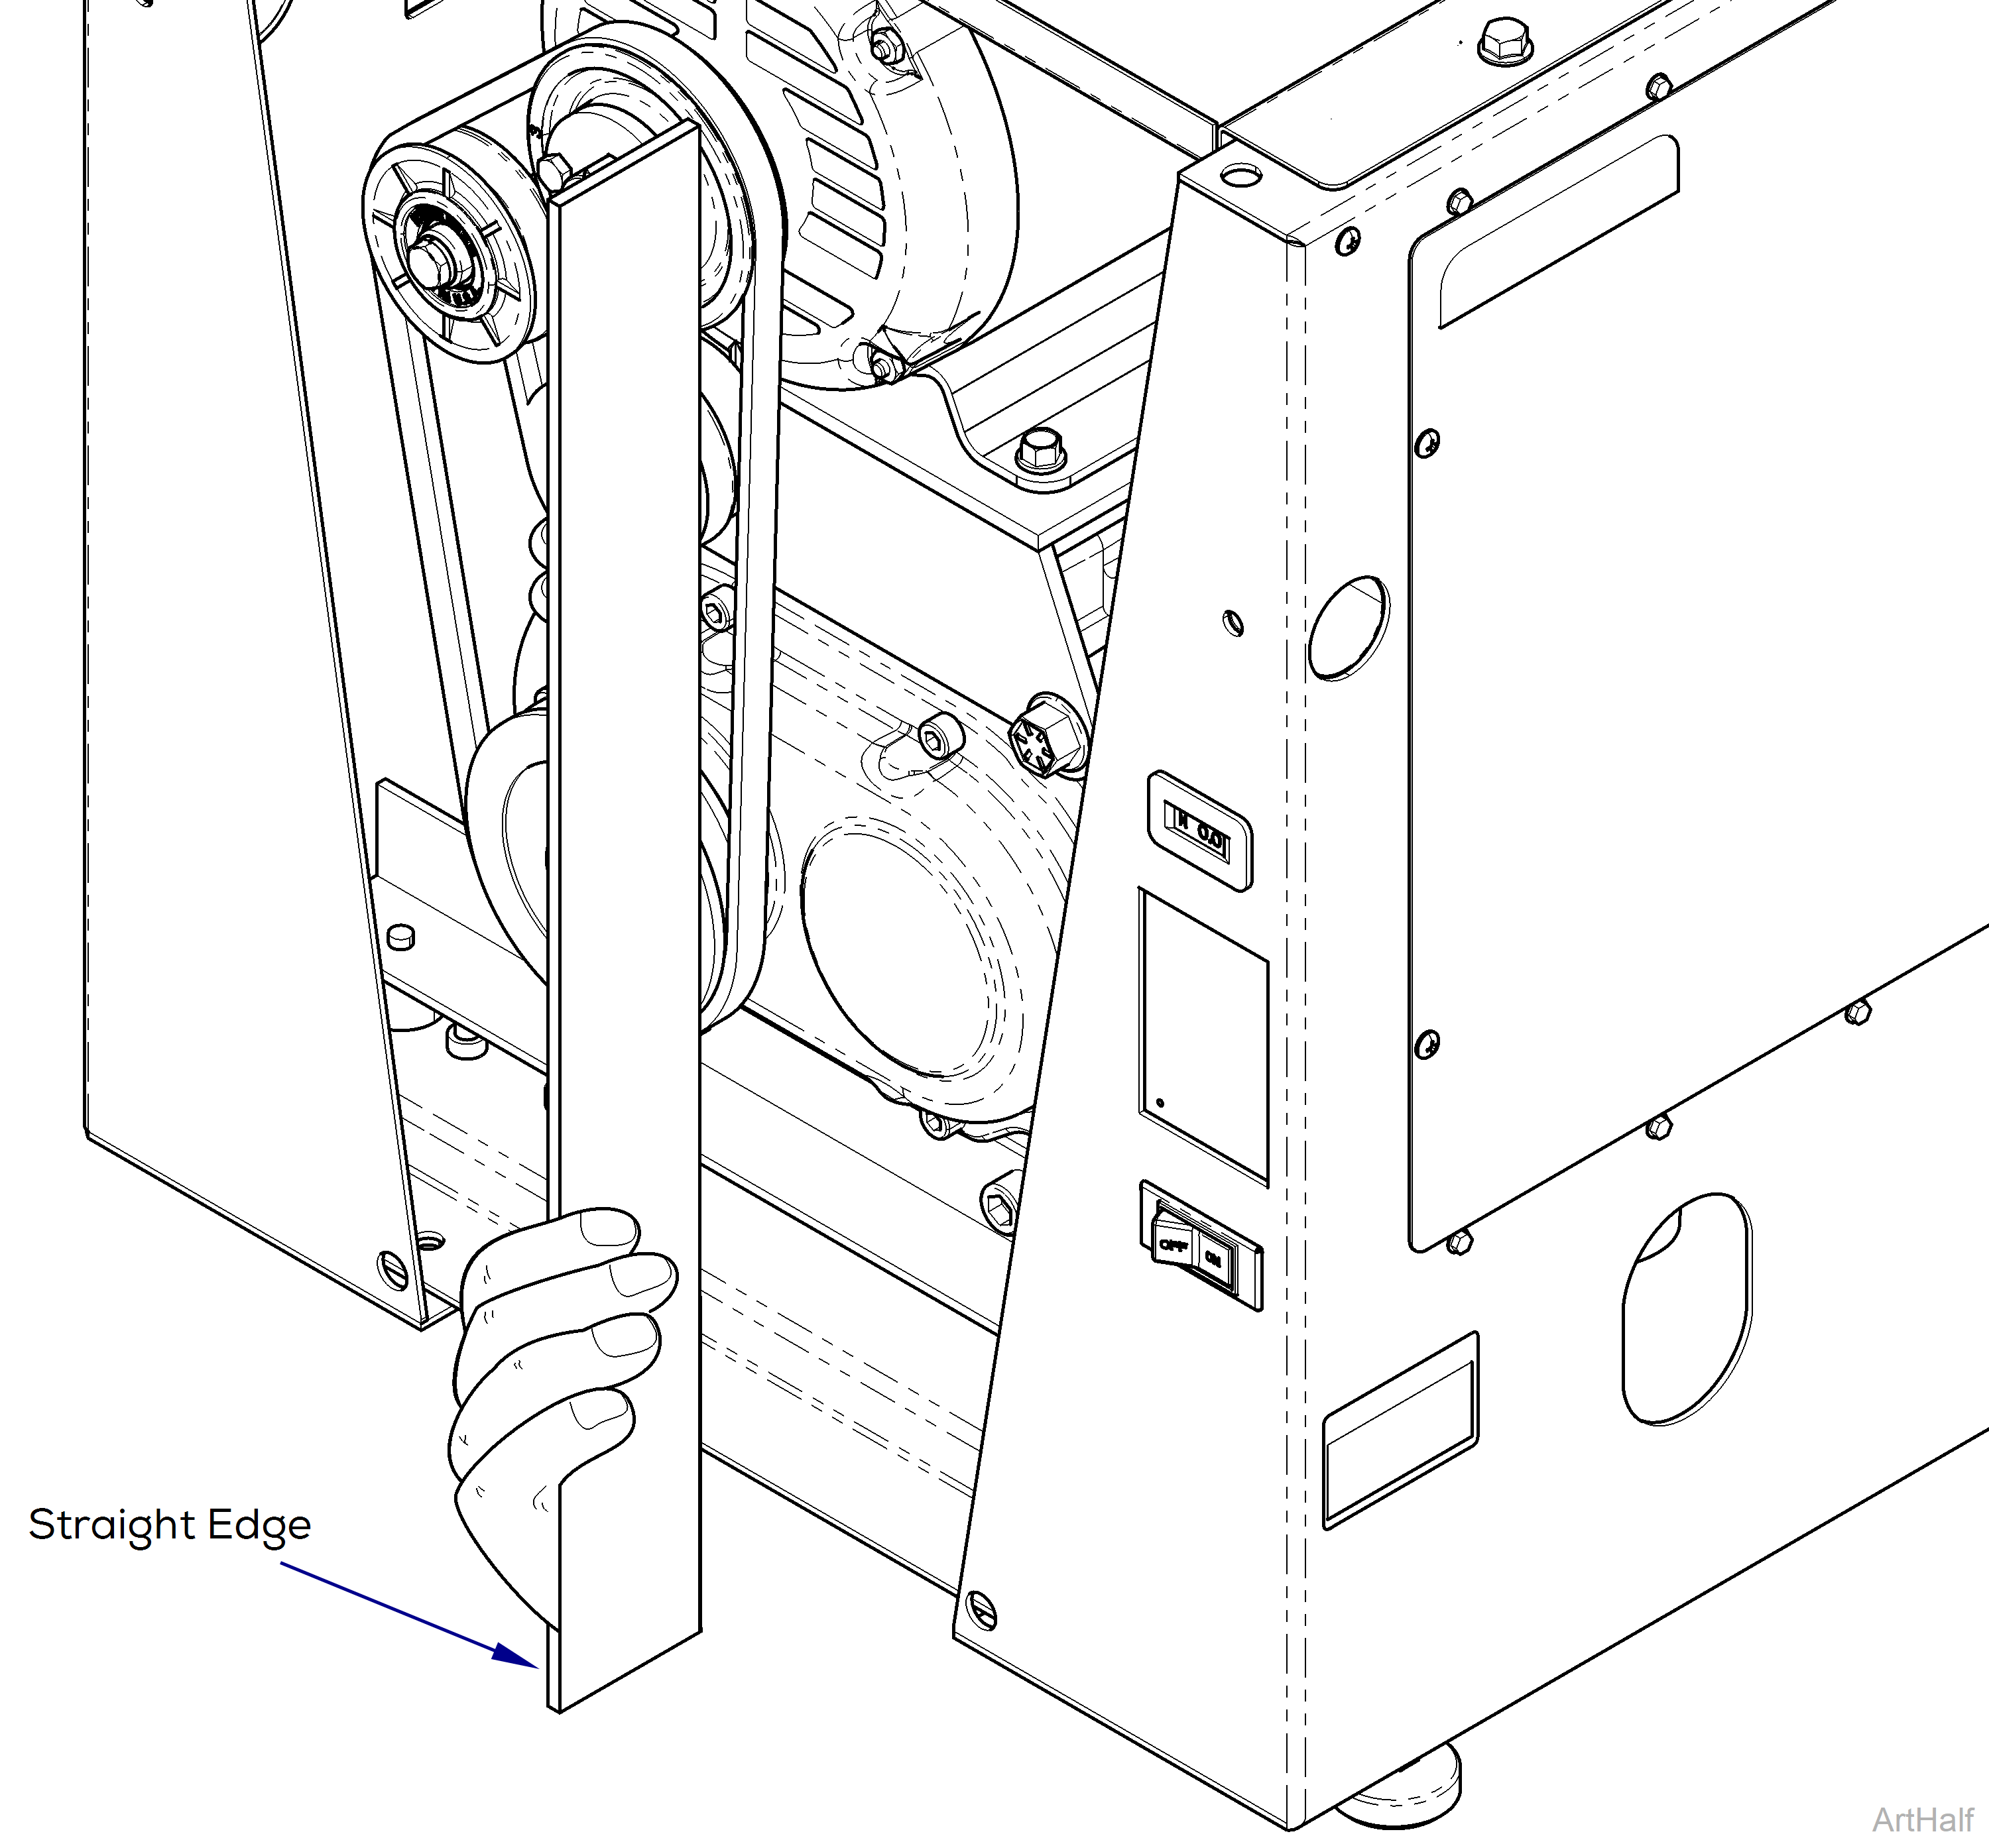
9.Position hub and pulley on the motor at a depth that will align the motor pulley with the pump pulley. Verify pump and motor pulley are aligned with a straight edge on both sides and alternate tightening mounting bolts. Install belt.
10.Replace front cover. Refer to: Front Cover
11.Connect power.
12.Test vacuum.
