Midmark® Dental Halogen Light Troubleshooting Chart
| Symptom | Probable Cause | Check | Solution |
|---|---|---|---|
| Light does not illuminate, indicator lamp ON. | Light is in AUTO-ON mode, and flex arm is positioned above horizontal. | Check position of flex arm. | Reposition flex arm. Inform user of proper operation. |
| Damaged / disconnected wiring. | Check wiring from flex arm PC board to bulb socket in lighthead. | Repair / replace wiring. | |
| Faulty bulb. | - | Replace bulb. | |
|
Console / LR mounted lights only - Light does not illuminate, indicator lamp OFF. |
No air supplied to pressure switch in power supply unit. |
Turn Master ON / OFF Switch ON. Switch located on delivery unit. |
Refer to delivery system troubleshooting if necessary. |
| Facility circuit breaker. | - | Reset circuit breaker. | |
| No power to power supply unit. | - | Connect power to power supply unit. | |
| Power supply unit fuse(s) blown. | Check fuses. | Replace fuses. | |
|
Pressure switch malfunctioning. Pressure switch located in power supply unit. |
Perform continuity test on pressure switch. With Master ON / OFF switch ON, there should be continuity between N.O. and COM terminals of pressure switch. |
Replace pressure switch. | |
| Transformer in power supply unit malfunctioning. |
Unplug light from power supply. Turn Master switch ON. Check voltage across secondary output leads of transformer. The voltage should be: 19.4 +2 VAC. |
Replace transformer if necessary. | |
| Flex arm PC board is malfunctioning. | Check for proper output voltages. | Replace flex arm PC board. | |
| Damaged / disconnected wiring. | Check red and black wires from: transformer / flex arm PC board / lighthead. | Repair / replace wiring. | |
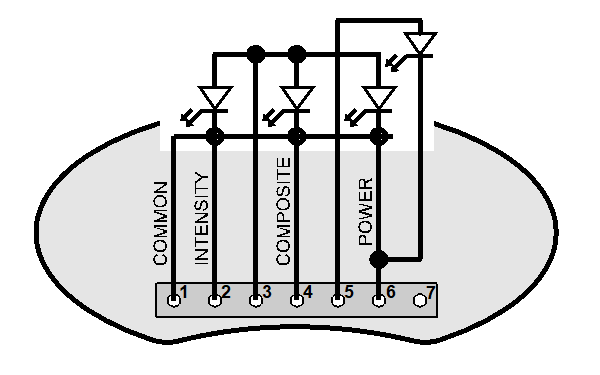
| Light touchpad is malfunctioning. | Check continuity between terminals 1 and 6 of light touchpad while pressing power button on touchpad. | If no continuity, replace touchpad. | |
| Faulty connection to bulb socket. | Clean bulb socket / secure connections. | Replace bulb socket if necessary. | |
|
Ceiling / Track / Wall / Cabinet / Universal lights only - Light does not illuminate, indicator lamp OFF. |
Facility circuit breaker. | - | Reset circuit breaker. |
|
Transformer fuse blown. Fuse typically located inside cover on light mounting plate. |
Check fuse. | Replace fuses. | |
|
Transformer malfunctioning. Transformer typically located inside cover on light mounting plate. |
Unplug light from power supply. Check voltage acrosss secondary output leads of transformer. The voltage should be: 19.4 +2 VAC. |
Replace transformer if necessary. | |
| Flex arm PC board is malfunctioning. | Check for proper output voltages. | Replace flex arm PC board. | |
| Damaged / disconnected wiring. | Check red and black wires from: transformer / flex arm PC board / lighthead. | Repair / replace wiring. | |
| Light touchpad is malfunctioning. | Check continuity between terminals 1 and 6 of light touchpad while pressing power button on touchpad. | If no continuity, replace touchpad. | |
| Faulty connection to bulb socket. | Clean bulb socket / secure connections. | Replace bulb socket if neccessary. |
| Symptom | Probable Cause | Check | Solution |
|---|---|---|---|
| Light flashes (or goes out) when lighthead or flex arm is moved. | Damaged / disconnected wiring. | Check red and black wires from: transformer / flex arm PC board / lighthead. | Repair / replace wiring. |
| Symptom | Probable Cause | Check | Solution |
|---|---|---|---|
| Some functions work, some do not. |
Touchpad malfunctioning. Disconnect touchpad and use a meter to check continuity at terminals on back.
|
Check continuity of touchpad. For POWER switch: Check terminals 1 and 6 of light touchpad while pressing Power button on touchpad. For COMPOSITE switch: Check terminals 1 and 4 of light touchpad while pressing Composite button on touchpad. For INTENSITY switch: Check terminals 1 and 2 of light touchpad while pressing Intensity button on touchpad |
If no continuity, replace touchpad. |
|
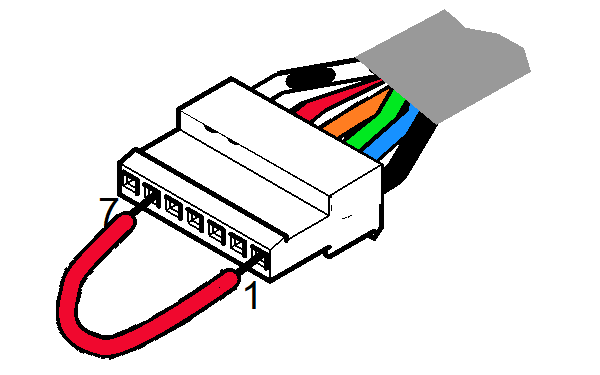
Damaged / disconnected wiring harness. Use a jumper wire to short out two receptors on the touchpad harness connector.
|
Check continuity at the touchpad harness connector, coming from the flex arm PC board. Check POWER: function by shorting receptors 1 and 6 of touchpad wire harness connector. Check COMPOSITE: function by shorting receptors 1 and 4 of touchpad wire harness connector. Check INTENSITY: function by shorting receptors 1 and 2 of touchpad wire harness connector. |
Repair / replace wiring. | |
|
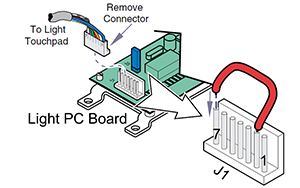
Flex arm PC board is malfunctioning. Remove the wire harness connector from J1 on the light PC Board. Use a jumper wire to short out two terminals.
|
Check PC Board functionality by shorting out two terminals on J1 on the PC Board in the flex arm. DO THIS FIRST to turn power on. Check Light ON / OFF function by shorting terminals 2 and 6 at J1, on the PC Board. Check COMPOSITE, lowest light setting: function by shorting receptors 2 and 5 at J1, on the PC Board. Check INTENSITY function by shorting receptors 2 and 7 at J1, on the PC Board. |
Replace PC board in flex arm. |
| Symptom | Probable Cause |
|---|---|
| Photo switch on flex arm PC board malfunctioning. |
Select Auto-On function. Remove flex arm cover. Lower flex arm below horizontal so trigger is between two posts of photo switch (set point line). Light should illuminate. |
| Symptom | Probable Cause | Check |
|---|---|---|
| Light beam out of focus. | Check light pattern at focus depth between 21” to 39” (53 to 90 cm). | Adjust light beam focus. |
| Symptom | Probable Cause | Check |
|---|---|---|
| Bulb malfunctioning. | - | Replace bulb. |
| Facility voltage is too low. | Facility voltage should be: 115 VAC +11.5 V | Correct voltage problem. |
| Flex arm PC board is malfunctioning. | Check for proper output voltages. | Replace flex arm PC board. |
| Transformer malfunctioning. |
Unplug light from power supply. Check voltage across secondary output leads of transformer. The voltage should be: 19.4 +2 VAC. |
Replace transformer if necessary. |
|
Shield assembly is clouded. This can be caused by cleaning solution. |
Inspect shield. | Clean shield. Replace if necessary. |
| Symptom | Probable Cause | Check | Solution |
|---|---|---|---|
| Light touchpad buttons work, but indicator lamp(s) do not illuminate. | LEDs on touchpad burnt out. | Replace light touchpad. | |
|
Console / LR mounted lights only Light stays ON when Master switch is turned OFF. |
Pressure switch malfunctioning. Pressure switch located in power supply unit. |
Perform continuity test on pressure switch. With Master ON / OFF switch OFF, there should not be continuity between N.O. and COM terminals of pressure switch. |
Replace pressure switch. |
| Symptom | Probable Cause | Check | Solution |
|---|---|---|---|
| Light will not turn ON / OFF in Auto-On mode. | Auto-On mode is out of adjustment. |
Select Auto-On function. Remove flex arm cover. Lower flex arm below horizontal so trigger is between two posts of photo switch (set point line). Light should illuminate. |
Adjust trigger to cross set point line earlier / later as necessary. |
| Symptom | Probable Cause | Check | Solution |
|---|---|---|---|
| Lighthead does not rotate freely or drifts when released. | Pivot joints out of adjustment. | - | Adjust pivot joint tension. |
| Flex arm drifts down on its own, or requires excessive force to lower. | Flex arm spring tension out of adjustment. | - | Adjust flex arm spring tension. |
| One pivot joint will not rotate, or requires excessive force to move. | Bearing in joint is dirty or damaged. | Remove and clean bearing. | Replace bearing if necessary. |
| Lighthead / arm(s) drift to one side. | Light arm is not leveled properly. | Place a level on vertical arm of light. | Adjust light until level. |
| Flex arm rotates farther than it should. | Stop pin is missing. | Check for missing stop pin. | Install stop pin. |
| Flex arm will not rotate thru its full range of motion. | Stop washer installed incorrectly. | Check orientation of stop washer. | Reposition stop washer. |
